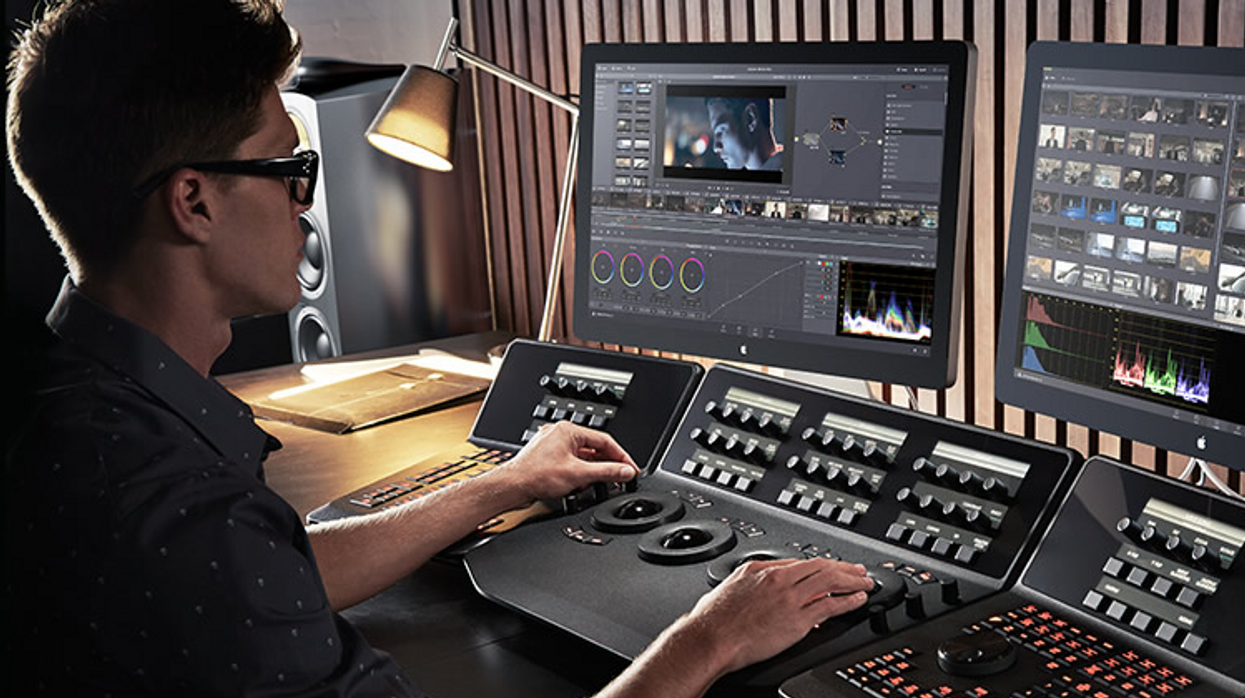
It seems like only months ago that DaVinci Resolve 12 had been released, leaving colorists to explore tons of new features in the software's expanding capabilities. Now, the speedy team at Blackmagic Design has released Resolve 12.5 (in beta as of this writing), boasting 1000 more improvements and 250 new features, spelled out in a 13-page document. While some of these innovations are cosmetic, other improvements will transform your grading game outright.
1. Fusion Connect
At the top of the list is linking Resolve to Blackmagic's effects program, Fusion. This is 12.5's most significant feature because it opens colorists to accomplishing much more than in a traditional color session. Within the goals of a grade, Fusion enables colorists to remove rigging or facial blemishes with more nuance and articulation than in Resolve, allowing images to more closely realize their full potential with the finesse required in post. Fusion raises the question of whether colorists should add detailed special effects work to their list of skills.
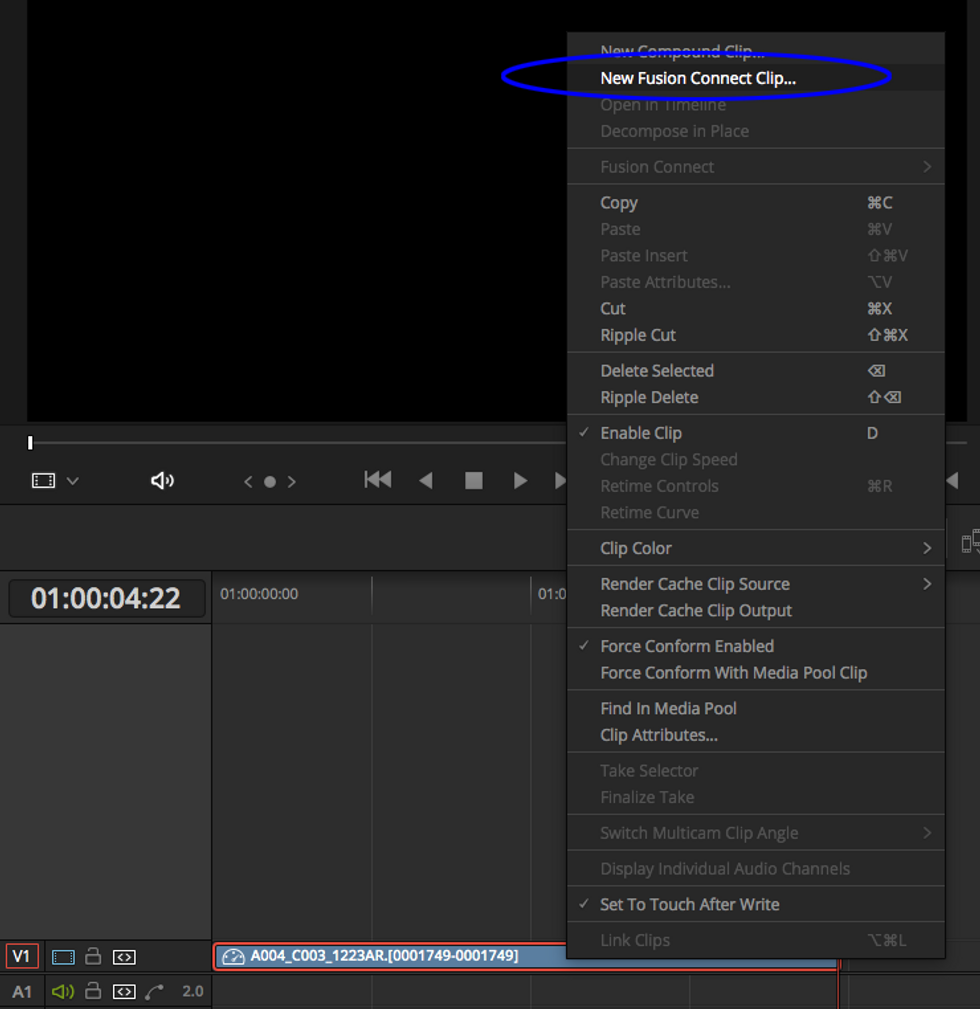 Creating a Fusion comp is as simple as right-clicking a clip and selecting New Fusion Connect Clip.
As in a Premiere/After Effects workflow, Resolve can create Fusion Connect clips to be sent for effects work, rendered, and boomeranged back to Resolve for further processing. This is all native, ensuring a painless round-trip workflow.
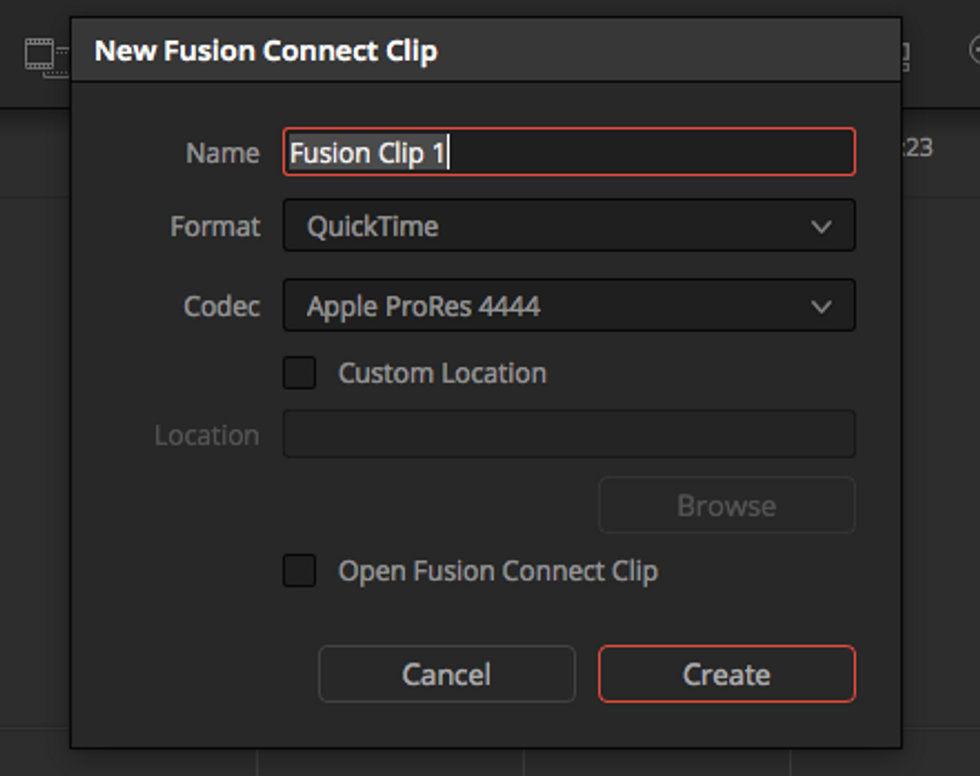 A dialogue box pops up to allow you to rename and store the comp elsewhere on the drive, as well as open it for immediate editing.
2. Temperature and Tint Sliders
Temperature and tint sliders have been added to the Color Wheels section at the bottom left of the interface, accessed by clicking the number "2" below the color wheels. The temperature slider can be useful to globally cool or warm the image, and the tint slider could be used to make skin tones less green, for example. I welcome any additional methods to control the image in the colorist's toolbox.
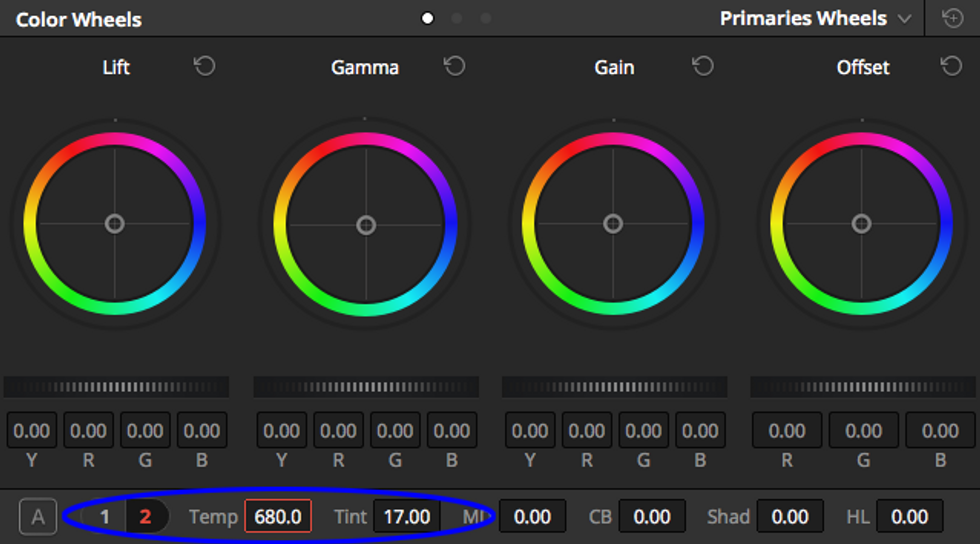 The new Temperature and Tint sliders are hiding in the "2" panel in the Color Wheels section.
3. ResolveFX
Blackmagic has included several OpenFX plugins standard with 12.5. The effects encompass utilities, like Color Space Transform, as well as aesthetic effects, like JPEG Damage, which I challenge someone to use on a project. Film Grain, an effect sure to get frequent use, is also included.
A single OpenFX tool can be applied per node and can be keyframed. Likely for the foreseeable future, the effects remain processor-intensive, especially if multiple effects are applied to a single shot.
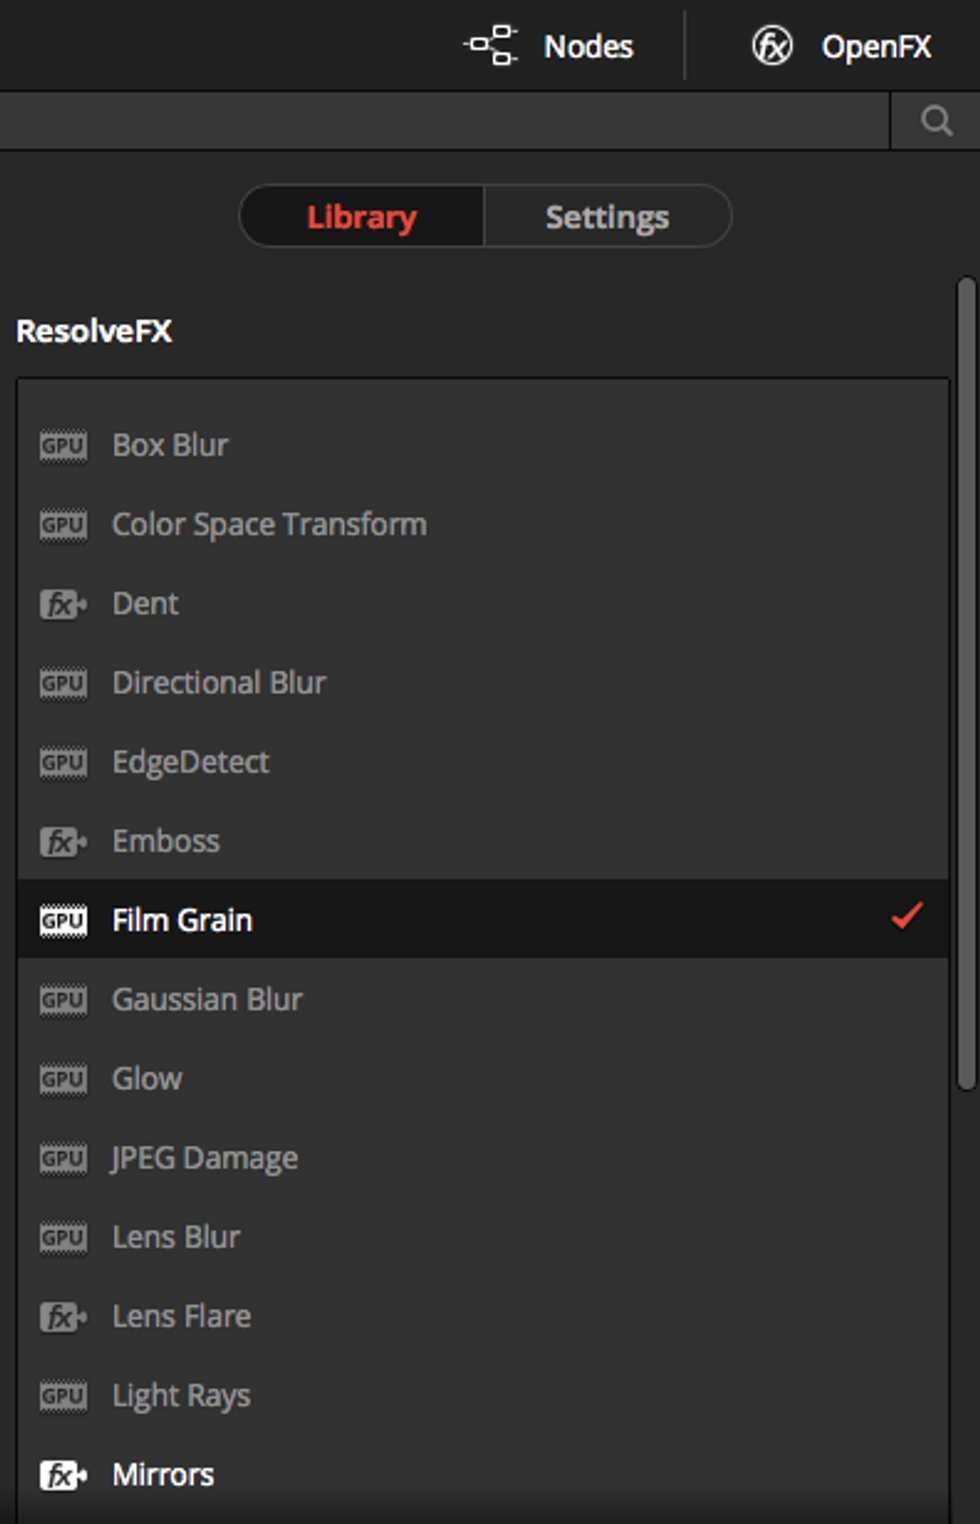 A host of OpenFX plugins now come standard to Resolve.
4. Improved Temporal and Spatial Noise Reduction
Temporal noise reduction can now be expanded to five frames, increased from two. Temporal at its highest setting allows Resolve to retrieve a better profile by analyzing more frames at the expense of time. Resolve's Spatial Noise Reduction, a tool I use in the majority of sessions, has also been dramatically improved.
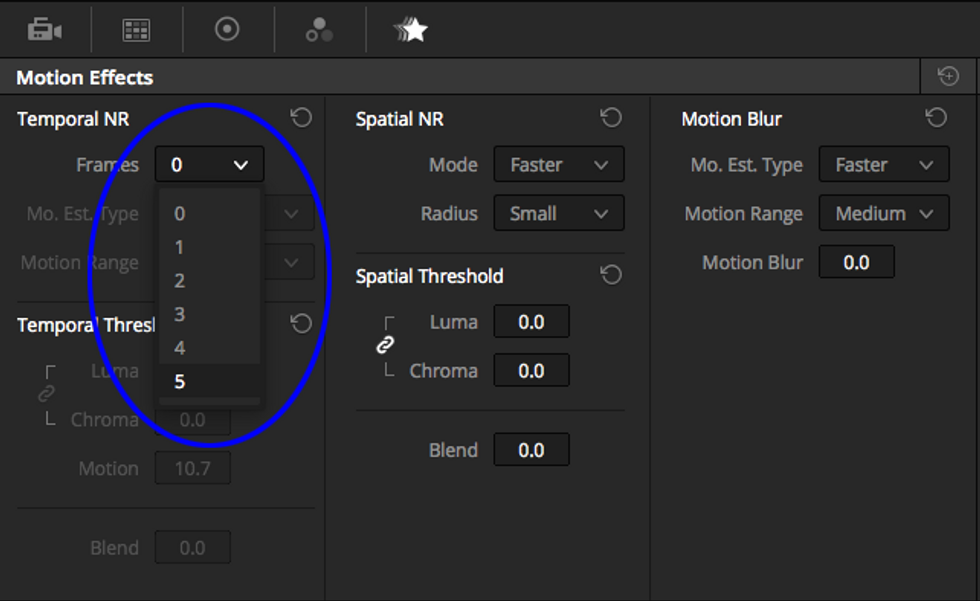 The Temporal Noise Reduction can now analyze up to five frames and the Spatial Noise Reduction algorithms are improved.
5. HDR Grading Controls
HDR grading mode can be accessed by right-clicking a node, whereas in the past a more complex HDR node tree had to be devised.
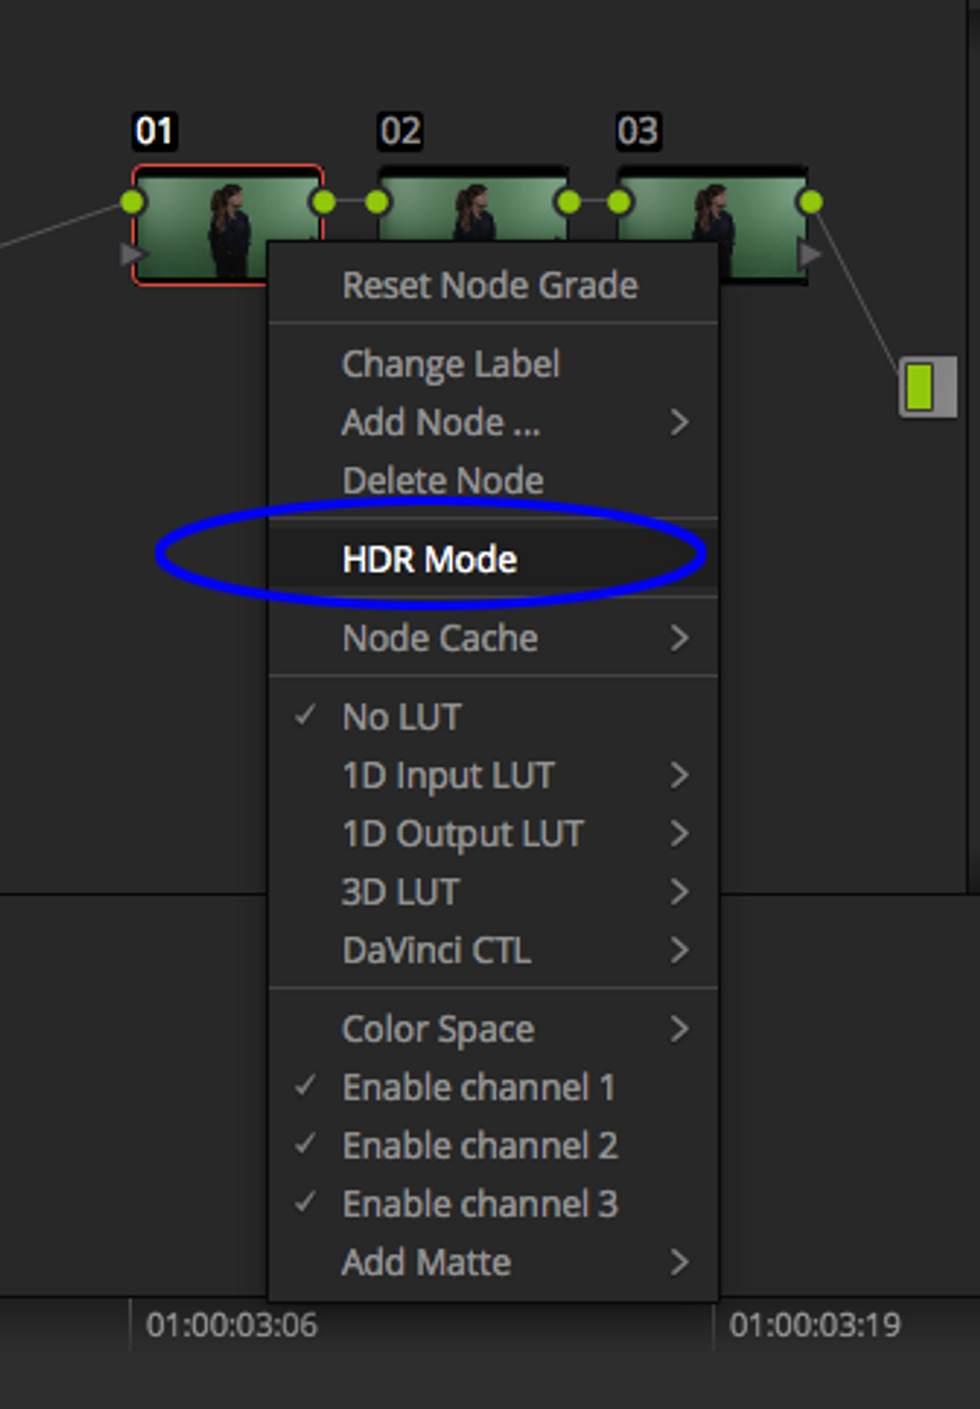 Easy access to HDR grading prevents setting up complex node trees.Credit: Demo footage courtesy of Ian Perlman
6. Media Pool Power Bins
Not to be confused with Smart Bins, Power Bins are a new feature that work similarly to Smart Bins but carry their contents across multiple projects of the same user. This could be made less confusing by giving this option to Smart Bin, but it's a useful feature nonetheless.
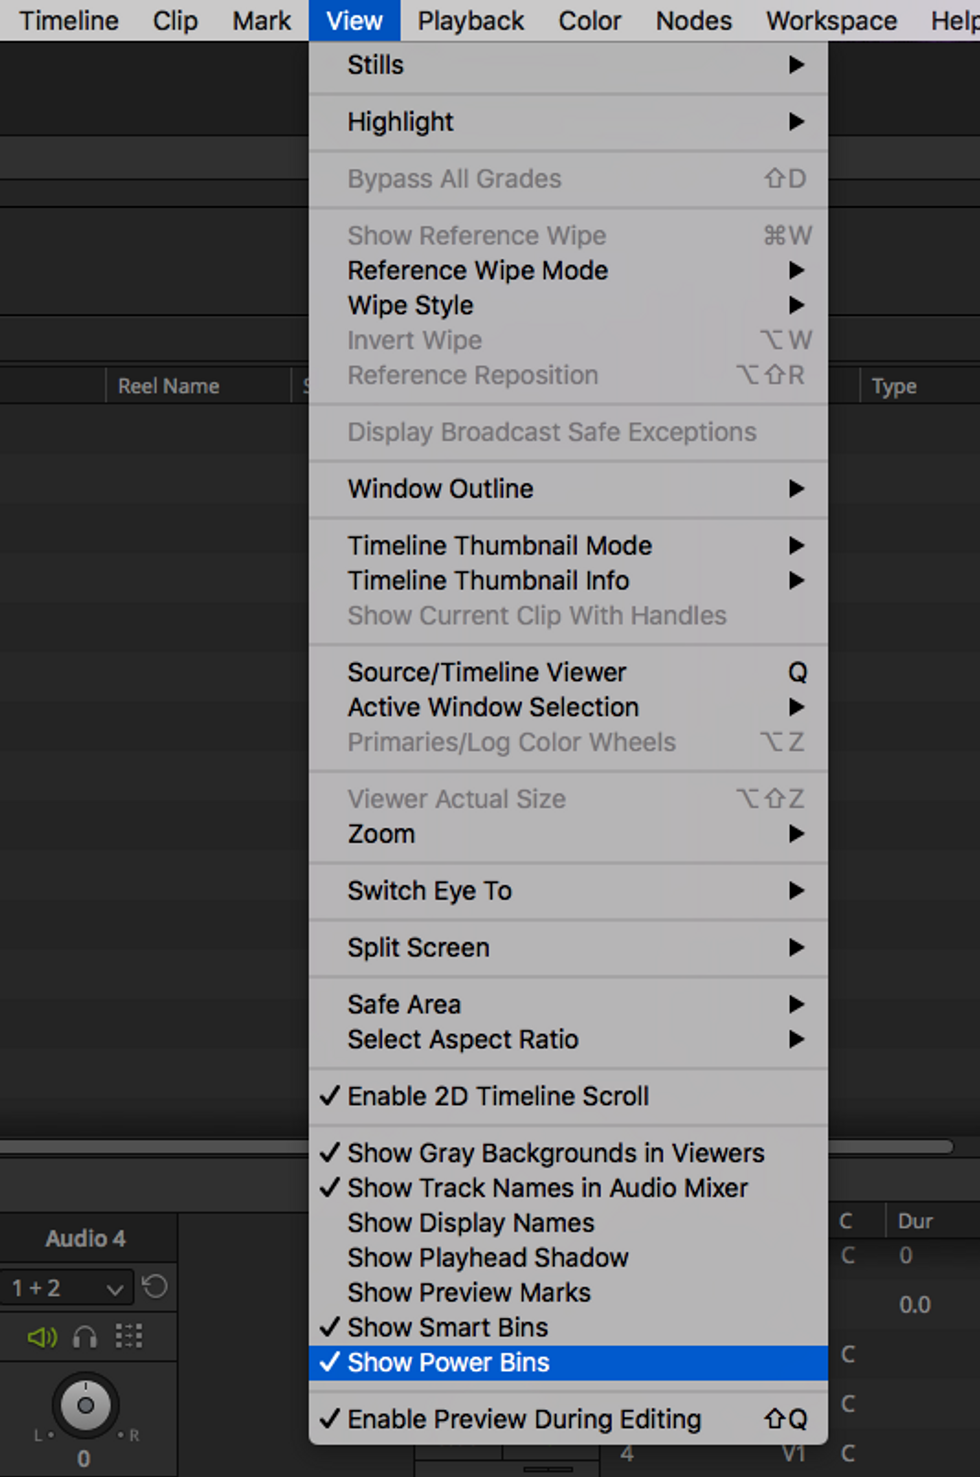 Power Bins aren't revealed by default. Turn them on through the View drop-down.
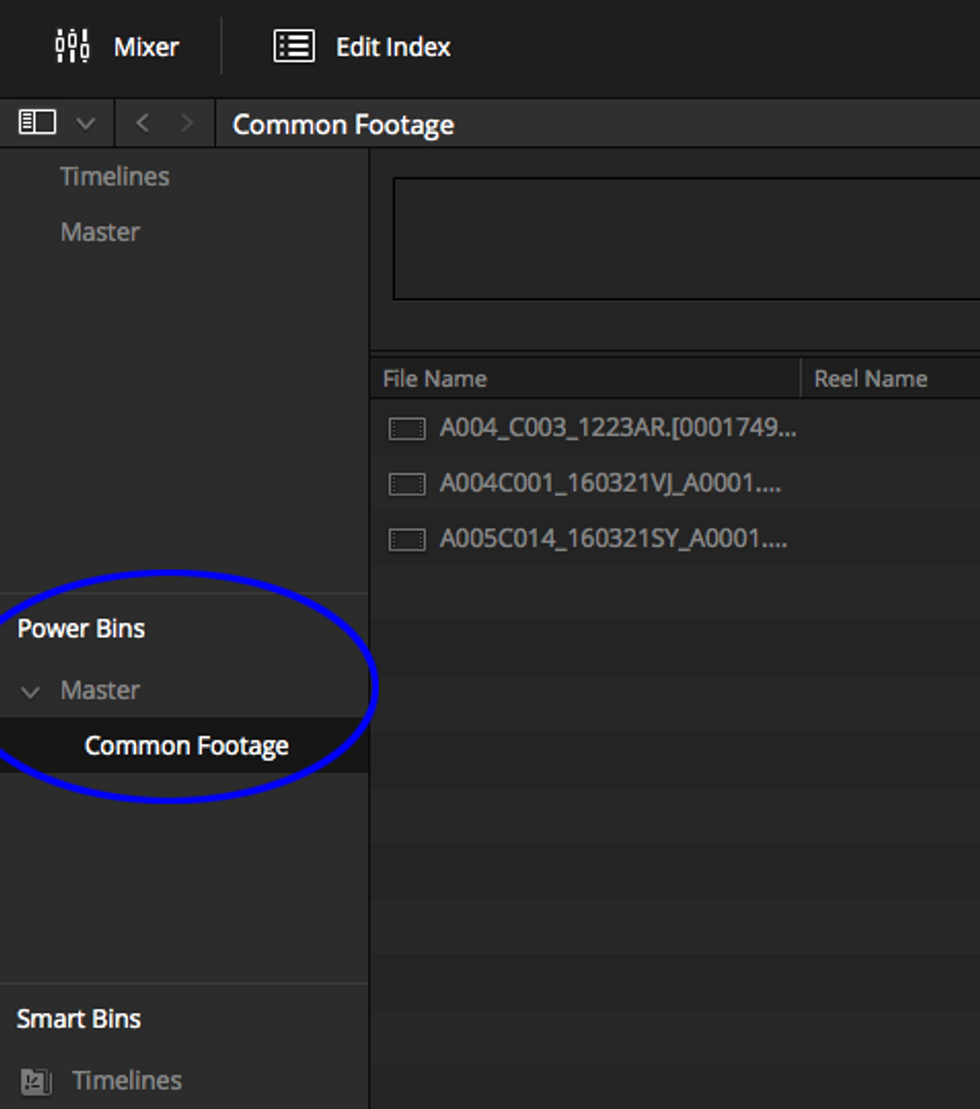 The new Power Bins, not to be confused with Smart Bins, enable sharing common assets across different projects.
7. Lens Distortion Correction
Resolve's lens distortion correction works similarly to Premiere's, except that in Resolve it's not considered an effect. Access it on the bottom of the Inspector within the Edit page.
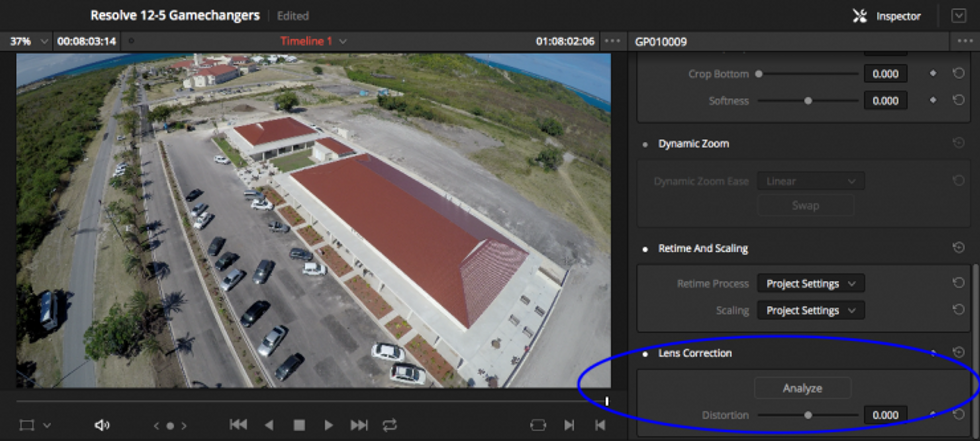 Lens distortion now comes packaged with Resolve, found in the Edit page's Inspector window.
After Resolve processes the shot with the "Analyze" button, the amount of distortion can then be tweaked to taste.
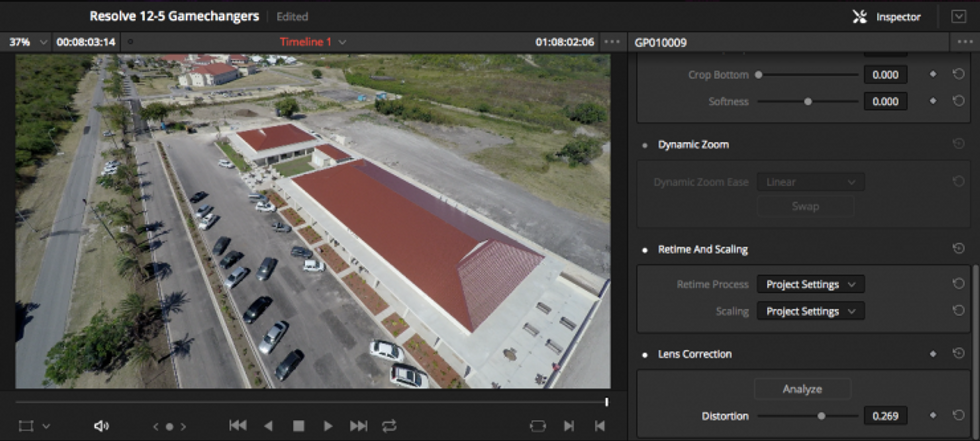 After Resolve has analyzed the clip, the distortion can be further tweaked to taste.
8. Crop Softening
Softening a crop is useful when creating a seamless split-screen or for concealing a boom mic, which recently came up in a project for me. The director wanted his film delivered as a single Quicktime out of Resolve and we spent a lot of time scrutinizing the crop to make sure it wasn't visible. Using even a touch of softening on the crop would have made this simple effect effortless. This is a welcome feature, one that's overdue.
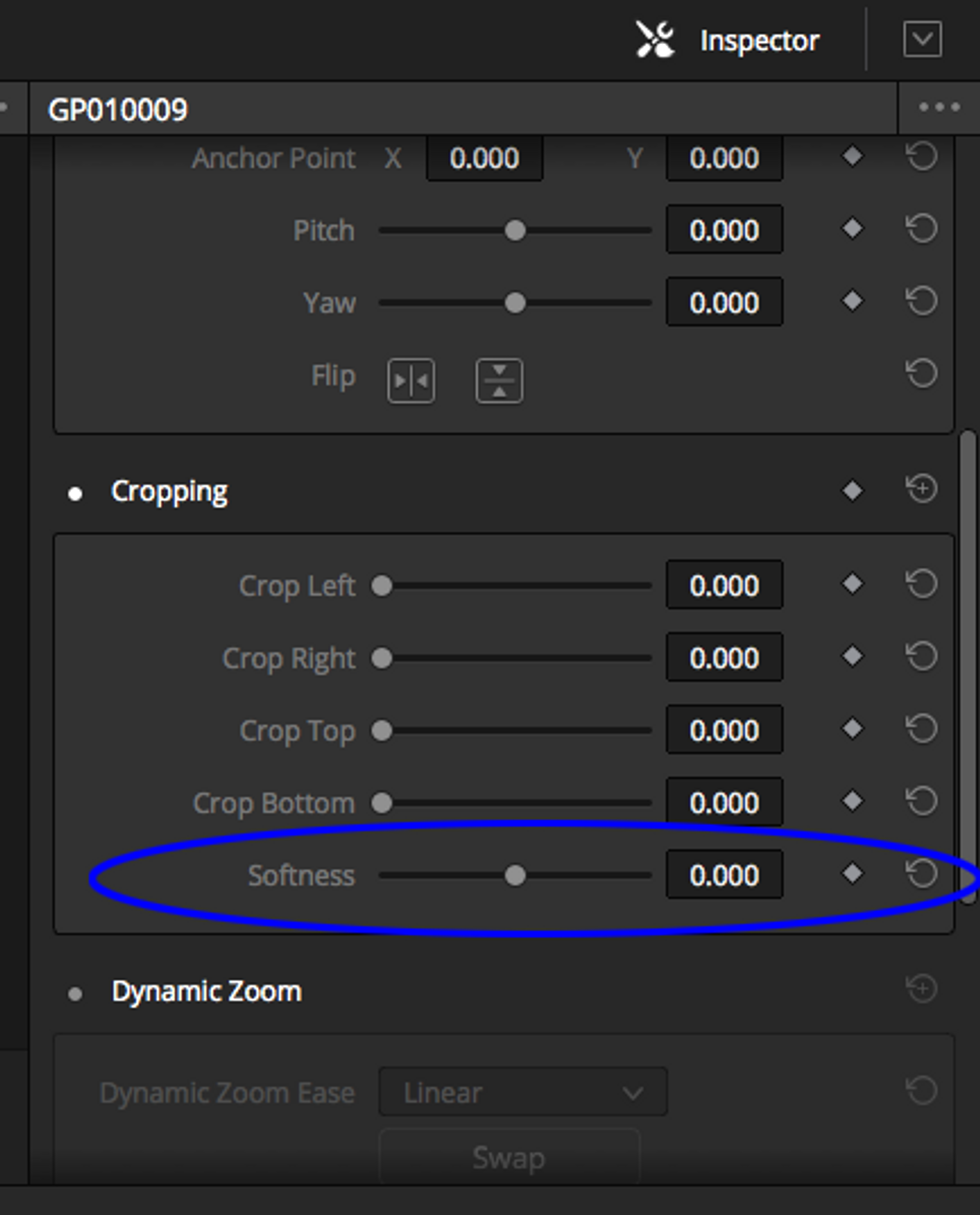 Use crop softening to seamlessly combine two separate pieces of footage or get rid of a boom mic without fear that viewers will see the cleanup.
9. Offline Reference with Difference Mode
I'm will be using this one regularly for evaluating the timeline both at the beginning and end of jobs. At the start of a job, the reference picture is used to make sure that edits have imported with accuracy down to the frame. Since the difference of any two equal frames will result in a black image, any inconsistency will be revealed if the images are out of sync.
 At the beginning of the session before any grading has been accomplished, if a cut is aligned with its reference the two images will subtract perfectly to yield a black screen. If the cut is off by even a frame, as is shown here, it will become immediately obvious and can be remedied before coloring starts.Credit: Demo footage courtesy of Ian Perlman
At the end of the session, this same technique can be used to more precisely resize images. Grading will prevent the images from subtracting to black, but will create an embossing effect when the sizing is not equal. When the images are sized properly, the doubling effect disappears.
 You can tell the editor has repositioned this shot by the "embossing" effect over the image (left image), which results when common elements in both frames are misaligned. Modifying the pan, zoom, rotate and tilt corrects the image to its proper repositioning (right image).Credit: Demo Footage Courtesy of Ian Perlman
10. Linear vs. S-curve Contrast
There are several additional preference options, one of which is the option to use an S-curve when applying contrast. It's another one of those subtle touches that can completely change the way you grade, and it's awesome to be able to have the functionality to toggle Resolve's behavior based on a source material's needs.
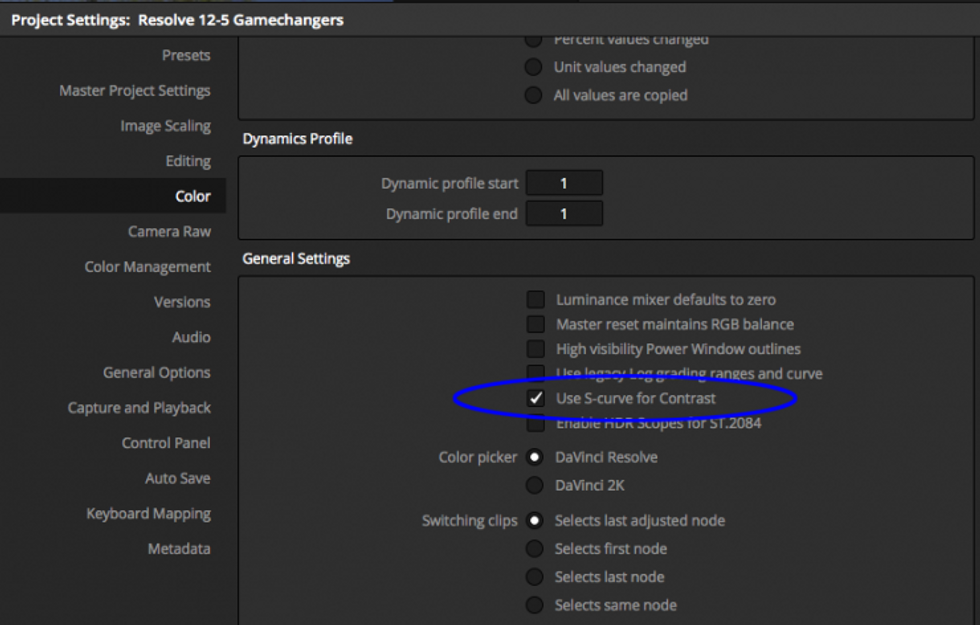 By default, Resolve applies an S-curve when adjusting the contrast slider in the Primaries, but this can now be turned off should the colorist desire.
11. Redesigned Deliver Page
Output options directly to Youtube or Vimeo are finally here, as well as exporting Premiere-specific XMLs. The page itself has also been redesigned, with audio and file-naming options placed in separate tabs. A status bar now displays in the Mac dock, so you can monitor status of the render while surfing the web.
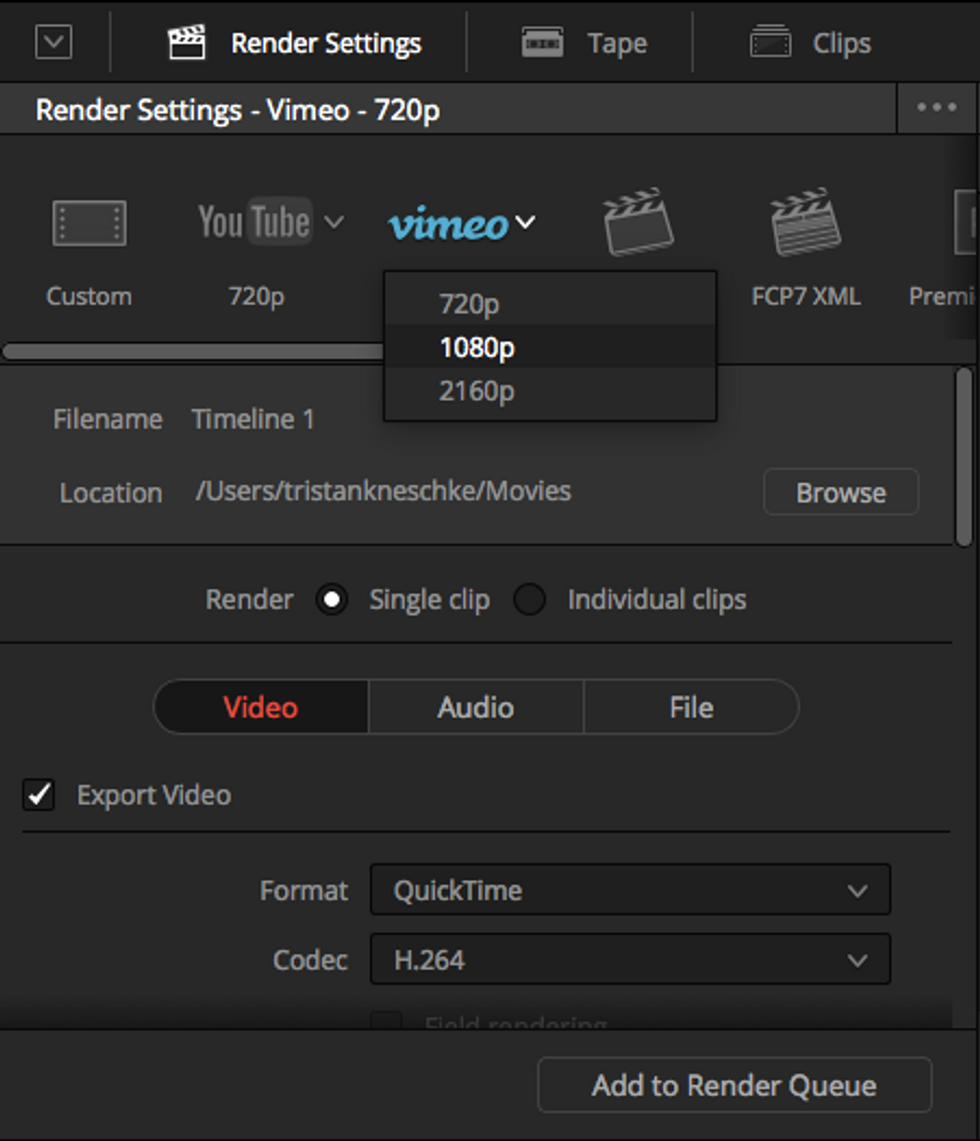 View of the redesigned deliver page, complete with Youtube and Vimeo output options.
The Render Queue job can also be renamed and updated if a job detail was overlooked. Once a job is complete, you can Reveal in Media Storage to snap to that directory in Resolve, or Reveal in Finder to check the renders or upload.
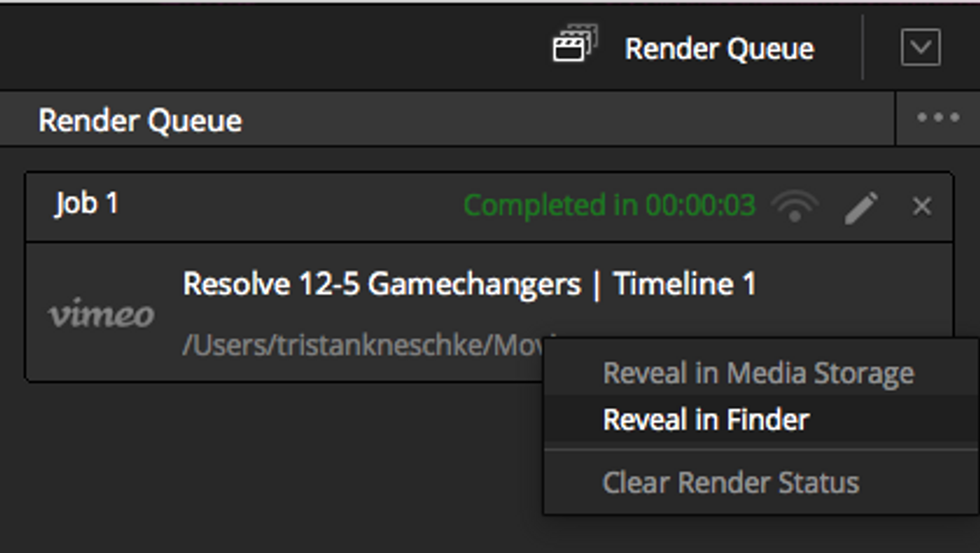 Once rendering has completed, right-clicking on the job will allow you to jump right to its location in Resolve or on the drive.
Also new in 12.5 is the ability to export a shot's alpha channel when rendering to an RGBA format like ProRes 4444.
12. Revert to Last Save
Right-clicking a project in the Project Manager now includes a "Revert to Last Save" option. This option can also be found in the File menu within the project. This is an essential feature to any piece of software during those crucial moments when work may be lost, and a good place to start before resorting to the Autosave Vault.
13. Working with Nodes
There are several convenient ways to work with nodes.
- Command-dragging one node onto another swaps their contents. Resolve never had a way do this quickly. Such simple functionality can work its way into the daily navigation to save tons of time in session.
- Option-dragging one node onto another overwrites the second node's contents with the first.
- Pressing "E" in the node tree disengages the current node. Disengaging a node will disable the whole grade once you click onto another node, so make sure that the separated node is deleted or reconnected somewhere in the node tree for the grade to become visible.
14. Standard Editing Features Now in Resolve
Many of the editing features new to Resolve are already standard to prominent nonlinear editing platforms. Blackmagic is getting closer to substantiating its grading software as a viable editing platform in its own right with each Resolve release.
- Create timelines with a specific number of audio and video tracks: When creating a new timeline, users can specify precise numbers of tracks for both audio and video, rather than defaulting to one of each as in the past.
- Dragging clips to Timeline Viewer: If there aren't any timelines, dragging a clip to the timeline overlay now automatically creates a new timeline. This saves the extra step of creating a timeline before adding clips to it.
- Command-Option Up or Down moves a video clip up or down tracks.
- Command-Shift Up or Down moves audio up or down tracks.
- The middle mouse button enables horizontal and vertical timeline scrolling.
Smaller Features
- Timecode-sensitive Gallery stills: Grades can be aligned according to their source timecode to align keyframes.
- 23.98 and 24fps material can be rendered to 29.97 and 30fps: It seems like most projects deliver in 23.98, but just this month I had a job that required delivery to 29.97. Having this render option available saves a conform step and is indispensable when delivering directly from Resolve.
- Deinterlacing: Another simple but essential feature for working with legacy footage, and can be set to Normal or High in the Image Scaling Project Settings.
- Edited status: The word "Edited" appears on the top center of the screen when a change has been made after the project has been saved.
- Release graphics card when Resolve is not in the foreground: Clearly many were annoyed by Resolve tying up the capture card when using it in conjunction with other editing software. Find this checkbox in the General Options.
Honorable Mention: The Point Tracker
The familiar Cloud Tracker has been one of Resolve's biggest selling points, and will still be in heavy use in the future. Colorists also now have the Point Tracker that tracks using a single user-defined point. Perhaps this will be used in instances where the Cloud Tracker fails.
![]() The Point Tracker enables colorists to choose a single point to track, as opposed to the Cloud Tracker, where the software automatically picks multiple tracking points based on a Power Window.
The Point Tracker enables colorists to choose a single point to track, as opposed to the Cloud Tracker, where the software automatically picks multiple tracking points based on a Power Window.
Of course, these aren't all of the features, but I think you'll agree these exciting new additions deepen what is already an extremely versatile tool.
Watch No Film School's Resolve coverage from NAB 2016.
What are some of your favorite Resolve 12.5 features? What's missing from the upgrade? Let us know in the comments.