Tutorial: 3 Unexpectedly Creative Ways to Use Premiere's Crop Tool
There are more uses for the crop tool than you might think.
Premiere Pro’s crop effect is a seemingly simple tool. However, when you use it in conjunction with a few camera and editing tricks, you can quickly achieve some complex and creative looking results. Here are three ways to use the crop tool for more than just cropping, namely to clone people, create Jason Bourne-style wipe transitions, and even color correct.
Clone
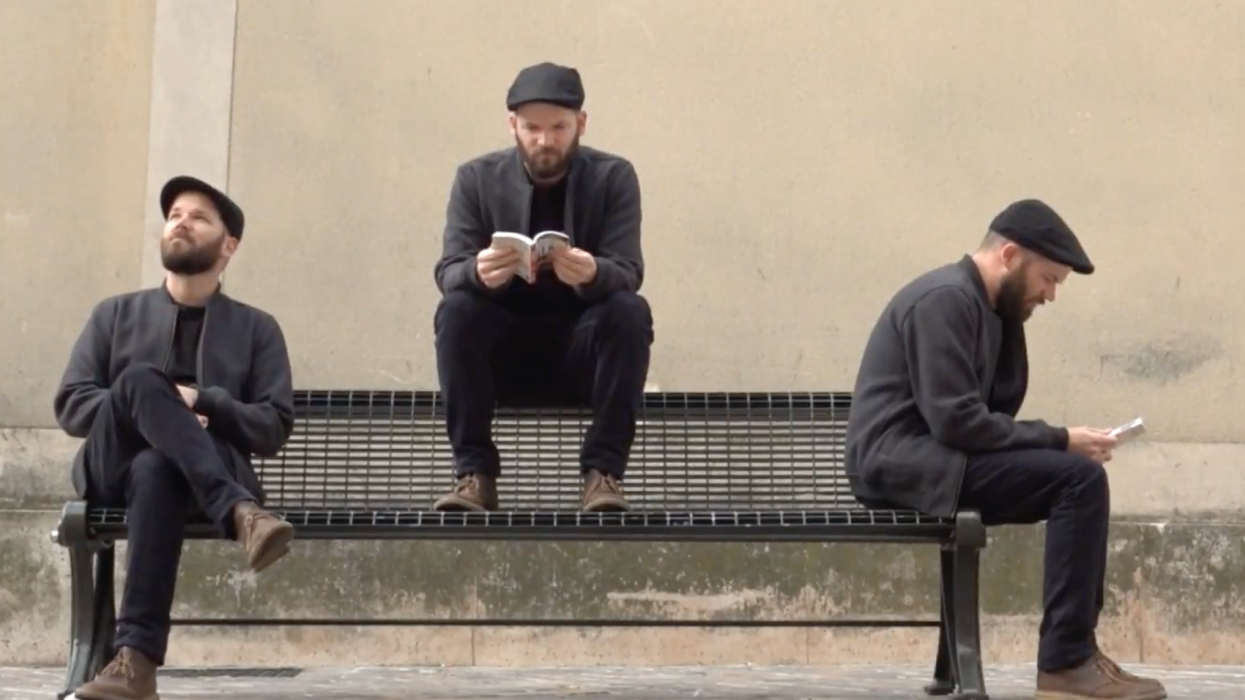
If you have a tripod and a few minutes, you can quickly create this effect. Simply shoot multiple takes of the same scene with your subject in different areas of the frame for each take. Once inside Premiere, layer up the various takes. Apply the crop effect to the top layer, and then adjust the crop to reveal your subject in the bottom layer. Adjust the edge feather to make the layers blend together. The key to success for this effect is shooting your shots on a tripod, in similar lighting settings, and in positions which allow you to properly composite.
Wipe Transition
This is a great effect, but again, it requires a bit of preparation to make it work. Just as with the clone effect, you need to capture two different shots of your scene—one with the subject in the shot, and one without. You also need to have something moving through the frame with which to apply a transition. This can include something or someone moving in front of the camera, just as long as the entire frame is covered. Again, as with the clone effect, you need to layer the two different shots and apply the crop to the top layer. Then you can create a mask with the crop effect's pen tool and animate the mask path to follow the front edge of the object moving in front of the camera. However, for this effect, you need to crop the transition clip completely by first adjusting one of the crop edges to 100%. Then you’ll simply need to invert the mask and voilà! Your transition is working. Fine-tune the edge of the transition by adjusting the mask feather.
Color Correction
Use this method of layering and cropping to apply color correction effects to precise areas of your frame. The mask feature in the crop tool allows you to isolate areas of your shot, and even track the motion of those areas. Use this method to quickly brighten up eyes or a face. To brighten a face, for instance, all you need to do is duplicate your shot and apply the crop effect to the top layer. Next, add a circular mask to your subject's face and track the motion of your subject through playback, or frame by frame for more precision. Remember to fully crop and then invert the mask for it to take effect. Now you can make adjustments in the Lumetri panel to bring brightness and saturation levels up on the face, or darken the background by adjusting Lumetri levels on the lower (background) layer. And don't forget to feather out the mask and adjust the expansion to perfectly blend the layers.


![Ethos, Pathos, Logos: 20 Effective Ways to Advertise [Infographic]](https://nofilmschool.com/media-library/ethos-pathos-logos-20-effective-ways-to-advertise-infographic.jpg?id=34064614&width=600&height=600&quality=90&coordinates=560%2C0%2C0%2C0)

