A few simple parts, and a cheap lens wrench, can create a cinematic look on a budget.
Jealous of that cinematic, anamorphic look with lens flares and luscious bokeh? You may want to make your films have a David Lean look, but you're stuck with a YouTube budget. What can you do? Well, with a special tool that you can buy on Amazon for around $20, and a bit of organization, you can modify your lens for an anamorphic like look, without breaking the bank.
What you're shooting for here is called an "Anamorfake" and it requires taking apart a lens, and then adding an aperture disc, some very thin fishing wire, and a splash of color. But a word of warning. Neither I, nor NoFilmSchool will be responsible for screwing up your lenses should you mess up this modification. That's why we recommend you go on eBay and pick up a used camera lens, a Russian Made Helios 44-2 mm lens works best for this mod, and it at under $60, you won't lose a lot should disaster strike. But the results will be worth the risk. You'll also need to pick up a specialized lens wrench from Amazon ($20), and an optional oval shaped aperture disc from eBay. These can be bought on eBay, or you can make your own out of plastic or even paper. The benefit though, of using the purchased ones, is that they come in different aperture settings. So it's up to you.
 Credit: Shutterstock
Here's a complete list of what else you'll need:
- Some paint or a marker
- thin fishing line
- sand paper
- Brasso
- acetone
- double stick tape
- rubber or nitrite gloves
A quick word about Brasso. The idea is to use it to remove the anti-flare coating on your lens elements to make them more prone to lens flare. It does this by adding thousands of micro scratches to the element as it removes the coating. But obviously, that could also make your elements more prone to scratching, so confine it to the interior elements if you plan on adding that step.
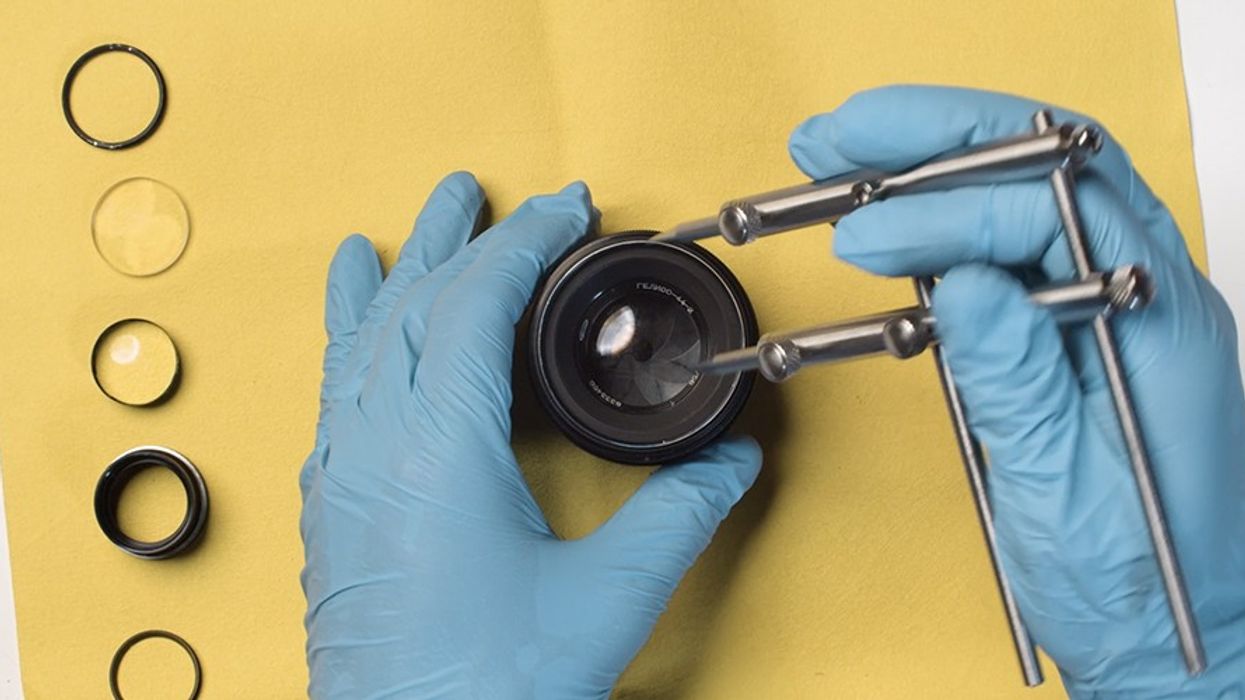
Now I can't stress enough here that in taking apart your lens, it'll be really easy to lose track of what elements goes where. So keep in mind the mantra ... Organization will set you free. I mean it. Be almost anal about lining up your lens parts as you take them out, so when you put them back in, you just go in reverse order. Speaking of organization, make a tiny mark on the outside of the top center of the lens, so you know where it is, you'll see why in a minute.
Now it's time to disassemble the lens with the lens wrench you bought on Amazon. It's not like any wrench you've ever seen. It's almost like a pair of chopsticks created by an industrial designer like Jony Ive. If you look closely at your lens front and back, you'll see some tiny slots or holes on either side of the lens element assembly. Those are where you place the pointed end of the lens wrench.
 Credit: Shutterstock
Starting with the back end of the lens, insert the lens wrench, lock down the distance with the two screws, and give a firm turn of the lens (not the wrench) until the assembly ring comes loose. unscrew it and the lens elements should simply drop out one by one. Be exact here, don't just dump out or you're doomed. And keep track of which way the concave portion of the lens elements goes out. That is also vital. Organization man, is an exacting mistress.
 Credit: Shutterstock
You'll also notice a secondary lens assembly on the back that will require the same unlocking, but with a smaller assembly. So make sure you carefully repeat the process. Repeat it all for the front lens elements. Lastly, there are loose elements that can fall out. Again, be careful removing them.
You'll notice that some of the lens elements have a painted black coating on the edges. Now you can leave that on, or you can use the acetone to remove the black paint and then repaint it with any color you want. You can also sand down the inside of the lens tube and paint it, should you desire. I'd pass on this step though. Too much can go wrong.
 Credit: Shutterstock
Now that everything has been disassembled, it's time to take the aperture disc you either bought or made, and sand it as thin as possible. You're going to be inserting this in the back of the rear lens assembly, as close to the last element as you can, and so the thinner it is, the less it'll throw off your focus. You'll want to then use some black paint, or a "sharpie" and paint it black, or perhaps adding the same splash of color that you put on the edges of the lens elements. Either way. Then take a very short piece of fishing line filament and stretch it across the aperture, taping it down with double sided tape.
Place it on to the final lens element in the small assembly and place them back together in reverse order. Now you'll use the lens wrench to tighten down the lens ring, spinning the lens in the opposite direction to tighten. Oh, and remember when I mentioned to make a mark on the lens where the top was? Keep that in mind as you put the aperture ring into that interior lens element assembly, that you'll want it vertical. So when you place that reassembled inner lens assembly back in, bear that in mind.
 Credit: Shutterstock
Now all that's left to do is reassemble your lens in reverse order, tightening the lens element rings down with the wrench and then go out and shoot some delicious "anamorfake" footage! Of course, while you have the lens taken apart, you can always "declick" it. But that's another tutorial.
In fact, you can read the entire tutorial at Shutterstock here, or subscribe to Anamorphic on a Budget by Tito Ferradans on YouTube.
Source: Todd Blankenship, Shutterstock