Now, I'm not a professional colorist, but even I know that compiling all of the information on color correction, grading, and timing (color correction with film stock is commonly referred to as "timing," but that's another conversation...) would take eons. It's an incredibly complex art form that can't be learned from one 2-minute video.
Having said that, here's one 2-minute video teaching you the complex art form of color correction.
Wait, wait, wait...before you punch this article in the face, understand that this video covers the essentials in its quick rundown. Check it out:
Let's Talk Basics
Color correction starts with how a video gets shot.
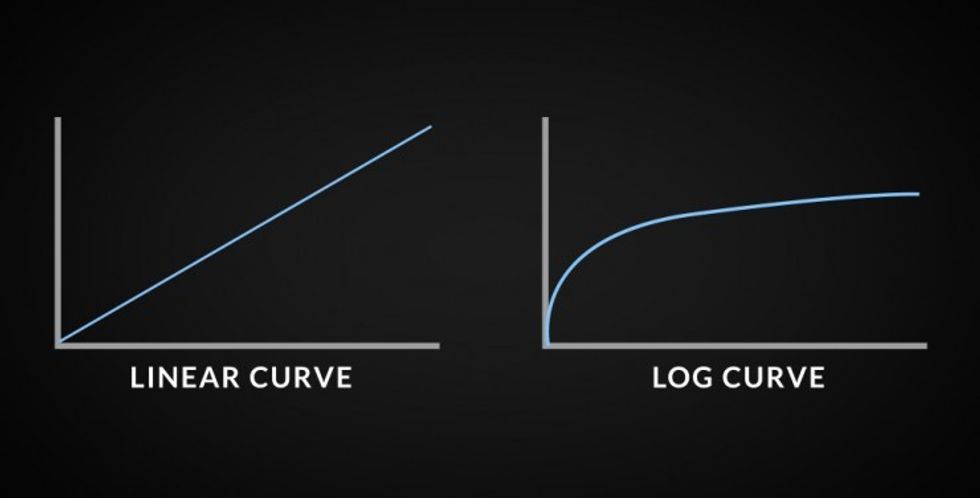
Power on your camera, go to your picture settings and make sure that you're setting up your camera and its sensor to record the cleanest, most usable image for the given situation. Some cameras (and the list gets bigger by the day, it seems) shoot in what's called "LOG" (short for logarithmic) profiles, which retains a higher amount of the highlights and shadows in an image (known as dynamic range). If your camera doesn't have a LOG setting, a good way to eke out a stop or two from the camera is to dial back the saturation and contrast in a neutral color profile.
 Credit: Shutterstock
It's time to shoot.
I'm going to assume that you're shooting digitally. When you get to the point where you're dialing in your exposure settings, it's a good idea to overexpose your LOG footage by anywhere from .5 to 2 stops, but it totally depends on the camera's sensitivity and what sort of LOG profile you'll be using...a bit of research on your setup will help solve this issue. My personal setup is with a Sony a7RIII (currently 19% off) and I like to shoot 2 stops over in S-Log 3.Cine and 1 stop over if I'm shooting in HLG in a Rec2020 colorspace. (I learned that from this guy.) Use your exposure meter and, if you have it, your histogram to dial in exposure. Then shoot away!
 Credit: PremiumBeat.com
On to the edit.
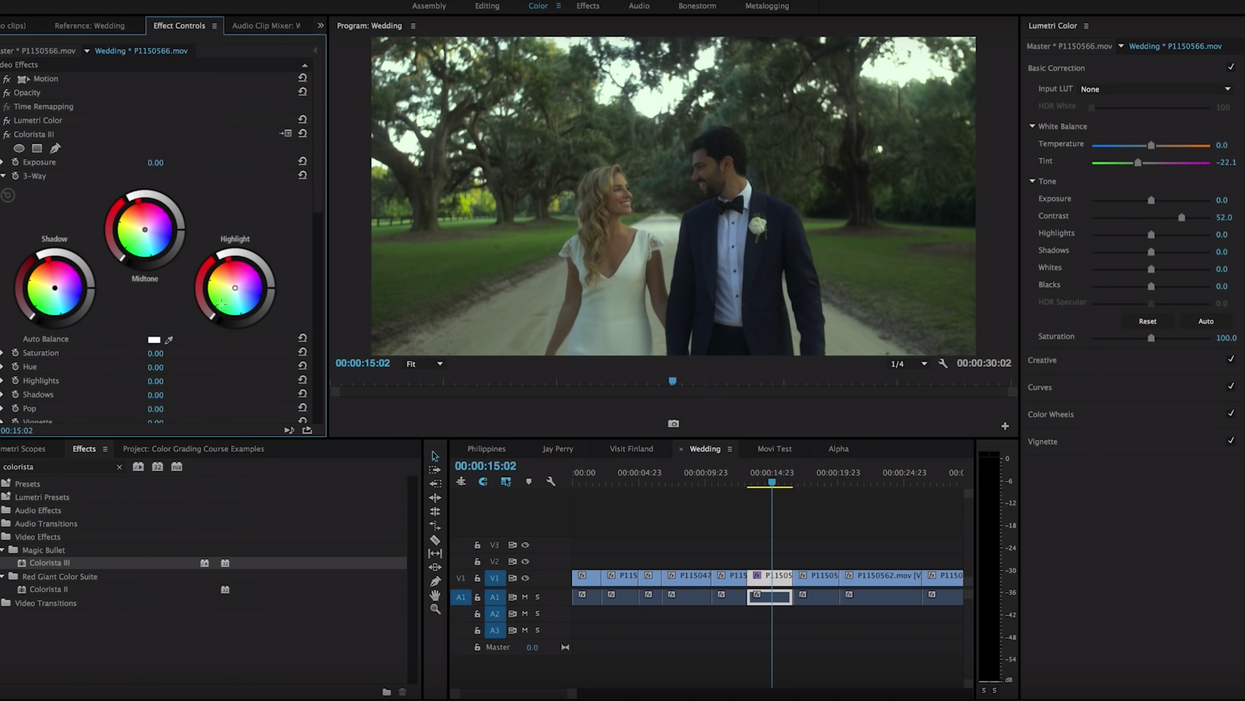
First thing's first, correction. This is different from grading in that it's a technique to get all of your footage looking like it's all shot similarly with the same settings and in the same sort of method. A good baseline off of which you can operate is to get all of your blacks and whites as close to 0 and 100 IRE as possible, respectively.
You can read these measurements on the left and right side of your waveform monitor, built into almost every editing software that you'll be using to correct and grade your footage.
Give it some style.
Once you have all of your footage graded and looking natural, it's time to move on to color grading which is far too deeply nuanced to cover in a single article. Color grading is different from color correction because it incorporates a story-specific motivation to the colorization of the image. Basically, it's a style choice (here's a great video by Matti Haapoja that goes into more detail about why to grade in a certain way).
Now that you're in the grading process, it's time to sit back, stress out, and contemplate about every editing choice you've made to your film thus far. Fun, isn't it?
What are some of your quick tips for color correction and color grading? Let us know below!
Source: NeoJesus
 No Film School's coverage of


