Occasionally I've been asked, “What are the most important things in filmmaking?”
I always have the same answer: food.
Outside of keeping people fed and hydrated, though, my second answer is always good audio, and while there are a plethora of ways to encourage excellent audio quality on-set, there are also a few quick tricks to implement in your post-production workflow. The wonderful people over atFStoppers have done a lovely breakdown of how to get superior quality audio directly in Premiere Pro. Check it out below:
Multiband Compressor
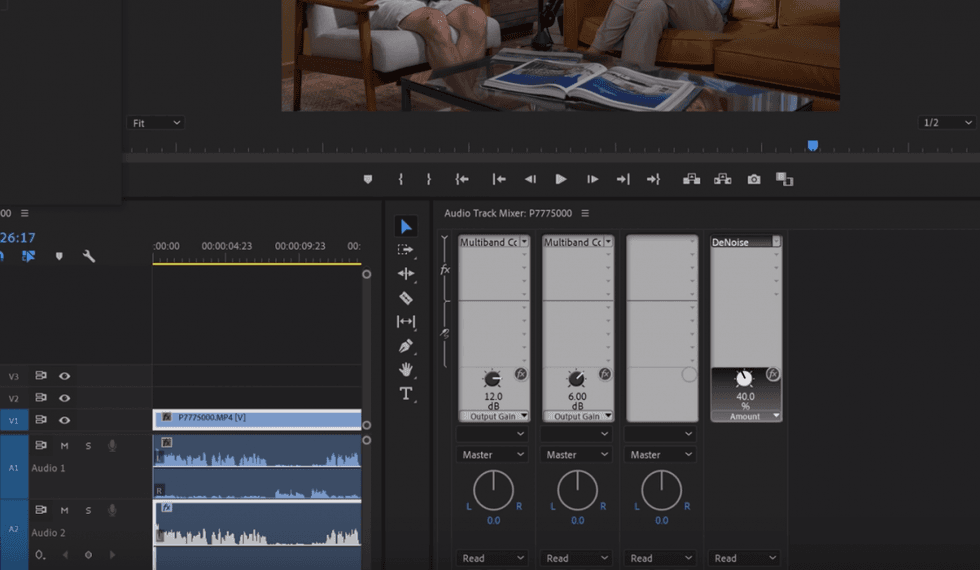
Your main tool is going to be the Multiband Compressor. For shorter pieces of content, or for videos that have a single audio file source occupying the entire track (like, for instance, a podcast, as shown in the FStoppers example), you can implement this effect to an entire track through the twirl-down effects tab in the Audio Track Mixer window (the little arrow at the top left corner), then double click the effect to access the popout window to access full controls. The important thing to note about a multiband compressor is that it allows you to precisely dial in different frequencies or bands of your audio track (hence, “multi” band), allowing you to precisely control the low, mid, and high frequencies of either your audio track or your audio clip.
Just like color, not all presets work the same on a given audio file
I find that “broadcast” and “classical master” work really well as a starting point for most audio files.
The first thing that you’ll notice after adding the multiband compressor is that your audio files will all be boosted significantly. For quieter audio files, this may sound a lot better, but make sure to take note of the noise floor (the hissing sound in the quiet bits of the audio file). We’ll get to that in a bit. For louder audio files, this may make your file sound like it’s clipping. Not to worry, we’re going to address this. Remember, we have several “bands” of audio that we can work with, one at a time.

Turns out, editing audio is a lot like color correction
You’ll see several vertical lines in the graphic that appears in the multiband compressor popout window. These are called “crossovers” and they basically operate as top-end frequency boundaries (they mark the top end of any given band). By moving these back and forth, you can adjust how wide your specific band can be. For instance, if you want to decrease the bass frequency, you can move the lower crossover closer to the bottom end. After that, play with the gain to fine-tune your audio’s clarity.
Just like color (again), sound has different layers
Think of your bass, mids, and peaks like shadows, midtones, and highlights. They each get their own treatments and effects to find that beautifully harmonic sweet spot.
Bass is done. Let’s move to the top end of the spectrum.
There’s a window just to the right of the waveform graphic that has options labeled, “Thresh”, “Margin”, “Attack”, and “Release,” and while most of these sound like slang used by fishermen, they’re actually powerful audio tools. Setting your margin to -3 and toggling the “brickwall” feature will set a hard ceiling on any and all audio on that track to -3dB, ensuring that your audio never goes above that margin. Then, you can mess around with your gain level, called “output gain,” until it falls somewhere between -3 and -9 dB (personally, I like to have my average output right around -6dB). Repeat this whole process for each track.
If you’re still having some background noise pop through on the lowest frequencies (around -40 to -50 dB), throw on a noise reduction effect to the master track, but be wary, because pushing too much noise reduction can very quickly make it sound like your microphone is gaff taped to the inside of an aluminum can. Don't push the sound too far.
Done? Great. Now it's time for more
Don't worry, though. Everything after this is done to the entire video you're making, not individual tracks (for the most part...).
All the things from now on are finishing processes to audio that we've already mixed in Premiere Pro.
If you don't know him, Oliver J. Hughes is a freelance filmmaker and composer. His YouTube channel,which can be found here, is dense with audio and video tutorials. His latest is all about how to get the most out of your video when it’s published online. Take a look:
My favorite thing about this tutorial of his is that it both starts and ends with the why behind what he’s doing, not just doing it to do it.
To sum up:
- In the Audio Track Mixer window, twirl down the channel strip effects (the little arrow in the top-left corner of the panel).
- In the “Master” track, twirl down to the “Special” option, then “Loudness Radar” and double click the effect to show the graphic overlay.
- Go to “Settings” in the graphic overlay, and set the target loudness to “-16”.
- Play the video and note your average loudness (the number in the bottom right corner).
- Calculate the difference of that number and “-16” (for instance, if your average is “-19” then your difference will be “3”).
- Add a “Hard Limiter” to the master track, set your peak limiter to “-0.6dB” and use the difference that was previously calculated as the “input boost”.
- Laugh in the face of lesser YouTubers with poor audio quality in their videos.
That last point is not optional.
Give it a shot and let us know how your videos turn out! And don’t forget to show some love to Oliver J. Hughes’s YouTube channel.
Let us know about any tips and tricks that you use for making your audio shine in post-production in the comments!
Source: FStoppers