The Lumu Power light and color meter can measure color temperature, illuminance, spot, ambient, and flash exposure via an app on your iOS device. NFS covered the announcement of this piece of gear here in 2015, and I ordered one as soon as I heard of it. Here I’ll go into detail about how we found it useful in practice on a music video shoot.
If you aren’t already using a color meter, I sincerely recommend you do.
I've been working as a cinematographer for over a decade, largely on narrative work, where we use movie lights to expose and craft the scene. I have never owned a color meter. The generally high cost seemed hard to justify for something that I wasn't missing on set. I do own a light meter, but as I came into filmmaking when the shift to digital and HD was in full swing, there were few situations where I had to use it. While I wanted to get in the habit of lighting more with a light meter and being less dependent on graphs displayed on monitors, it just wasn’t a practice I fell into.
 Close up from music video shot, with light at play from an HMI unit and natural sunlight bounced off the sky, a brick wall, and a white wall. By director Rhett duPont and cinematographer Lauretta Prevost.Credit: cinematography by Lauretta Prevost
Overview
After acquiring the Lumu Power, I took this combo light and color meter to the first shoot that came down the pike, and it turned out to be very useful. Going forward, I plan to bring it to along to every set. Many cinematographers and lighting technicians don’t own or use color meters, but after my recent experience on set, I am seeing what I didn’t know I didn’t know. If you aren’t already using a color meter, I sincerely recommend you do, and this one is a very convenient, useful, and price-point friendly piece of gear to pick up.
The main attractions of this device are:
- It's really all-in-one
- Its price point makes is an economical color meter
- At little larger than a gumball, it is easy to slip it out of your pocket and pop it on your phone, and then pocket it again. (It comes with a little carrying pouch that seems meant for a belt-- though I don't know who these tiny-belt wearing people are.)
In this case, size matters. When I bring my hefty Sekonic light meter to set, I am always putting it down...somewhere. It has a belt holster, but in practice I don't always find myself keeping it on a belt (maybe because I am using an Easyrig which makes that inconvenient.) Plus, acquiring one of these little Lumus puts less materials into the world than a full-sized meter does, which matters when one's planet is increasingly overrun with excess Things; and when one's New York sized apartment is increasingly overrun with excess Stuff.
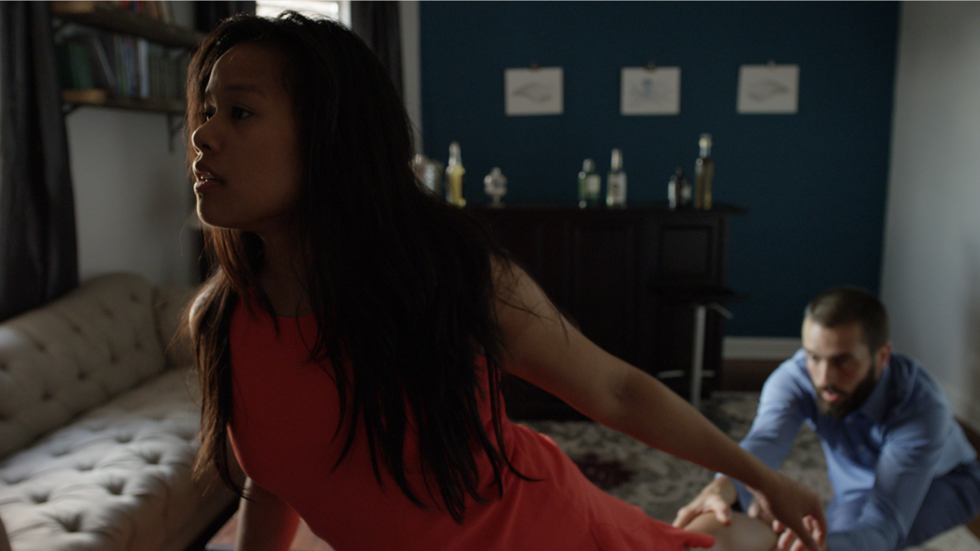
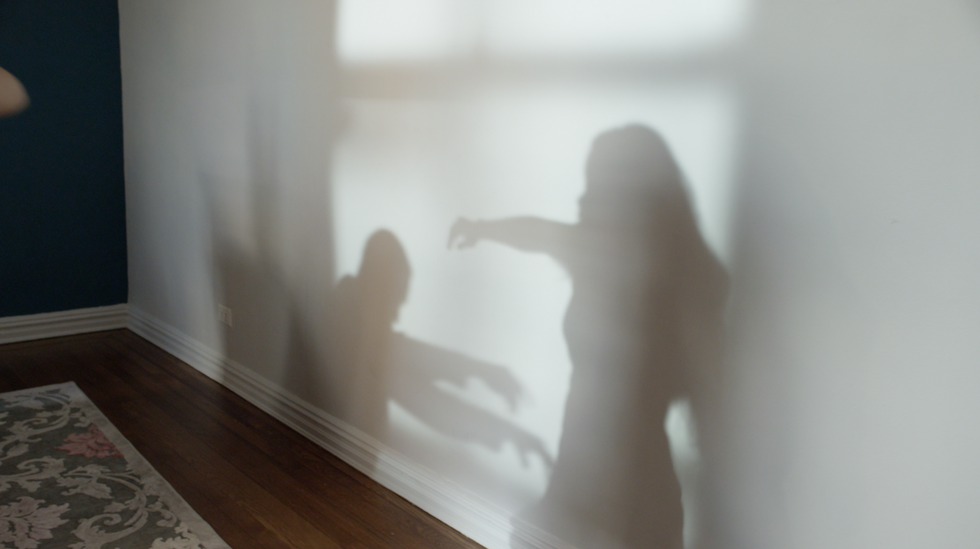 This one-shot music video sometimes left the characters for their shadows on a white wall, and it was important for the filmmakers to know the white balance of the various units. Here we see a cooler light slightly mixed with the warmer tones of sunlight bouncing off an adjacent brick wall.Credit: Cinematography by Lauretta Prevost, gaffing by Scott Nocero.
The shoot conditions
The shoot where I debuted this little gizmo was a one-shot music video: we were using a Steadicam to do a continuous take of a woman and man dancing between three rooms and a hallway in a New York City apartment. Two of the rooms had two windows each—in one case on walls facing different directions. The kitchen and hallway had no natural window light, save for the ambient spill from the adjacent rooms.
We were shooting in a fifth floor apartment, so our ability to light from outside was limited, and we intended to make use of the natural light. The director wanted the piece to look slightly ethereal, and hence he wanted to shoot at a high frame rate, which is normally used for slow motion. In our case, we shot at 36 frames per second, and intended to play back at 24 frames per second, but we played the 3.5 minute song sped up to 2.5 minutes. Long story short: the dancers had to dance extra fast, and the idea was to play the footage and song back at 24 fps, so there would be just a bit of flow to the woman's hair, to the swirl of the skirt, that differentiated the imagery from regular speed footage.
We were using several different sources and different brands, along with natural bounced light from outside coming in from different directions.
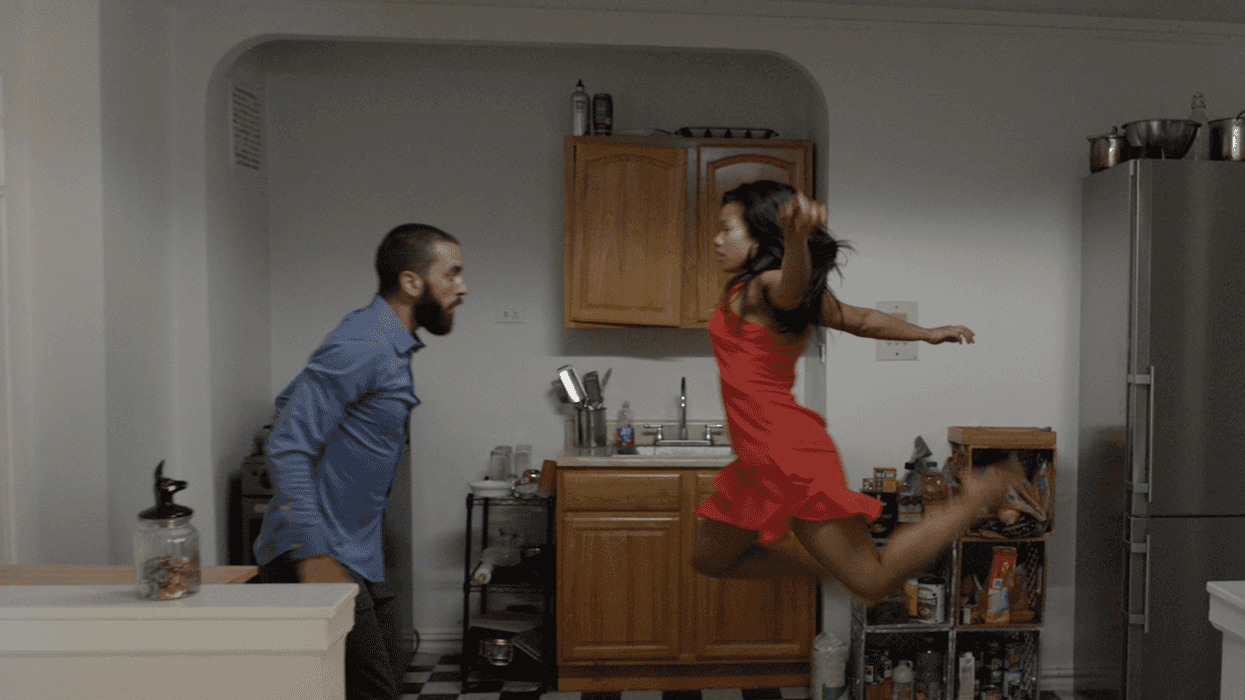
Long story even shorter: there wasn't a whole lot of light in the apartment to begin with, and as we were shooting at 36 frames per second, we needed more light to get to an adequate exposure than we would have if we were shooting 24 fps. So we had a HMI 800W Joker lighting unit on the fire escape and beaming in through a window in one room, mixing with natural daylight, and we had a different brand HMI, the Kobold 800W, rigged to the fire escape and mixing with natural daylight in another room. In the kitchen, we taped a Quasar tube to the ceiling, and used black wrap to cut the light off a far wall, so the unit was gently bumping up the exposure in the kitchen, as though the light given off by it was just an extension of the light coming in from the windows.
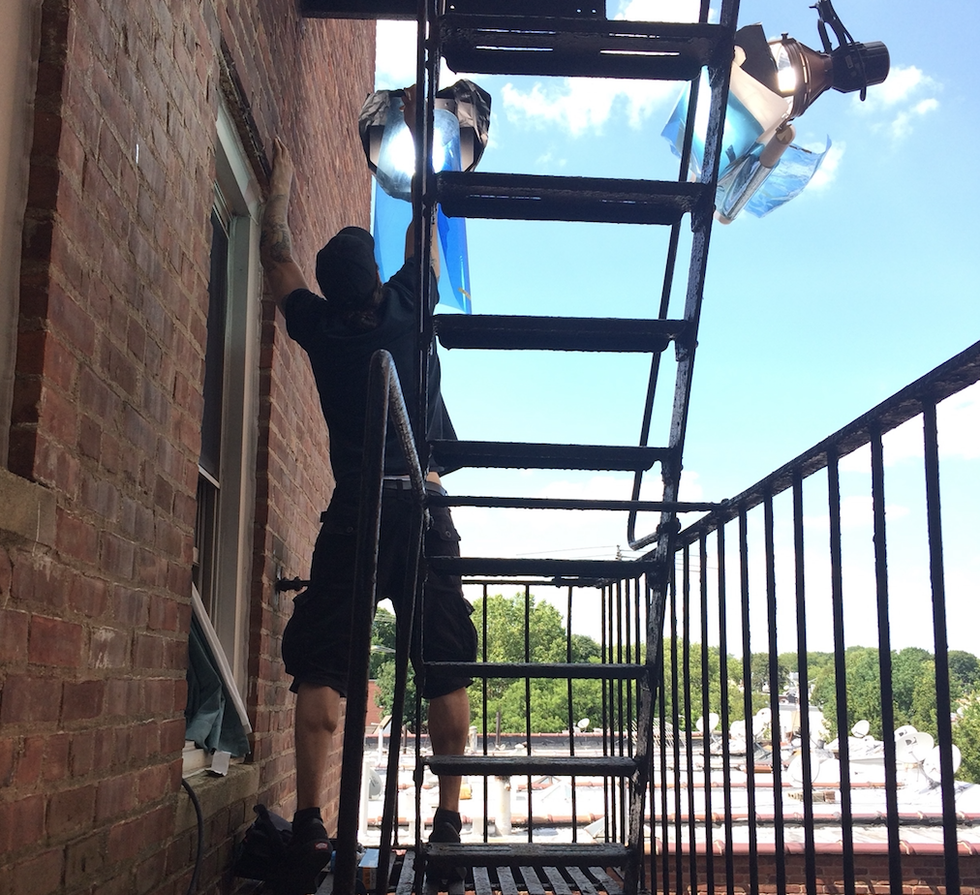 Gaffer Scott Nocern adds blue gel to correct HMI units to match daylight bounced off the sky and clouds.Credit: Photography by Lauretta Prevost.
Why use a color meter?
We were using several different sources and different brands: a HMI JOKER, a HMI Kobold, and a Quasar dialed in to 5600K, along with natural bounced light from outside coming in from different directions (sunlight bouncing off the sky and clouds, and sunlight bouncing off the exterior brick wall). Using the color meter, I could easily tell that the outside natural light was weighing in between 6200-7000 Kelvin, as opposed to the 5600 Kelvin temperature that is the traditional estimation of where daylight generally falls. So we set the white balance on the camera at 6500K, and our gaffer Scott Nocero gelled the HMIs to match by adding 1/2 CTB, a blue gel which cools the color of the light that passes through it. I was able to tell what the outside sky bounce light truly was, as opposed to just assuming it was 5600, as I may have done in the past, or looking at where the camera would auto-white balance; where auto white balance fell would be an average, and the lighting would likely look mixed on screen.
Once I knew I wanted to get all our light close to 6500K, I could have just dialed in that number on the Quasar tube. Having a color meter let me know what level of light was actually being emitted when the Quasar was set at 6500K, and we found that the color temperature of the light in actuality was a bit warmer than what the dial read, so we could add some blue over the tube—which was already maxed out on the dial—to make the unit match our camera's white balance setting. Light emitted from a particular unit can shift over time for various reasons, and it is unlikely that every unit will be spot on.
Light emitted from a particular unit can shift over time for various reasons, and it is unlikely that every unit will be spot on.
This shoot was a complicated one: we were using a Steadicam moving in conjuncture with fast-paced dancers through a narrow hallway and around multiple rooms in a real location. Since the concept was that the shot was a oner and we didn't plan to cut at all, we needed a take that was equally good for the dancers' performance, good for smooth Steadicam operation, and good for focus all lined up together. Having a color meter allowed me to check the output of different sources using my iPhone, as opposed to asking the Steadicam operator, Tanner Carlson, to shoulder the rig and move from room to room and function as a mobile viewfinder. He could therefore save his strength for the actual takes—and we could remain friendly!
Another benefit: our director Rhett DuPont was put at ease knowing we had a color meter on set and seeing us use it.
A potential drawback
The Lumu is designed to work with your iPhone. I do think the fact that the unit easily pops on an iPhone is an advantage overall, since it becomes so mobile, light weight, and affordable. That said, in the days before the shoot I had become locked out of my iTunes / Apple account on my phone, and it was going to take a few days before I would be allowed access, which I needed to download the free app. So I had to ask my camera assistant, Wyatt Maker, to download the app to his iPhone so we could use it on set. I suppose if he hadn't had enough space on his device—or if he hadn't been so amicable to giving up his phone for the shoot—things might not have gone as smoothly.
An advantage is that the meter is also powered off the iPhone, which is useful compared to a traditional light meter. Light meters usually run off a battery that you may not be able to scrounge up a replacement for on set (the CR123A). I recall 2nd ACing on a splinter crew years ago, and the DP's light meter battery died in the middle of sunny outdoor exposing. We hadn't packed a back-up battery for our tiny breakaway shoot, so lighting by eye it had to be. However, this also means that you need to make sure you can power and recharge your iPhone during a shoot.
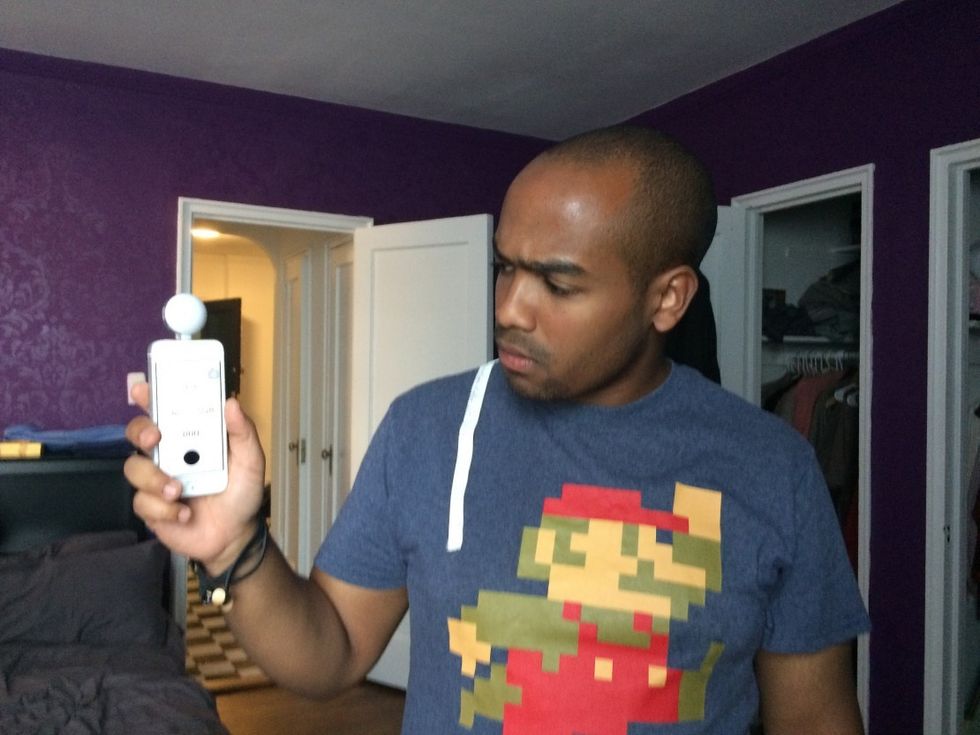 Assistant Camera Wyatt Maker is exposed to the Lumu meter for the first time, and now plans to pick one up to use on his own cinematic endeavors. Photo by Lauretta Prevost.
An on-set time-saver
Regarding the light meter perspective, I did find myself using the Lumu meter to check my sources more than I normally do when I have a Sekonic light meter on set, though that seems largely the nature of this particular shoot. Often, I find myself relying on a histogram or waveform to gauge exposure, and as this shoot didn't often have the camera in a position where that was useful, having a light meter enabled me to dial in exposure without having to have the folks drag the camera around. We were aiming to expose at a t2, and I could bop from room to room gauging how it was all looking, consciously keeping the actors' faces at a "proper" exposure, or knowingly choosing when to silhouette them.
If I didn't have this little be-bop by my side, this picture may have been lit ranging from 5400-8000 Kelvin, with a camera balanced at 5600 Kelvin. In the case of this project, having the light sources more closely matched will look better, and it will save us from tasking our colorist with tough asks on our low budget. If I didn't have this little do-dad, I'd have been asking us to put camera in different positions, which would have taken time—a hot commodity on set—and used up the Steadicam operator's energy and stamina.
Conclusion
All in all, I'm super happy to have this meter in the tool kit. I think it will impact my approach to cinematography as it will help me make conscious choices about mixing lighting, and I'll likely stop defaulting to 5600K for daylight balanced scenes. Instead, I'll get a reading on all the units at play in the scene, in addition to gauging color shifts by eye as I did previously—which is far from ideal, as our eyes automatically adjust. I can test lighting units I use often and note their temperature, so I know to always put a light piece of CTO on a certain unit that should be tungsten-balanced but runs a little cool. I can do this when not in the throes of set and make a note, so whenever that unit is pulled out we already know the proper correction, and don't have to test for various factors on set when a scene is feeling slightly off.
Another positive: I am out of town for a month, and I have left the Lumu with a cinematographer friend to play with while I’m away. Perhaps if its cost was in the $500-1400 range, instead of $225-299, I might be less likely to loan it out so readily.
The meter's light weight and size will make me more likely to bring it along when I meet up with a director to shotlist on location, so I can get some readings at different times of the day, even if I need to be packing light. I can therefore offer more informed opinions to the director and assistant director as to when it would be best for lighting to shoot at various locales.
The Lumu Power is available now for $299.
In the featured image, the kitchen is lit by bounced light as well as a Quasar tube taped up high, and corrected with gel to get a proper reading on the Lumu meter. Direction by Rhett duPont and cinematography by Lauretta Prevost.