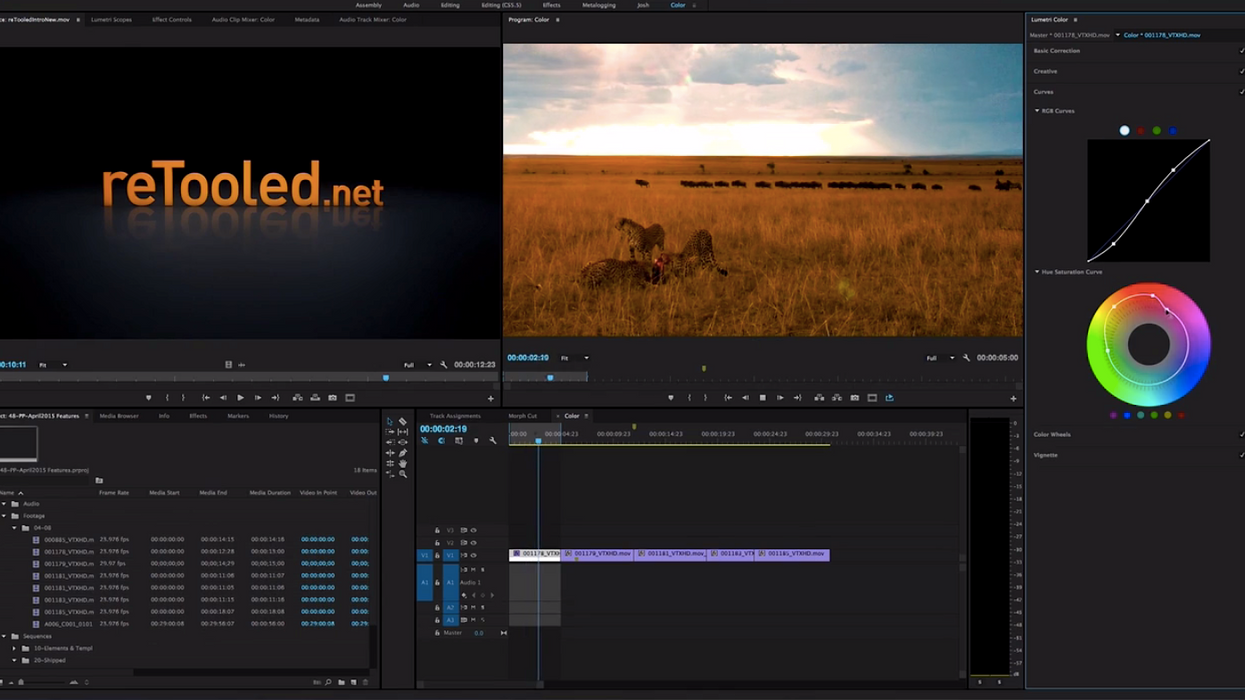
Last month, Adobe unveiled the features that would be added in the forthcoming release of their Creative Cloud video apps. Alongside the intriguing Character Animator, which looks like the foundation for an affordable live motion-capture animation system, the most exciting part of the release was a massive update to Premiere Pro that focused heavily on incorporating powerful new color correction tools adapted from both SpeedGrade and Lightroom.
Josh over at reTooled.net put together a more in-depth look at the new features coming to Premiere Pro than we got at NAB (although an even more detailed video should be coming soon). So sit back, relax and take a gander at the new Premiere Pro.
Here's the list of features covered in the video:
New Workspace Bar
The New Color Workspace and the Lumetri Color Panel
Clip Markers are now visible even when a track is collapsed.
Track Output Assignments in the Timeline
New Frame Hold Option to use Source Timecode
Increase on Handles in Project Manager and Render and Replace to 999
Ability to Relocate the Anchor Point Like After Effects
Ability to Hide Items in your Project panel
Morph Cut
At this point, I can barely contain my excitement for the new color workspace in Premiere. As a long-time hater of color wheels, I can see myself becoming very friendly with the new sliders in the Lumetri panel, which were borrowed from Adobe's photo editing powerhouse Lightroom. The entire color correction workspace just feels very streamlined and powerful, not to mention intuitive, which should save plenty of time effort for editors who find themselves tasked with color correction and grading.
Also, despite the fact that the new Morph Cut transition stutters a bit in the above example with a moving camera, I'm still convinced that it's pure wizardry.
What new features are you excited about in the upcoming version of Premiere? What would you still like to see in future updates? Let us know down in the comments!
In the modern age of digital cameras, it's easy to forget the beautiful edge shooting on film stock can add to your visuals. Many successful movies proudly shot on film were released this year, from indie darlings like Strange Darling to bigger budget fairs like Sean Baker's Anora, Luca Guadagnino's Challengers, and Jeff Nichol's The Bikeriders.
If you're a filmmaker, you already know shooting on film is cool—it's just a heck of a ton more expensive (in most cases) than the much less labor-intensive production styles that come with shooting on digital. No need to buy extra film stock or worry if you make a tiny mistake, you could compromise that stock. That being said, if you have the skill and budget to pull off a successful film shoot, the quality of your picture will more than certainly be worth the stress and money.
On top of shooting on film, there's also the question of projecting on film. Quentin Tarantino famously loves screening projects on film, owning two theaters in Los Angeles, The New Beverly and The Vista, that project films exclusively on film—The New Bev focuses on older restorations, while The Vista does double time with a film currently in theaters and fun midnight screenings and matinees.
It can be extremely daunting if you're interested in film in any capacity—shooting with little experience or even just curious to know more. What do all the different millimeters mean? It can be quite intimidating, so we're here to help. Below, you will find a quick brief of film gauges, as well as a breakdown of the most common formats—8mm, 16mm, 35mm, and 65mm.
Breakdown of Film Gauges
As seen in the super helpful, super technical breakdown above, film gauges come in many shapes and sizes—literally. These different film gauges are measured by their sizes in width, climbing from left to right in the thumbnail above from 8mm to 70mm. The smaller the film gauge, the grainier your final picture, and the larger, the grander the scope.
The little holes just outside of the frames are called perforations, and they work in conjunction with cameras and projectors in order to match frame rate. the lines outside are magnetic strips used to record picture sound.
Before the digital age the standard was 35mm, but older epics like, say, Ben-Hur used larger format 70mm to project a more epic scope—i.e. an "epic". Tarantino also shot The Hateful Eighton 65mm and projected in 70mm with the intention to bring back the idea of a "Road Show", where premieres had a more theatrical presentation than the average theater-going experience.
Let's explore why different movies use different film gauges in the Fandor video below.
Examples of Movies Different Film Gauges
As noted above, some of our favorite film buffs like Quentin Tarantino, Paul Thomas Anderson, and Christopher Nolan swear by shooting on film and use it almost exclusively. Some recent notable directors who are as set on it but still utilize it in interesting ways are Sean Baker and Steven Soderbergh. Not that shooting on digital is in any way a crime, but if you watch any of these director's movies you can almost instantly appreciate why they chose film.
As noted, the more millimeters, the cleaner the look—with some directors mixing different gauges for different tones and visual language. With 16mm, it's typically grainier, but also more warm and intimate. If shooting for 35, it's more standard, straightforward, and with 70mm it's bigger scope, baby.
The most interesting choices noted from Fandor's video above are from Soderbergh and Baker, who portray different feelings with different gauges while also incorporating digital.
In The Florida Project, Baker shot the entire thing on 35mm until the very last montage, shot on iPhone. This gave a disjointed tonal shift that implied Brooklynn Prince's Moonee's trip to Disney Land was simply a fantasy—a tragic ending that made me bawl my eyes out.
Soderbergh uses it in an even more intricate way, portraying different stages of Steve Job's life through different formats. The early years are 16mm, the come up years are 70mm, and his final, successful days are shot digital. If there's a better way to portray the different advantages of shooting different formats and gauges, I'm interested!
Below, let's briefly explore some of the different ways we can use different gauges of film, and with some examples of how they have been and can be used.
8mm Film Gauge
Old school as can be, 8mm (or Super 8) is a teeny tiny format that is used primarily for style. It's the grainiest, dirtiest gauge for certain, but if you have a stylistic way to incorporate it into a project, it looks cool as hell. It's rarely used these days, but when it is, it stands out.
It might be intimidating, but shooting on Super 8 can be pretty straightforward with some proper instruction (as seen in the vid above), The most important things are finding the right equipment and film stock, and setting yourself up for success.
As noted in Fandor's video, a modern example is Porto, which uses Super 8 to show intimate memories of a failing relationship. Some other notable examples are Raging Bulland one of my all-time faves, Paris,Texas.
16mm Film Gauge
Although twice as wide as 8mm, 16mm is similar in its practical use. Similarly grainy, modern movies shot on 16mm can still be cleaned up pretty nicely. I recently rewatched Todd Hayne's Carol, and that's a great-looking movie that uses 16mm to add an intimate warmth to the story. Shooting modern movies on 16mm can also add an aged feel when trying to evoke an older, simpler time.
Some notables referenced above are Texas Chainsaw Massacre, Moonrise Kingdom, and Evil Dead which all have that vibe to them, if you know what I'm saying.
35mm Film Gauge
With 35mm, we get the standard, most modern look out there of all of the film gauges. That being said, you can still pull off a cool vintage style with the proper lens and camera setup, as seen with the above video from Kodac for Asteroid City, a very pretty lookin' flick.
An even neater Kodac breakdown, however, in my opinion, is Kodac's breakdown of Licorice Pizza,Licorice Pizza,shot on 35mm with vintage cameras and lenses. This is a nifty exploration of how your specific camera setup can bring the audience back to a specific time period, as was the case in Licorice Pizza for the '70s.
While film gauges may inherently bring a more stylized look to your project, the wider they get, the more inherently modern they look. That being said, it comes down to what you shoot on and how you color your picture where all the true art and intentions are solidified in your project.
65mm Film Gauge
The largest in size and scale, 65mm is the big dog of film gauges. As mentioned above, it is the go-to for adding scope and giving your image that larger-than-life feel you can't quite capture on smaller gauges. This video especially shows off DP Hoyte Van Hoytema's method of using black and white 65mm in Oppenheimer to express scale and scope, while also portraying two different time periods through color.
Hoytema is a frequent Nolan collaborator, a perfect voice to cap this exploration of film gauges. Nolan historically swears by shooting on film, but he'd be nothing without his dude behind the camera who's working with Nolan to pull off shoots on film to the scale he's known for.
Another notable example of 65mm pulling off massive scale is PTA's The Master, where he uses 65mm to portray the grandiose nature of Philip Seymour Hoffman's Lancaster Dodd. The Master is a beautiful film with beautiful cinematography that might be my favorite of the modern examples of 65mm in scope for the human nature of it—it isn't showing a giant battle, or whatever, but rather the giant scope of the man at the center.
Now that's moviemaking, folks.
I hope with all my heart this article was a helpful, intuitive look at different film gauges and how to use them. If it wasn't? You can comment and tell me all your woes. You can fix me.