Even with the growing prominence of cheaper color correction systems, the craft of color grading is still mysterious to many, including those who work in post-production. I'm often asked how I approach specific projects or how I achieve particular looks so I thought it would be helpful to illustrate some of my methodologies with a music video for the rap artist Killer Mike. Beyond nerding out on Resolve, I hope the reader will start to see that there is a lot that happens outside of the software.
Here is the music video (and you can check out more work here). There is some NSFW language:
I had worked with director Ben Dickinson and cinematographer Adam Newport-Berra on several projects by the time we worked on this one, so I already knew somewhat how they worked. A positive pre-existing relationship can help the work tremendously because aesthetically you are aware of where the other creatives may want to take things, where their sensibilities lie, and what elements in the frame they are likely to be drawn to. Ben and Adam don’t just rely on one signature style, but approach the grade from an angle that makes sense to that specific project. So they don’t just always have super-crushed blacks or popped colors.
The facilities at Pleasant Post also provided a great environment in which to grade, particularly because their color suite houses an OLED monitor, which was a huge help especially on this video as the monitor displayed beautiful blacks, enabling me to dial in subtle details from the black chasm the talent inhabits. Due to the large amount of Red work Pleasant edits and grades, they invested in a Red Rocket so render times didn't take an eternity.
I always ask for a rough cut before I step onto a project not only to begin thinking about the appropriate palette but also to diagnose any potential issues before they occur, from separating graphical plates, to multiple camera formats, to seeing if the client has an unrealistic expectation of what can be achieved (for example, bringing back overexposed skintones or changing an element to a radically different color). When I received the rough cut I was excited as it was a very different type of rap video, and care had been given in the mise-en-scene.
[caption id="attachment_28503" align="alignnone" width="616"]

We scheduled four hours to grade on the day of the session, which I thought would be enough time as the edit was not very complicated and some of the shots were repeated setups, though I still needed to check these shots to make sure an exposure or color change hadn't occurred across their duration. Ben and Adam needed to shoot a pickup shot (the opening shot with the hourglass) so we discussed the grade beforehand and let me work while they got the shot. They had a ton of references organized into a PDF that they had culled from Renaissance paintings which we used as a conversational starting point. They were drawn to paintings that popped one color element, usually someone’s clothing, as a way to guide the eye. Whenever possible I made a note to achieve this (one good example is the black Madonna with her child). Blacks were to be black, as opposed to a tinted black, and not overly crushed. The image was to have a golden look to mimic the era's palette, with relative desaturation to give it a more natural feel. Skintones can actually be very desaturated without feeling processed. It just depends on the creative’s sensibilities.
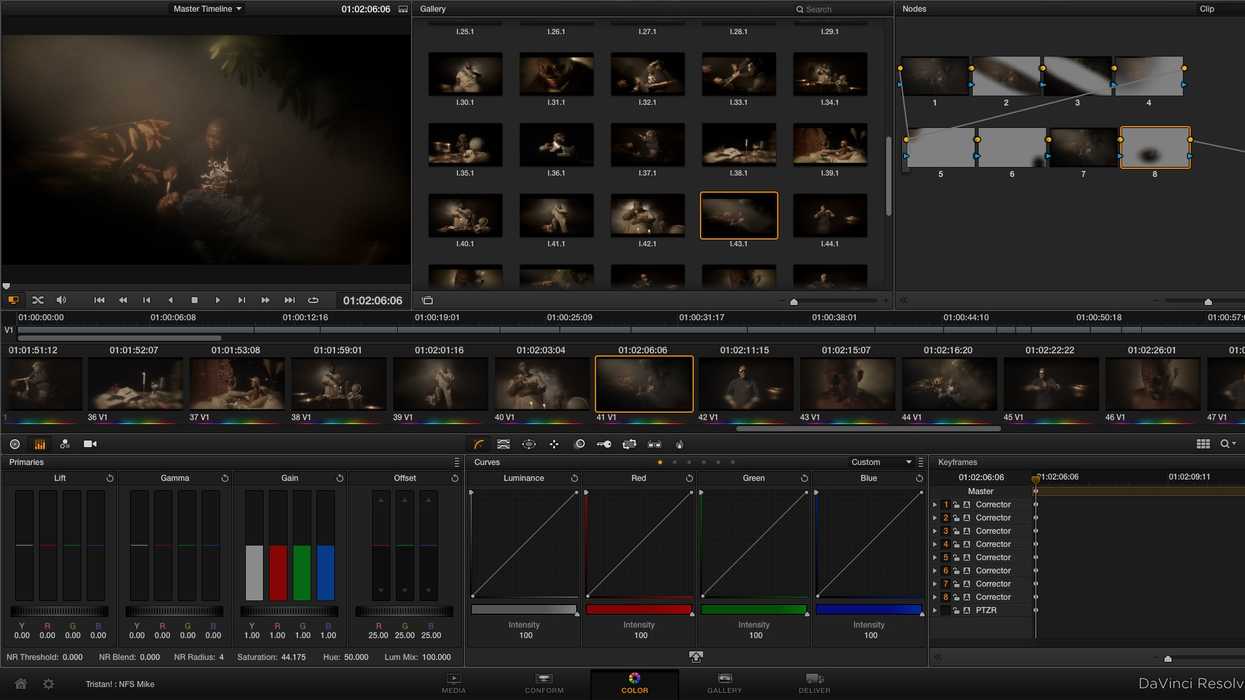
I actually prefer to have the edit project instead of a XML generated from the project as many editors are not informed on how to prep timelines adequately for Resolve beyond just getting all the clips down to one video track. There is actually much more to the way I prep the timeline to help me later in the session. On the timeline I can easily diagnose things I know are going to trip up Resolve, such as multiclip camera angles or odd effects that were left on the clips. I can get rid of edit points in the same clips that were added as part of the editor's process. I can also see which shots are blown up, sped up, or flopped. I use the multiple video layer capability of XMLs as a way to flag clips to myself visually. For example, sometimes I put every shot that is blown up on the second video layer, or on a multiple-format project, I may opt to put Alexa footage on V1, Red footage on V2, and 5D/7D footage on V3. This is an easy way to answer the client’s question of what format the current shot you’re working on was shot on and to know which shots need resizing.
It’s also from the project file that I create my reference picture to make sure my XML came in correctly. Sometimes editors make H264s that lose timecode, making me go into the edit program to reexport anyway.
I loaded all the raw Red footage manually which I requested to have on the drive, and loaded the XML without selecting “automatically import source clips into media pool” as the video was cut using Prores Quicktimes, the most common Red-Final Cut workflow.
Resolve has the ability to link a rough cut with your XML after you bring it in. After loading my session the first thing I do after loading the footage in is to load the rough cut and compare all the shots. Even with cinestyle cameras such as the Reds and the Alexa which contain timecode and metadata, for some reason during this project some clips would be one clip off from the correct shot. Using the Final Cut project that was given to me made it easy to find the correct shot and force conform with the correct clip. This is an essential preparatory step as there is nothing worse than loading a cut with the wrong shot and having the client call you out on it. Neglecting this step is an immediate way to lose credibility.
Resolve automatically groups shots that share the same dailies together so you only need to grade the shot once for it to apply to all of those setups. I went through and grouped other shots that were clearly the same setup, but just not part of the same dailies to make this process even more autonomous.
On to the actual grading. I began by crushing the blacks in each shot and building in a healthy bit of contrast, not spending more than thirty seconds on each shot to accomplish an initial correction before moving on to the next shot. I really had no idea when Ben and Adam would get to the session but it would be best to be able to show them a work-in-progress of most of the cut as opposed to a finely-tuned first shot that they might change completely.
[caption id="attachment_28504" align="alignnone" width="616"]

Most of the images in the video ended up far below the upper legal limit of the scopes, probably around 80 IRE, resulting in images that were not too bright but by no means were dim either. I desaturated the shots while pumping in a golden yellow mostly in the mids to add an old-world feel to the overall image.
I quickly realized that the guest artist's skintone was very different than Killer Mike's. I inched them closer together and made a mental note that I’d have to do that throughout the whole video, particularly in shots where they both appeared.
[caption id="attachment_28501" align="alignnone" width="616"]

I continued blasting through the setups, trying to accent at least one element in each scene, whether it was the subtleties in the clothing or the heavenly halos around the artists. When the creatives arrived they were happy with the progress thus far, and made some aesthetic changes to intentionally leave certain shots less consistent with each other. We spent time putting the Malcolm X setups into their own world, and let the closeups of both artists edge into a warmer, more saturated territory to accent their candlelit faces.
[caption id="attachment_28499" align="alignnone" width="616"]

Whenever possible we warmed up the smoke by adding vignettes as I knew they wouldn’t separate cleanly with secondaries. We directed the viewer’s eye by accentuating the shafts of light in the baseball bat scene and reframed certain shots to add to the story, for example centering Mike in frame when his head was on a platter, or the very last shot where he is meant to be killing himself which was shrunken.
[caption id="attachment_28505" align="alignnone" width="616"]

The project was rendered at 1080p and round-tripped back to Final Cut via XML where Ben applied further effects before shipping the video for an exclusive premiere on Pitchfork.
[caption id="attachment_28502" align="alignnone" width="616"]

Would you like to see more types of these articles? What would be most helpful to you in elucidating the mysteries of color grading? (And yes, an article on Speedgrade is in the works.)
 Tristan Kneschke is a freelance editor and colorist who operates Exit Editorial based in New York City. He has worked with a long list of clients including Victoria's Secret, Pepsi, Microsoft and Google, and has also enjoyed working with such artists as Beach House, RJD2 and Newvillager.