Have you ever wanted to just make a "quick and easy" film? That was filmmaker Joey Ciccoline's intention for his first narrative short, a sci-fi film entitled 88:88, which has now gone on to win a handful of awards (including a Vimeo Staff Pick) and screened at festivals all around the world. But his idea for a "simple short film" turned into an exercise in creating stunning and clever practical effects without a small crew and an even smaller budget. Now Ciccoline wants to let you in on how he captured (almost) all of those effects in-camera.
This is a guest post by Joey Ciccoline.
In the summer of 2011 I had a conversation with my best friend, Sean Wilson. I told him we needed an idea for a simple short film that could be made for nothing and would give me something to show for myself as a director. The result was 88:88. Now, a little over two years later, we have screened at film festivals all over the world, have been to Venice and Dubai, have met with many producers and a few studio executives, and I have industry representation. All of this began with that one conversation and deciding to just go ahead make something, however we could.
The initial idea for the story of 88:88 came from Sean. It started simple: someone is working hard, very focused, preparing for something. What she is doing isn’t normal, though. None of it makes a lot of sense -- until the end.
Nice and simple, and easy. That’s how it started.
However, by the time we finished writing, we had a script that involved levitating a person, throwing a room into chaos, custom-made models, and a lot of visual and special effects. Our budget was only whatever we could afford to spend, which ended up being about $3,000. Here’s how we tackled a few of various aspects and came out with something, from very little.
The Setting
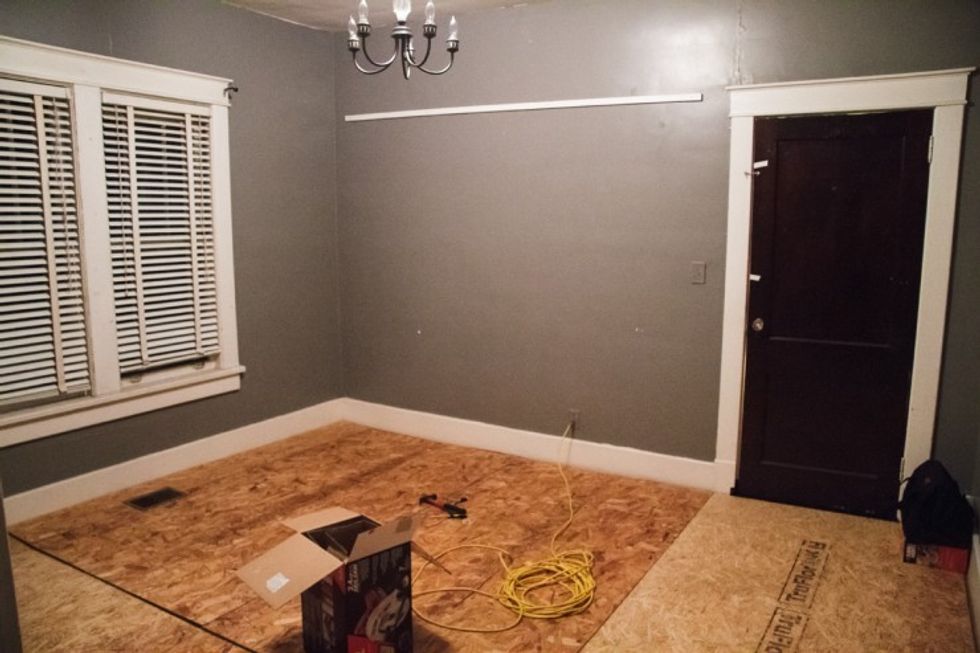
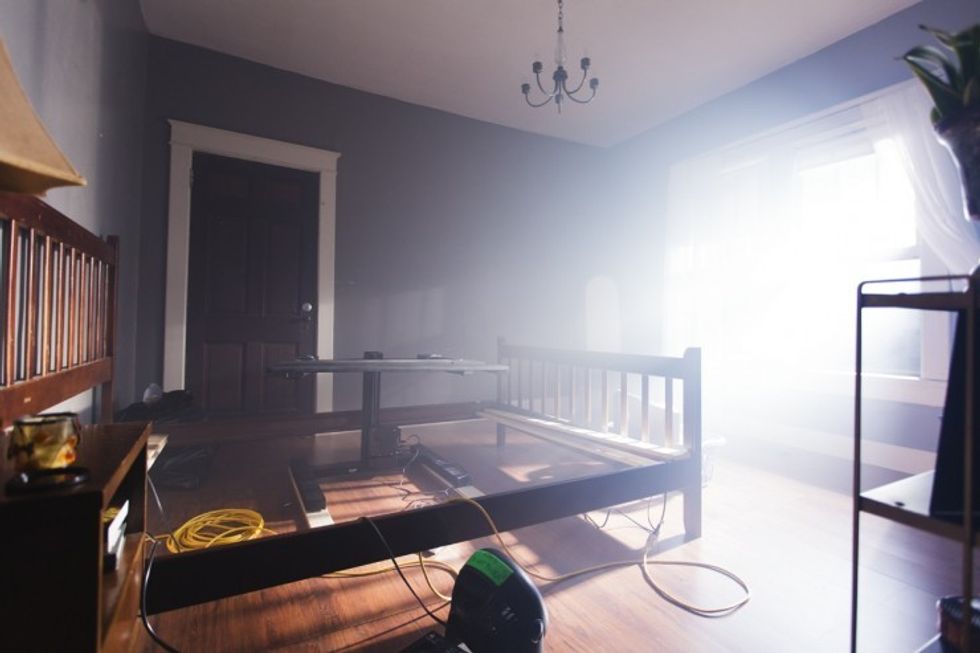
88:88 is about someone roughly our own age, living in similar circumstances, who is at home the whole time. This meant that we didn’t have to go anywhere or pay anything for locations That being said, we still used the best of what was available to provide the ideal setting. The downstairs (living room and kitchen) was my neighbor’s house, the bathroom was Sean’s, and the bedroom was a spare room in my house where we could wreak the most amount of havoc with the minimum amount of inconvenience.
We only had 3 days to shoot the film, so the bedroom had to be set up in a way that didn’t require much prep time for different shots. The house was also a rental, so we really needed to avoid damaging anything. To allow drilling into the floor whenever and wherever best suited a particular scene or shot, we covered the pre-existing hardwood floor with packing blankets, then a layer of plywood, and then finally a layer of the cheapest artificial wood flooring we could find that still looked decent.
The door to the room was replaced with a similar door from a local Habitat for Humanity Homestore. They take donations of everything from furniture to building supplies which are then resold at thrift store prices. Finding a suitable replacement for the odd-sized door in an old house could have been a huge pain, but we found one (likely pulled out of another old house during renovation) just the right size for only $25. Anything else that needed to be installed in the room, such as the pulleys on the ceiling and the locks and brackets on the door frame, were done with heavy-duty double-sided adhesive. One of those pulleys is still on the ceiling, two years later.
For the exterior shots of the house, we wanted the bedroom windows to be visible. The bedroom we shot in was on the first floor, and my house didn’t quite look right from the outside. Sean and I drove around my neighborhood for a while until we found a house that would work for what I wanted. The 3 shots in the film were all constructed from a still photo of the house we found. I swapped the windows on the second with a photo of the actual windows from the room we shot in. I then replaced the sky and relit the shot based on the time day that was required. Most of this work was done in Photoshop. To help make the shots feel a little less static, I added birds flying in the background of the sunset shot and bugs swarming the street light in the night shot. Sometimes little, subtle details will be enough.
The Practical Effects
From the beginning, I wanted as much of the film to happen in camera as possible. I feel very strongly that anything physical that is filmed in the moment -- even if it’s obviously fake -- will feel way more natural than anything added digitally later. A good example of this is the Yoda in the original Star Wars films vs. something like the CG Yoda in the prequels. You know it’s a puppet, but you also know that it’s a real object that’s really there. It’s easier to mentally assign life to a puppet than reality to a rendering.
The other upside of this approach is that it makes for significantly less work in post and relies less on my very unprofessional CG capabilities. Doing things practically is also way more fun! Here’s a few of the bigger practical effects in the film.
Stop-Motion
How do you make things move as the result of an invisible force? In a few instances, we used the classic fishing line, which usually didn’t even need to be removed in post. However, when it came to unlocking doors and windows, no amount of fishing line would have helped. The window unlocking was pretty straightforward. Lock off the camera and move the lock a little each frame. Add a little camera shake in post and you’re good to go. The door locks took a bit more work, though.
I really wanted the camera to move down the door as each lock systematically unlocks. Since I was working with 18mp still images for the stop motion, I could conceivably have just locked off the camera in a wide shot and then executed the camera move in post without losing any real resolution. This comes back to wanting things to feel natural, though. Even if the viewer didn’t pick up on it, the shot wouldn’t feel quite right, because you wouldn’t get any perspective shift in the locks as they move from the bottom of the frame to the top. It’s a very subtle shift, but strong enough to matter.
To do this, I borrowed a tripod that had a center post with a crank to raise and lower the camera. This way I could turn the crank just a tiny bit with each frame and get the camera to lower evenly over the course of the animation. It turned out to not be quite as even as I had hoped, but a little post finishing with stabilization and then adding motion blur did the trick. You may notice a trend here: old school, in-camera effects with modern digital cleanup. It’s the best of both worlds.
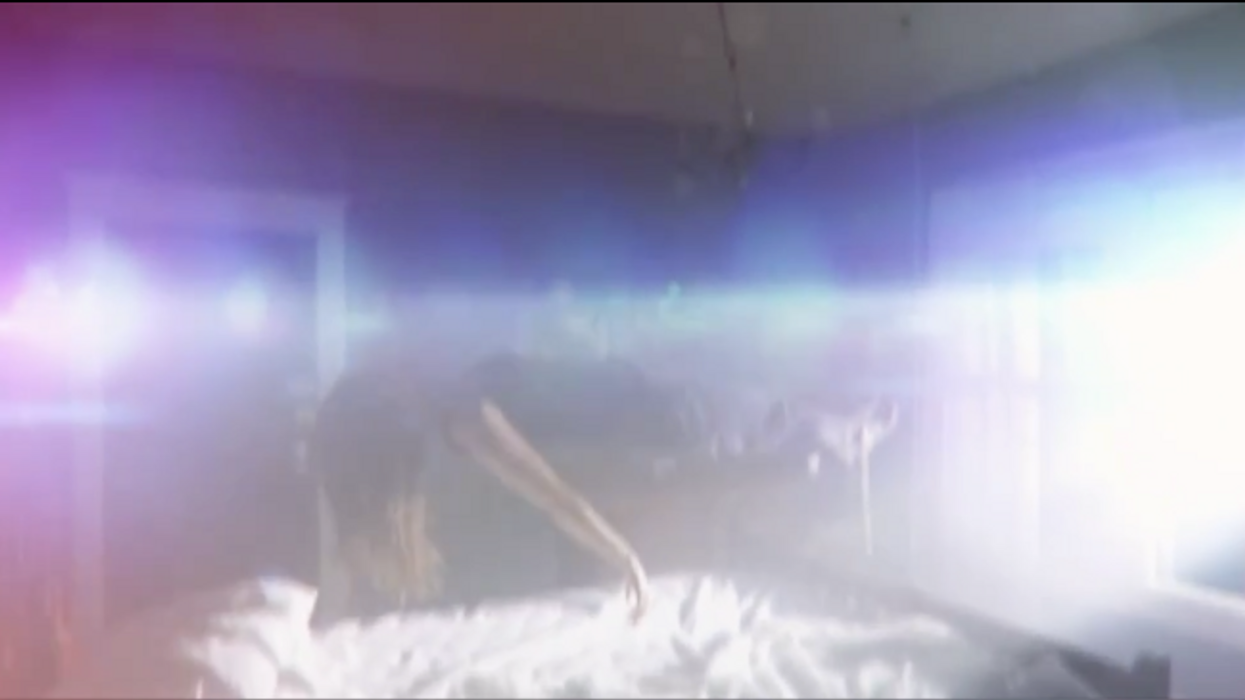
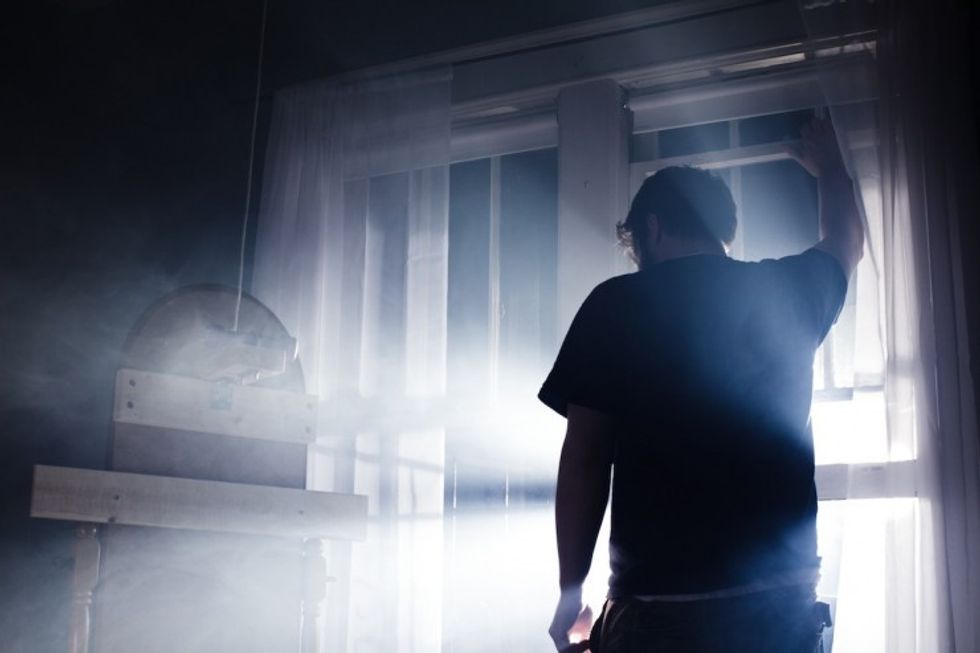
Levitation
This is probably the most important effect of the film. I could have filmed the actress against a green screen and composited her into the shot, but again it wouldn’t feel natural, would have required a locked off shot, and would have created a great deal more work in the end. From the beginning, I knew that she had to be there in the room and the environment going through that whole process on camera.
Sean and I worked through a lot of schemes and ideas, including some custom rigs and other less than simple methods. In the end, the simple solution came from the music industry. My father works with a touring musician who plays the piano. During a show, the musician likes to play from both standing and sitting positions.
To do this, they use a heavy-duty keyboard stand that supports up to 200 pounds and can be raised and lowered at the push of a button. Seeing it as the best solution, we ordered one of these stands for about $500. It was a lot of money to spend, but we knew we could sell the stand afterwards and get our money back (which we did).
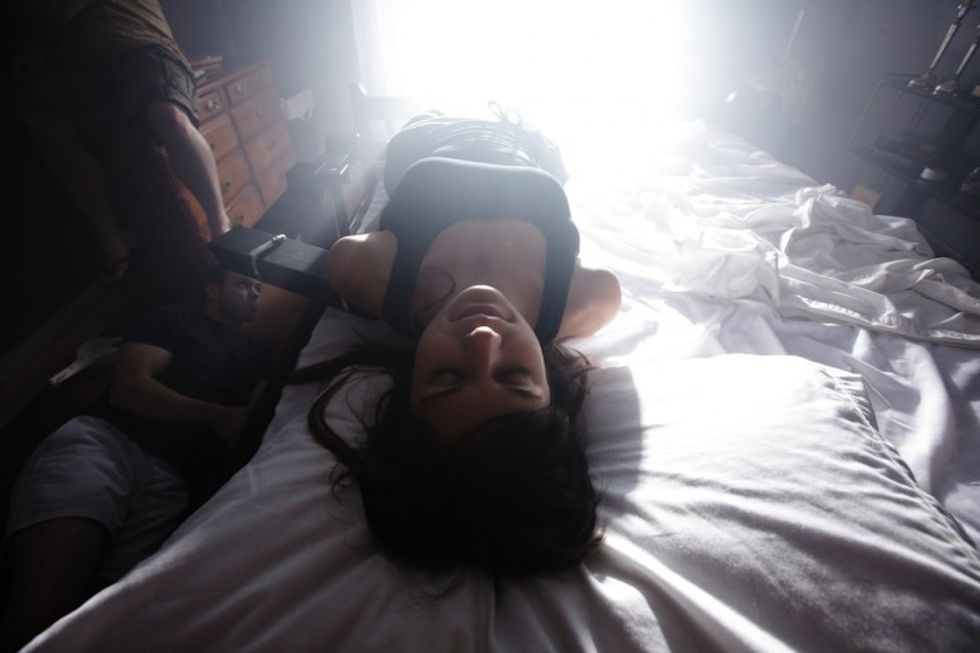
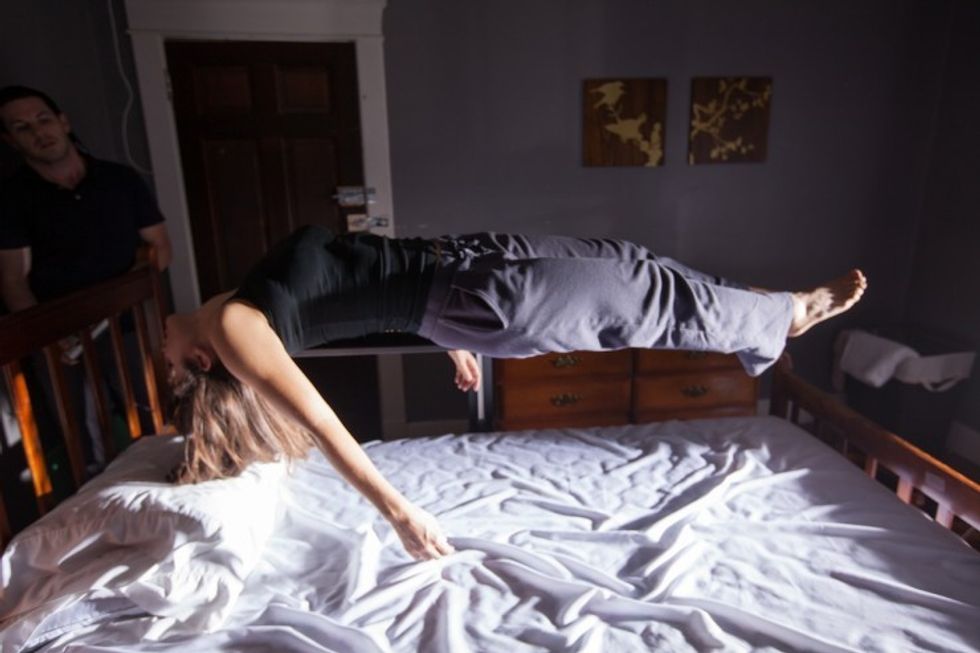
Using some light 1x4 lumber, I modified the stand to have a better reach out over the bed, a more stable base, and a platform to hold the actress. Once everything was set, someone off-screen would operate the controls to raise her off of the bed.
I could operate the camera from most anywhere and all that was visible of the keyboard stand in the shot was the center post that ran from the base to the platform. This was fairly easily removed in post with some simple rotoscoping and background replacement.
To add a little more fun, we put the stand on a dolly track that ran under the bed. While one person operated the keyboard stand controls to raise her above the bed, someone else could slowly slide the base, along the dolly track, moving her towards the window.
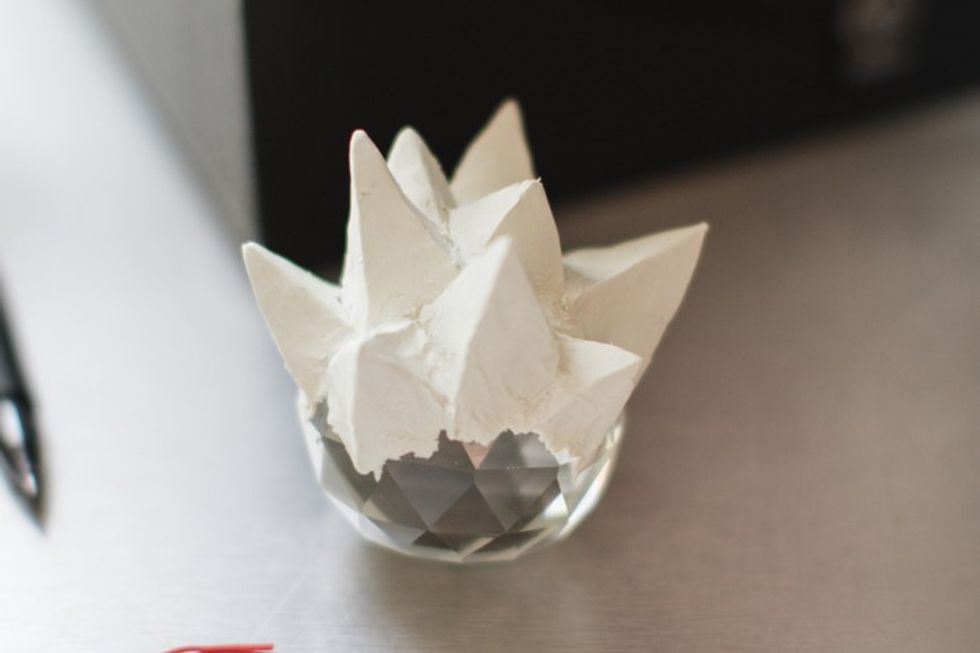
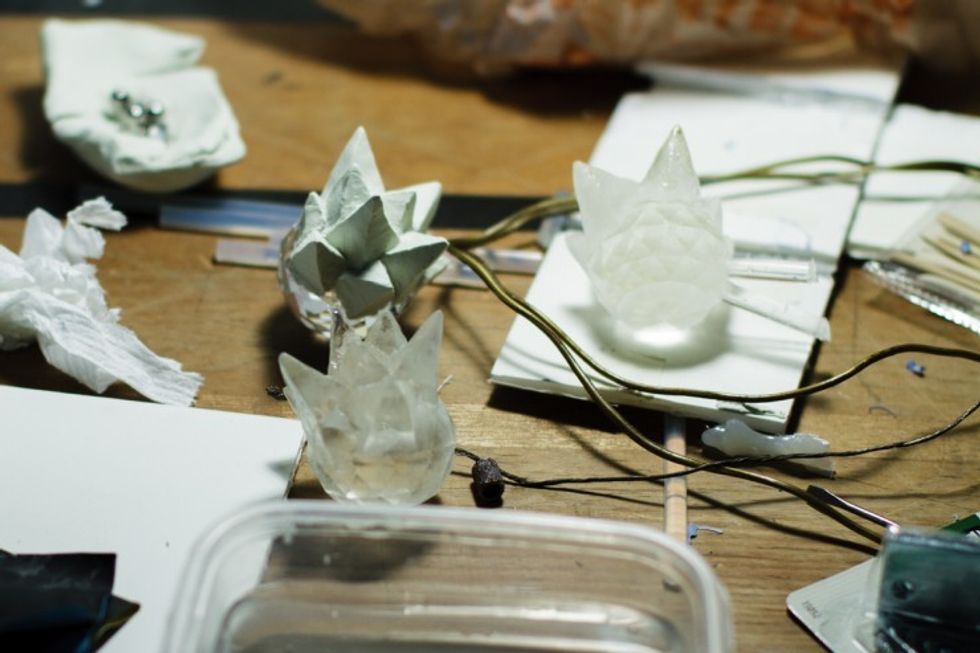
The Crystal
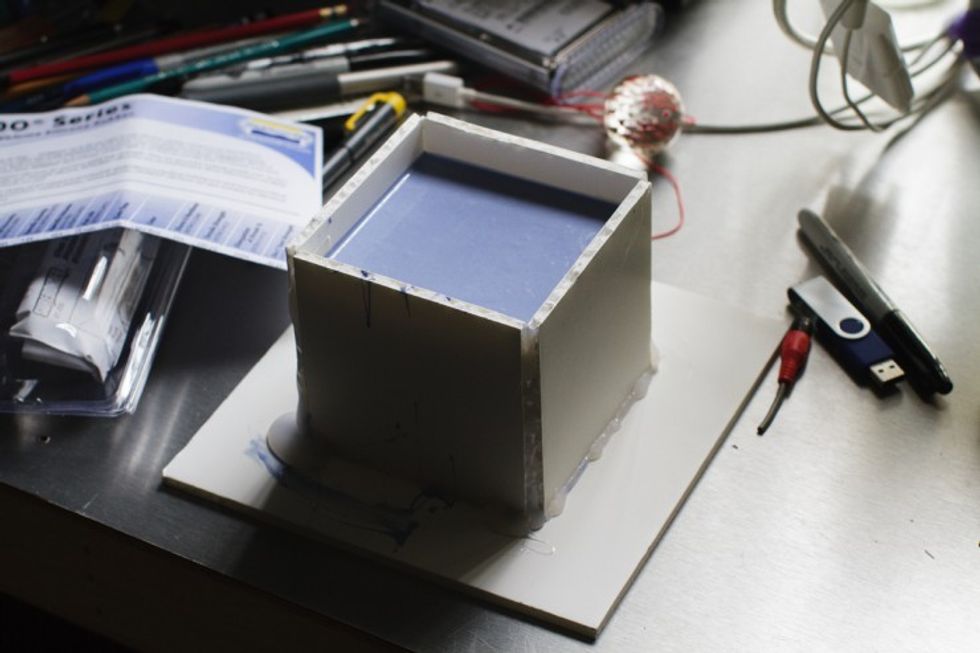
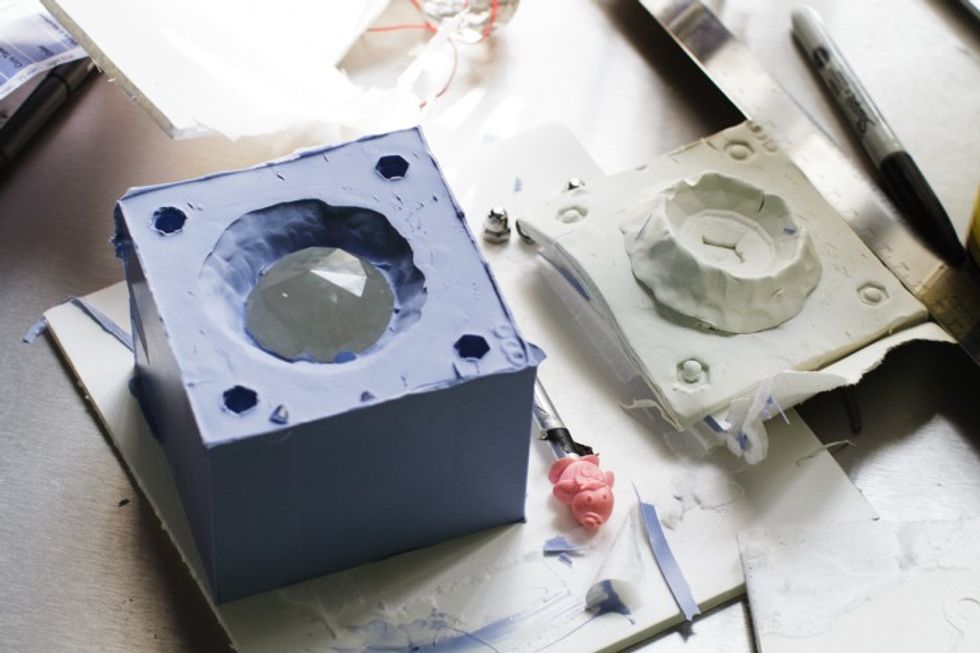
At the end of the film, a silly crystal-topped trophy is knocked on to the floor, reacts with the beam of light, and turns into something else entirely. This is another case where I feel like most people with limited financial resources would just lean on CG to get the job done. However, that relies on giving her a placeholder object to hold on to, that is covered up or removed later, some sort of practical lighting to light her hand and face, and some really good 3D tracking to keep the object in her hand in spite of her movements, as well as the camera's. None of that even addresses the need to light and render the object in a photorealistic way. Why do all of that work when you can have a lot more fun learning the basics of custom model-making and working with something real?
To make the modified crystal, I started with one of the original glass ornaments we bought for the trophy. I added on to the crystal with modeling clay, sculpting the spike-like structures conceivably formed by the alien light blasting outwards from its core. Once I had a structure I liked, I consulted the internet and our local art store for the supplies and know-how to make a mold of my model. Using the mold, I made several castings in a clear plastic resin. Most of them didn’t turn out too well, but we eventually got one that looked great.
To make the crystal glow, I drilled a hole in the bottom of the crystal and rigged up an LED inside to a very small battery that could sit under the crystal in her hand. At times the connection of the battery was a little wonky, but the flicker that resulted actually helped give the crystal a little more life.
One last note with the crystal -- I’m not opposed to CG where it makes the most sense. Many things were digitally augmented in post, and the one full CG shot in the film is the shot of the crystal rolling along the floor onto the mirror. We tried all manner of ways to get that move to work in camera and we just couldn’t ever get it right. A digital solution was the best tool for the job there, and mixing techniques is often a great way of preventing a viewer from picking up on and getting distracted by how things are done.
The Sound Design
A large part of selling the intensity of the abduction scene is in what you hear. This is an area where I’m still not quite satisfied with the result, but we did the best we could. Most of the sounds in the room were either recorded at the time of filming, or in the room later. Apart from the light and the scream, very few of the sounds were stock sounds or created after the fact.
The Light
Really I’m attributing most of the ambient sounds of the abduction scene to the light. The goal was to create something that was almost deafening, but would not mask the other sounds happening in the room. It needed to feel like a source of immense power, but also otherworldly. The result is simply a combination of several different sounds, from some stock rumbles, to public domain NASA sound clips of natural radio signals from Saturn. We may have even mixed in some mysterious, unidentified underwater scientific sound recordings. Sean and I passed audio files back and forth, each working with them, until we found something we were happy with.
The Scream
This happened in a similar way. It’s a layering of several different types of sounds. Sean did more of the work on this one. We kept going back and forth on how it should sound, where it should land in the spectrum of human to alien to full-on monster. I think we decided it was better to err on the side of something a little more terrifying and intense to add to the height of the moment. I also mixed a little Wilhem Scream in there for good effect.
A Lot With a Little
I like to think that the approach you take with something, and the thought put into it mean a lot more than the money and resources you have. If you look back on most great artists, namely filmmakers, the best work always comes out of restrictions and difficult situations. It forces you to really think through what you’re doing and to be creative about the best way to achieve what you’re after.
It’s easy to get discouraged by a lack of resources when you’re starting out, but it can also be fun to figure out how to work with what you have.
For a filmmaker, and especially for a director, this is one of the most vital skills. It’s important to keep this attitude even as you progress and have access to everything you could need. The difficulty and responsibility then lies in creating your own constraints to keep yourself on your toes and as creative as possible.
---
Joey Ciccoline is currently working on a new short film entitled Eidolon, which is now raising funds on Indiegogo. Be sure to check it out, and, if you feel so inclined, support it -- with money -- and/or your thoughts down in the comments!
 Joey Ciccoline is a director from Nashville, TN. 88:88 was his first narrative short film.
He previously led a small freelancing career creating music videos featured on CMT and at SXSW, and directed a comedy web series. Currently, he is working on a feature film followup to 88:88, as well as the new short film, Eidolon, which is currently running a crowdfunding campaign on Indiegogo.
Joey Ciccoline is a director from Nashville, TN. 88:88 was his first narrative short film.
He previously led a small freelancing career creating music videos featured on CMT and at SXSW, and directed a comedy web series. Currently, he is working on a feature film followup to 88:88, as well as the new short film, Eidolon, which is currently running a crowdfunding campaign on Indiegogo.