Adobe Character Animator is a performance-based animation software that allows you to bring 2D characters to life using only your voice and a webcam. It tracks your facial expressions and motions in real time, so when you smile, your character does too. You can create your own characters in Photoshop or Illustrator, or download character templates from Adobe’s website. Character Animator works as a part of Adobe After Effects, so if you already have After Effects downloaded and installed, then you have the program.
Let’s take a look at the basic steps to create a character and bring it to life in this tutorial from Okay Samurai, a designer from the Character Animator team.
Make an expressive face
The head and face are the most important parts of your character since this is where most of your animation will take place. Using Photoshop or Illustrator, create your character’s eyes, eyebrows, mouth, and any other attributes you desire. Be sure to build your character in several pieces so you can manipulate each attribute inside Character Animator. Also, creating various expressions of each attribute allows you greater control over your character. For this example, the Wilk character in the tutorial has various eyebrow movements to show emotion, eyelid layers for blinking, and mouth positions for talking.
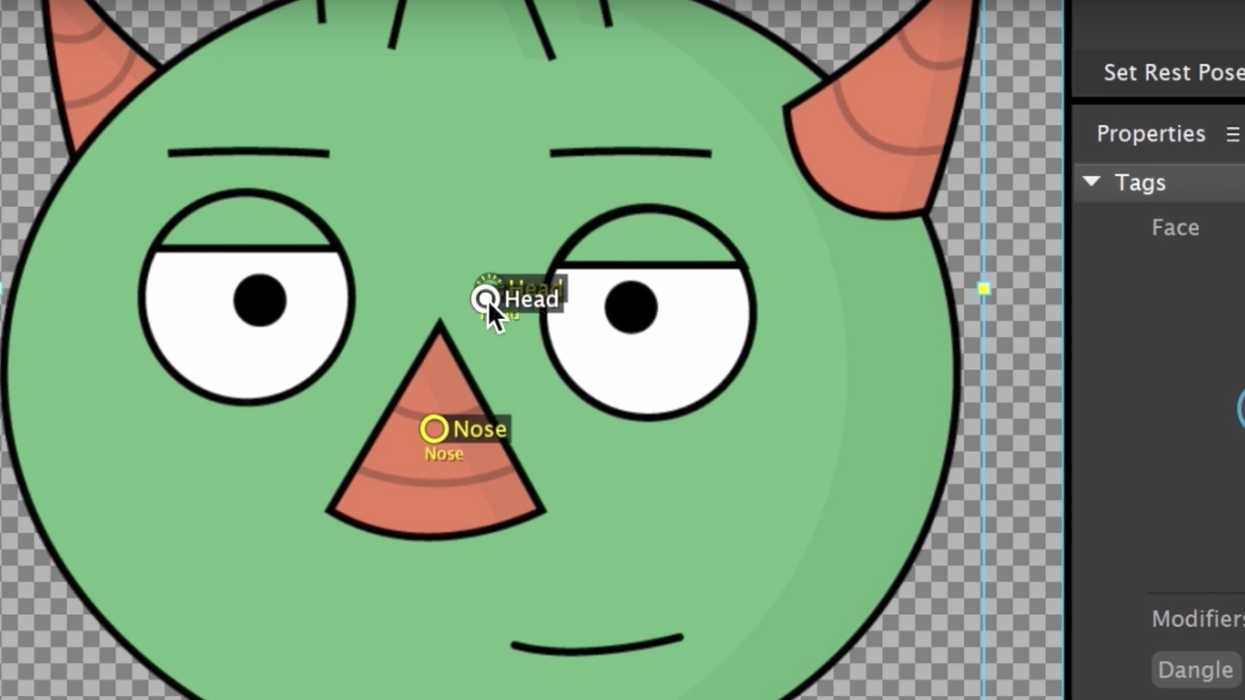
The basic structure of your character in Photoshop/Illustrator is very important and will give you complete control over your character. Use grouping to keep all of your attributes organized. Once imported into Character Animator, you can tag all of your attributes, letting the program know which layer corresponds with which attribute. Further control the movement of each element with sensitivity adjustments, keyboard triggers, and cycle layers. As usual, a great feature of working in Adobe programs is the ability to work with several applications at once. For instance, if you make any changes to your character in Photoshop/Illustrator, the file will update immediately in your Character Animator project.
Create a body
Create a body just as you created the head and face elements. Create arms, hands, legs, feet, and a torso in your original Photoshop/Illustrator file, and then group the attributes accordingly. Layer order is important since you want an arm and a leg to be behind the torso, while the others are in front. Just as we did with eyebrows and mouth positions, it’s important to create several hand configurations, including thumbs up, thumbs down, hand open, hand closed, and any other orientation you might want. These positions can once again be assigned to keyboard triggers for quick access during animation.
Once inside Character Animator, use the tools provided to put your puppet together. This process includes a number of different steps, all of which help your character become animation ready. First, change the center of gravity by moving the origin point to your puppet’s belly button. Staple limbs to the torso so they follow along with movements. Make the animation more realistic by fixing the character's feet to the floor with the Pin tool. If you want to move the arms, add a draggable handle to the each hand. This will allow you to move the hands with your mouse or touchpad. Finally, add “bones” with the Stick tool, and now the puppet is ready for animation!
 A character can mimic your own motions with the help of a webcam.
Create motion and record
What makes Adobe Character Animator such an interesting program is the fact that it’s performance based; it doesn’t require keyframing to bring your animation to life. Record behaviors live with a simple webcam and a microphone. You can quickly calibrate your webcam with the Set Rest Pose command. Record in slow motion to give yourself time to practice and perfect your movements. In the Track Item Behaviors panel, you have a number of attributes which you can record live, including dragger handles, face, eye gaze, keyboard triggers, lip sync, and transform options. Record any of these options individually or together. Fine tune your animation by recording one behavior at a time.
Export
Once you’re finished with the animation recording, you have several export options. Render out a simple video file through Adobe Media Encoder. You’ll find plenty of export presets from which to select when using Media Encoder, including presets for Youtube and many other social media platforms. If you want to edit your animation further in After Effects or Premiere Pro, export your project as a PNG sequence. This will export your animation as one file for every frame. You can then import directly into Premiere or After Effects for further editing and compositing.