I believe that video editing will be a skill most people possess. Just think about what happened to photography. Nowadays almost everyone with a smartphone takes and edits pictures on the go. The development of apps like Adobe Premiere Rush and accessibility of Blackmagic Resolve will popularize editing amongst us all. The majority of people will know the basics of shooting and editing videos. After all, this is yet another tool to tell a story...like writing, taking pictures and podcasting. And telling stories is what defines humanity.
Some people enter the filmmaking world because they want to share and document their craft. It happened to Andrew Reuter from Project Lab YT channel. Even though we’re thousands of miles apart we collaborated to bring to the surface what most DIY and instructional type videos have in common and how to deal with it most efficiently in the editing. We ended up talking about 5 areas of almost every craft video.
1. Speed/Duration Settings
Time remapping is very common in DIY videos. There’s one detail that distinguishes Andy's technique from what you can see in most videos out there. He uses Speed/Duration option in Premiere Pro and most often he applies the following settings:
- Speed: 1000%
- Maintain Audio Pitch turned on
- Time Interpolation: Frame Blending
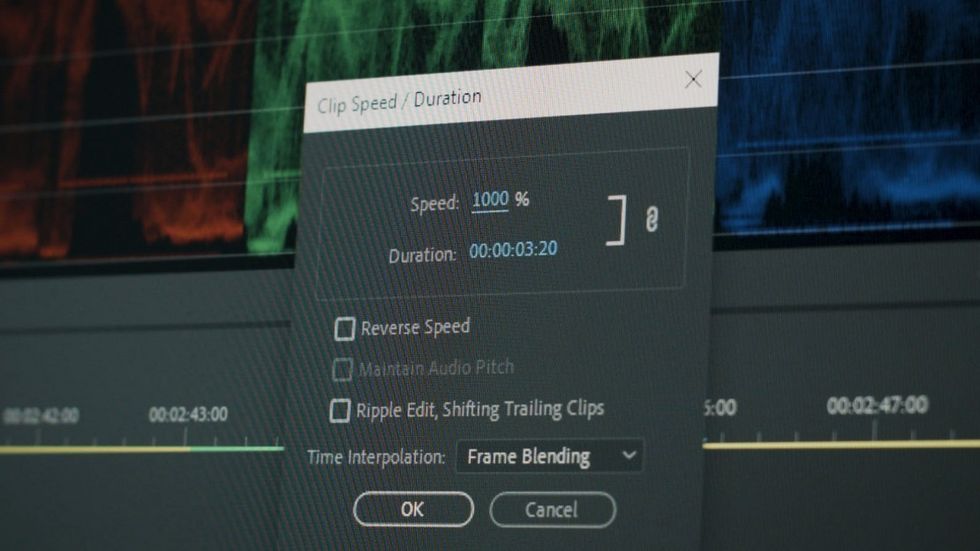
Actually, 1000% speed is a maximum amount if you use Maintain Audio Pitch option. If you need a higher amount you'd have to nest the clip and speed up nested sequence again. What's very important in his method is the Time Interpolation option that he uses. Here's the difference between Frame Blending and Frame Sampling (which is default setting). I think it just looks more interesting for this kind of stuff. Bear in mind that it may not be true for other types of shots. For example, if the camera is moving quickly it can produce very unpleasant, ghosty results.

2. Shooting for Editing and Managing Assets
For DIY videos very often you end up with a lot of footage that you don’t need like assembling a tool or organization of your working space. So how do we deal with that footage and how to make sure that it will edit together nicely?
The first thing we brought up is center framing. The technique used by for example George Miller in Mad Max: Fury Road. If you use it it will be very easy for a viewer to follow the action. In a broader sense, this refers to eye-trace which I already discussed in this article.
Producing this type of videos a maker needs to decide if he wants to record the whole process or just brief moments of most important processes. I think that the sweet spot is somewhere in the middle because while you save storage by shooting only scenes of transformation, you may also end up losing all moments of failure which are so unique and very often make the viewer stick around.
For organization purposes, it's good to use markers and subclips which are available in any NLE I can think of. If you're organized, the editing process will be enjoyable. If you're working in a messy environment then it will be a nightmare. Having hours of footage you need to squeeze into 10 minutes piece, you can really benefit from the organization.
First of all, within the project, it may be useful to make subclips in case of very long clips that only partially have some interesting moments.
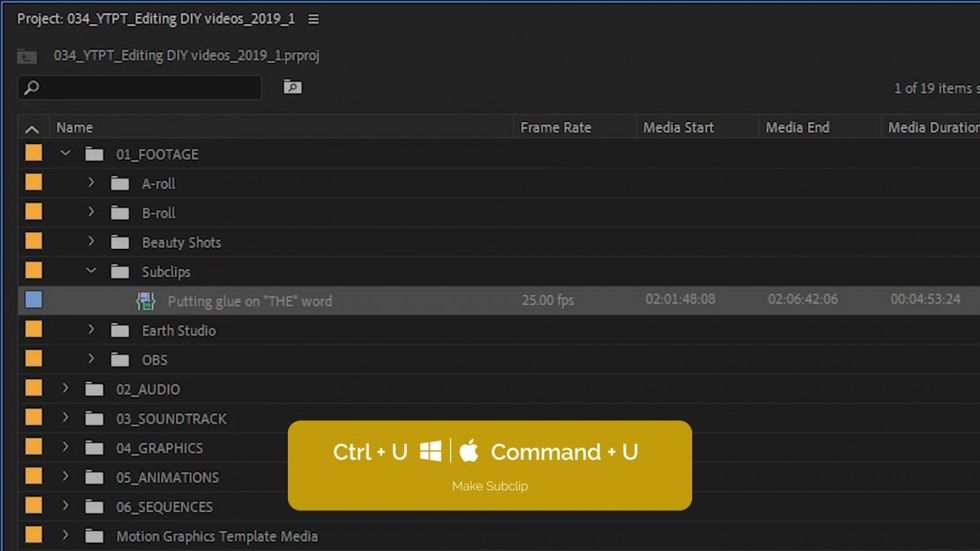
Secondly, clip markers can be very useful not only within the project but across the projects as well. In Premiere Pro there are two types of markers. Sequence markers that live only within a sequence and clip markers that live within the original file itself. At least this is a case if your files support this kind of metadata. To add a clip marker you first select a clip and hit M on the keyboard. If you press M twice then you can add marker properties and description. What’s great about this approach is that if you import this clip to another project all of these markers will be imported as well. Just imagine importing an old clip and having descriptive markers in place waiting for you. Sweet isn't it?
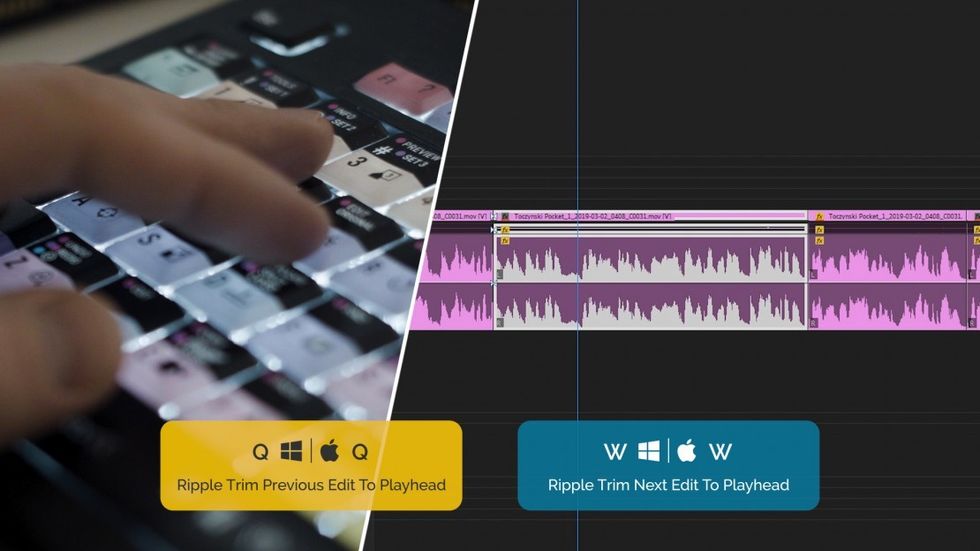
And last but not least: to go quickly through the clips and trim them for the first cut, Q and W shortcuts are just the best. Editing with them you don't need to change tools in Premiere. It's just the fastest trimming method out there.
3. Basic Sound Editing
It's very helpful to distribute a different kind of audio clips on separate tracks. So keep a track for any speaking stuff, a track for sound effects, for environment sounds, etc. Not only it will be easier to move across the project but any audio normalization and applying effects will be more convenient.
Once we have our audio clips distributed across different tracks, we can really benefit from using Audio Track Mixer and submixes. It will allow us to apply effects to entire tracks at once.
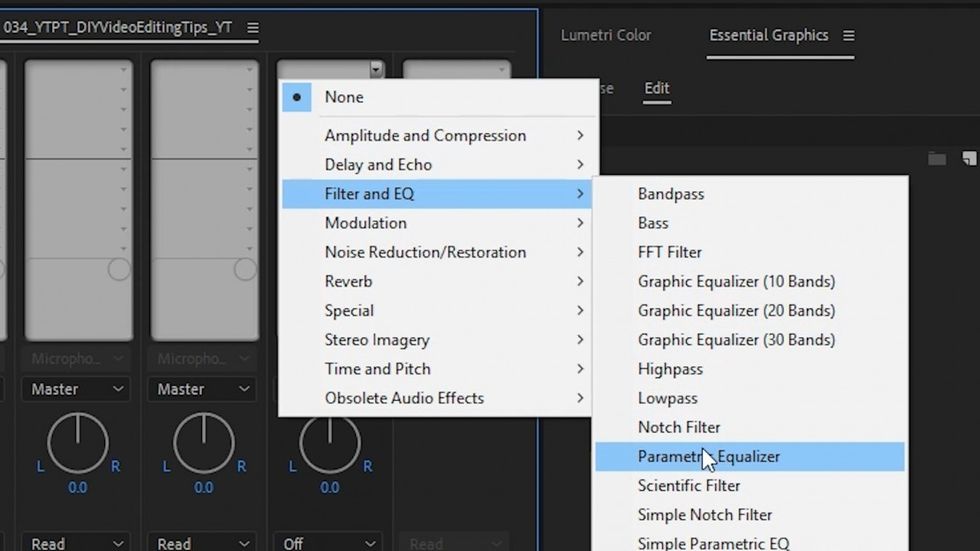
Let’s say we have music clips on tracks 3 and 4. We can create a submix by clicking on the audio tracks area. We assign tracks 3 and 4 to be fed to the submix before master track and now we can add up to 5 effects to the submix that will affect all of our music clips at once.
4. Archiving Projects
Many people struggle with archiving their projects. Generally, I’d advice not to delete original footage because storage has never been cheaper, but if you feel like you won't need all of it anymore it’s best to archive your project with Consolidate and Transcode feature. We can find it in File - Project Manager - Collect Files (on Windows).
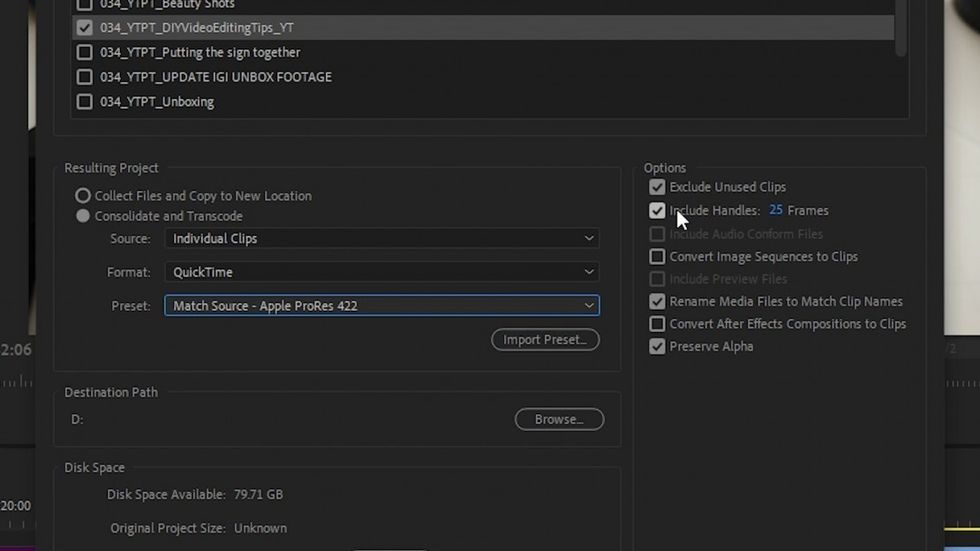
Thanks to this feature all of the source files you’ve used in your final edit will be collected in one location and you can transcode only parts of the footage that has actually been used in the final sequence with handles on both sides. So just choose your final sequence and follow the rest of the settings accordingly.
5. Using Clips from Different Projects with Dynamic Sequences
Whenever you want to import a clip from another Premiere Pro project it’s good to use Media Browser panel for that purpose. Simply navigate to the project file and you’ll be able to open any sequence by double-clicking on it. Next, you can use a pancake timeline technique and drag and drop clips between timelines.
What do you think about this Speed/Duration settings for time-lapse style shots? Is it something you'll use in your productions? Let us know down in the comments.