Final Cut Pro X, Adobe Premiere, and DaVinci Resolve have reigned in the editing space. Each one has a robust set of built-in tools for color grading, but the workflow is handled in slightly different ways.
The downside? A huge learning curve. Especially when it comes to DaVinci Resolve.
For beginners, or creatives that just need a touch of color, the color grading tools from the big three NLE software packages can be an obstacle to the creative process.
That's where Cinema Grade steps in. Creator Denver Riddle hopes his plugin will make the process of color grading you're footage more intuitive, and, according to Riddle’s claims, three times faster.
Initially released on the Mac for Adobe Premiere, Final Cut Pro X, and DaVinci Resolve, Cinema Grade is now officially available for Windows users as of today.
So who says PCs are just for gaming?
But how does Cinema Grade stack up against the heavyweights? Let’s find out.
Cinema Grade at a Glance
Cinema Grade works as a plugin for the big three NLEs. (Sorry, Avid users.) While the workflow is similar between Adobe Premiere and Final Cut Pro, there are a few differences in the Resolve version. We took a look at Cinema Grade in Final Cut Pro by dropping into onto our footage like an effect and then opening the control panel in the inspector.
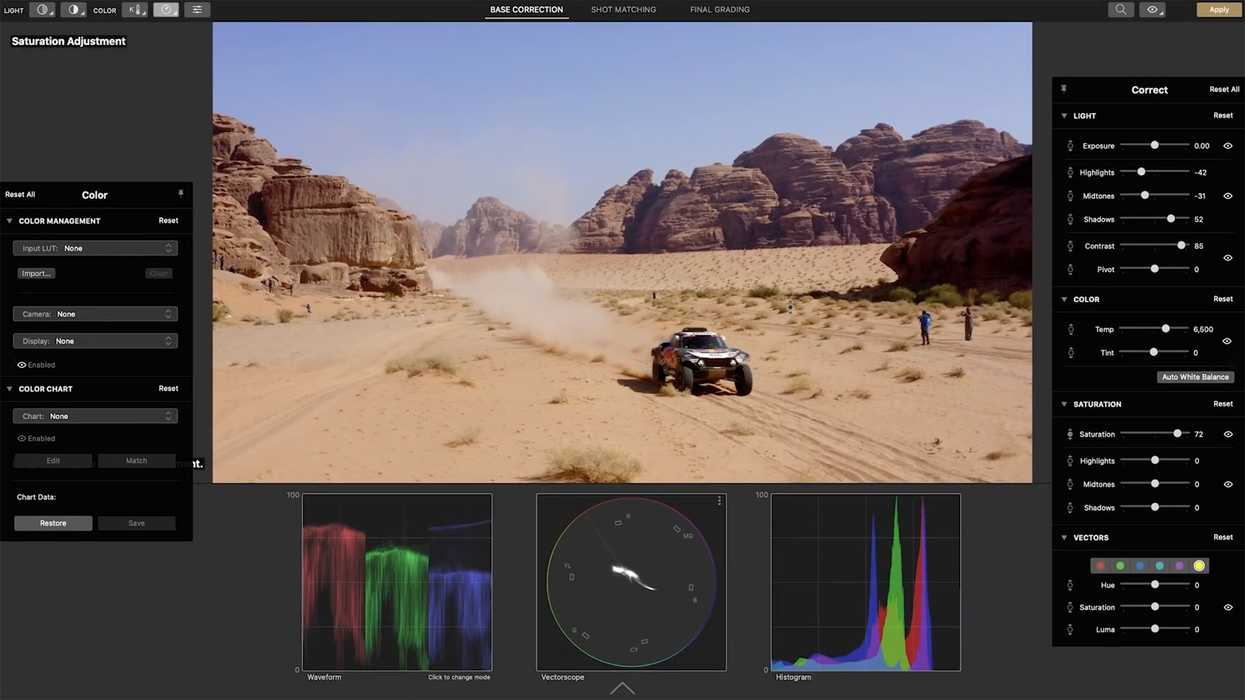
In the new viewer window, you'll see your footage, as well as a menu system on the right where all of your adjustments can be made using a Lightroom-inspired toolset. It covers everything you'll need for exposure, white balance, saturation, and secondary color changes.
Cinema Grade helps with the process of color grading by providing you with a workflow using the progression that is found on the top left of the viewer. Users can work their way from left to right in order to make changes to exposure, then color temperature, and finally finish off with saturation and color adjustments.
In the middle top of the viewer, users will find a page for the Base Correction, a Shot Matching page, and the Final Grading page.
These three sections encompass the entire workflow of Cinema Grade to keep things speedy in the edit bay.
While creatives can use the Lightroom-inspired menu on the left, Cinema Grade works best when making adjustments right on your footage. If your shadows are too bright, just click and drag on them to darken that part of your image. The same can be done with your highlights, midtones, and saturation. Cinema Grade automatically selects the luma range based on what part of your footage you clicked on.
If you want to adjust a single color in your image, Cinema Grade will qualify the region, and only make the adjustments to the colors you selected.
When compared to the tools in the big three NLEs, it’s a lot more streamlined. However, you are giving up super detailed control such as modifying your highlight or shadow range and adjusting the qualifiers. However, CInema Grade does a solid job of doing it for you.
Let’s see how we can implement these tools in a shot of our own.
A Brush on Canvas
Riddle talks about using Cinema Grade like painting a picture. By automatically selecting the color or luma range you need the whole color grading process becomes intuitive for creatives unfamiliar with traditional color grading workflows.
Let’s run a quick test on some footage from Episode #3 of Stupid Cupid, a web series I co-wrote and directed, to see how coloring with Cinema Grade works for us.
 Log FootageCredit: Stupid Cupid
In this shot captured on the Sony F5, we need to add more contrast and saturation. While we can always use a LUT to bring the footage into a Rec.709 color space, the results aren’t always perfect. In Cinema Grade, a few adjustments get us close to a Rec.709 equivalent, with quick access to the tools for fine-tuning.
By selecting our contrast tool in the top left of the viewer, or using the shortcut C, we click on our footage and drag up to increase the contrast. The image is a little desaturated so we'll press the shortcut S, or click on the saturation button in the top left, and do the same. Now we're cooking with gas.
But we're not done yet. Let's use the Shift-E shortcut to get selective exposure and clean up our shadows and highlights. With this tool selected, we can click to drop a node onto our image where were want changes made. We'll start with our shadows and drag the node we just placed and reduce the shadows as needed. The same can be done with our highlights. Click to drop a node and then drag it. All these adjustments feel like painting, and the toolkit on the left keeps track of every change we've made so far.
 Contrast, Saturation, Shadows, and HighlightsCredit: Stupid Cupid
This is where things get super cool.
The image is a little green in the shadows, so we'll push V to get control of HSL Vectors, then click on a dark green part of the image and drag to remove the green. Our skin tones and highlights remain untouched. Only the green in the shadows has been affected.
 Color AdjustmentCredit: Stupid Cupid
With only a few steps, we have corrected our image and fine-tuned the color.
To finish things off, Cinema Grade comes with a library of looks to elevate your footage. Let's move to the Final Grading page and open the Look Selection menu on the right side. We'll choose the Kodak Porta 400 look, adjust the mix in the toolkit, and raise the exposure a little to compensate.
 Kodak Porta 400 LookCredit: Stupid Cupid
Grading by selecting the part of the image I wanted to change really was intuitive and allowed for a quick turnaround. In a high-paced color grading environment, every minute can save you money.
While Premiere, Final Cut Pro, and Resolve can offer the same tools, Cinema Grade lets you interact with your image like a brush on canvas.
What About Multiple Shots?
This is where the Shot Matching feature comes in. By picking your hero shot and making the adjustments you need, Cinema Grade will match the other shots in the sequence. While it's not perfect, only minor adjustments are needed to fine-tune the sequence you're working on.
Let’s look at how Riddle tackles a series of shots from the same project. By color grade one shot and using the Shot Matching feature, the entire sequence is color graded in under two minutes.
Unfortunately, the Shot Matching feature is only available in Final Cut Pro and Adobe Premiere versions of Cinema Grade.
Is Cinema Grade Right for You?
Color grading is built upon decades of knowledge, research, and trial and error. Yet as the process becomes more democratized, more and more creatives are jumping into the pool. The learning curve remains steep, however, and getting the right hardware can be expensive, especially when you dive deeper into Resolve and discover the vast array of tools it offers.
Cinema Grade is a new way of looking at color grading when compared to the more traditional way of doing things. It connects the changes you make directly to the image you are trying to manipulate, and for $69 (Standard Version), it's a cheap way to learn how different adjustments affect your footage.
 Credit: JC Gellidon
Is it right for you?
If you’re a colorist already working in the industry, probably not. It may offer a new way to color grade your projects, but it can be hard to teach an old dog new tricks. If you need more advanced features such as power windows and motion tracking, Cinema Grade may not be for you.
But if you’re a creative that knows little to nothing of the traditional process, Cinema Grade can be a welcome introduction to the magical world of color grading. It’s fast and intuitive, we can agree on that.
With plugins like Film Convert, Dehancer, Colourlab.ai, and now Cinema Grade on Windows, color grading has never been more accessible. Most of all, it's never been as fun.
Whatever your needs are, there's a myriad of budget-friendly tools at your disposal. So go shoot something and start making magic.