Nothing will sideline your cinematic efforts quicker than bad audio. The minute your audience hears crackling, humming, or distortion, you better believe they're not going to want to stick around to hear the next minute, which is why it's paramount that you know how to both record good audio and fix problematic audio in post.
In this video, Jordy Vandeput of Cinecom lays out a few tips that will help you do just that, including protecting your mics from noise to treating a room to avoid reverb. Check it out below.
Get Rid of Noise
There's more noise going on around you than you might realize—even if you don't pick it up, your mic definitely will. Traffic from a nearby road or freeway, the hum of a refrigerator, or even the engine of a passing commercial jet can make its way into your recording without you even realizing it, so it's important to survey the area in which you're recording and take note of what you hear.
Unplug electronics if you can, including (again) refrigerators, air conditioners, heaters, clocks, or anything else that is ticking, humming, or hissing in the background. Try to shoot far enough away from traffic that you can't hear the passing cars. Survey the skies and ensure that there are no planes up there trying to ruin your take.
Also, make sure that there isn't any inadvertent noise being made by your sound recordist or sound equipment. Secure all loose cords, throw a windsock over your boom, and get your audio settings right.
Treat the Room
If you're recording sound in a room, one of your major obstacles is dampening reverb. A space that has a lot of hard surfaces, like a home with hardwood floors or a warehouse with floor to ceiling cement, is going to have sound bouncing all over the place, so you need to find ways to absorb those sounds before they're able to do that.
This is called sound treating, or "treating a room". You choose a material that is good at absorbing sound waves, which could be anything from professional sound panels to thick, heavy blankets, and set them up around the space you're recording in. Now, this is pretty easy if you're only recording sound—you can literally put them up all over the place—but if you're also shooting audio, you can use some portable sound panels to try and diffuse reverb or even record ADR later on.
Here's a great video from Caleb Pike that shows you how to make your own versatile sound panels:
Watch Out for Pops
Even if you're not very experienced working with sound, you definitely know about pops. Those big plosive P sounds can ruin your audio really quickly, and your first instinct might be to move your mic further away from your subject.
However, getting your mic nice and close is good practice (for a lot of reasons), so instead of doing that, throw a foam mic cover or windscreen over your boom, or if you're recording in a studio, a pop filter.
Avoid Clipping
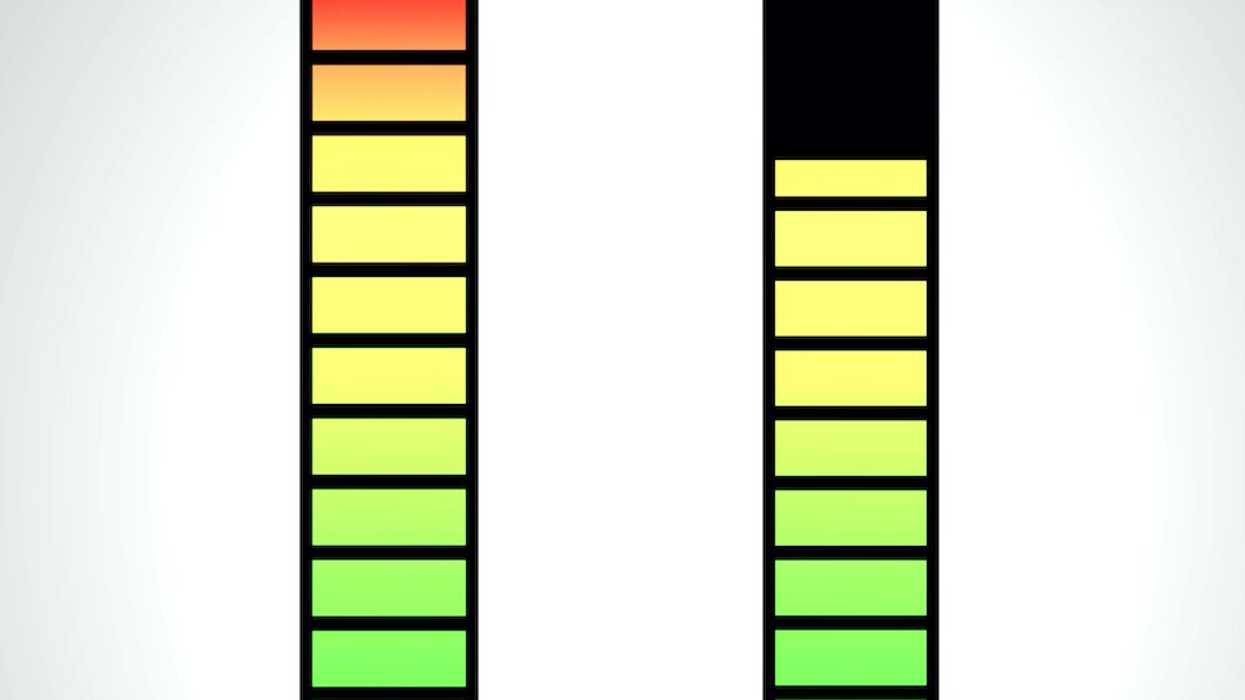
Okay, what's clipping? To put it simply, it's when your audio is too loud. You know it when you hear it because your subject begins to sound like they shapeshifted into an electric guitar with lots of distortion. Now, sometimes you can't avoid clipping, especially if your scene includes both soft and loud noises, like a quiet argument that devolves into a shouting match.
So, one way to address this is to record your audio on two different tracks: one set to the industry standard volume, which is around -10dB to -12dB, and one set to a lower level that doesn't clip during the loudest sound.

Source: Cinecom