
Smooth camera movements are one of the simplest ways to add production value to a shot, but dollies and sliders can be extremely expensive. Luckily, a high-quality DIY slider can be had for about $75 and three hours of your time.
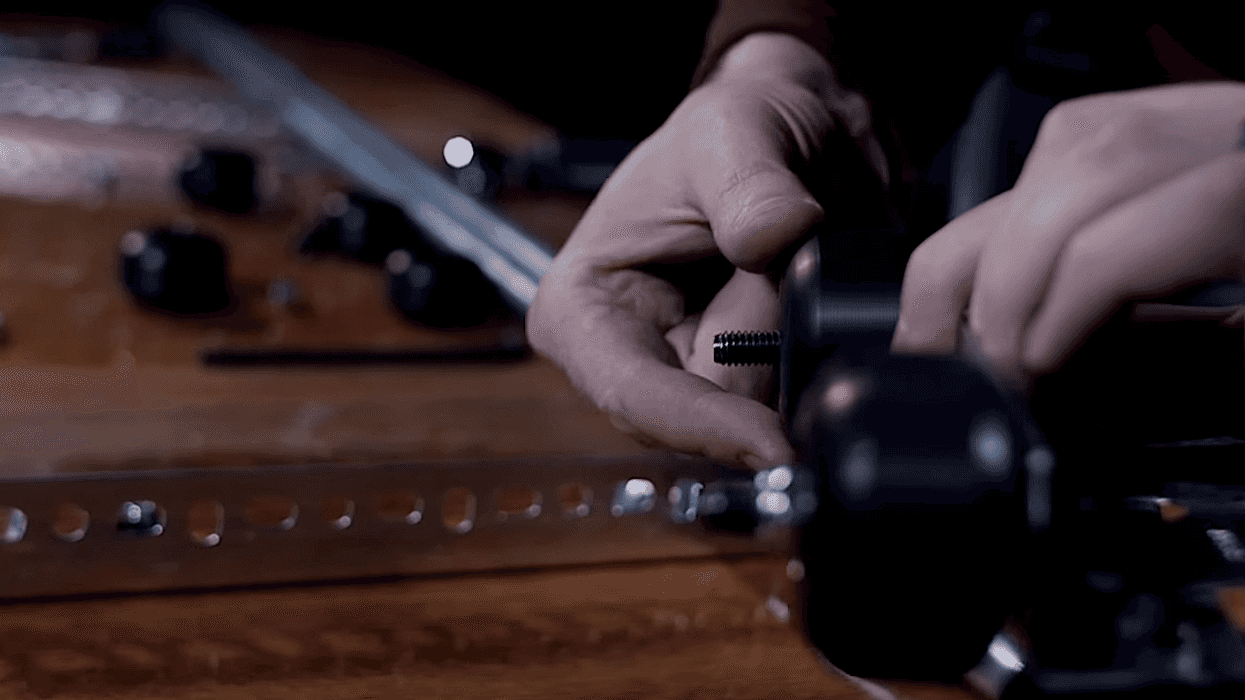
Kyle Hart, the man behind Rhino Camera Gear -- and the creator of one of the most versatile sliders on the market -- recently put together a quick tutorial/BTS video of his challenge to build a slider from scratch in just three hours. The resulting video is as entertaining as it is informative.
Obviously, pre-fabricated ball bearing sliders like the variations from Rhino will provide the best results with the most versatility and flexibility, but for a slider that's quickly assembled from basic parts bought on a limited budget, the results here are absolutely fantastic. If you're interested in building this slider yourself, you can download a PDF version of the instructions here. Just a heads up, you'll have to subscribe to Rhino's mailing list to get it.
Have you ever built a DIY slider? If so, share your process and results down in the comments!
Your Comment
27 Comments
Very cool video, although at 75 bucks, I'd just go for real slider, even if it's just the cheapest one on amazon.
December 29, 2014 at 12:23PM
Having worked with some really cheap friction sliders in the past, I can tell you that you'd be much better off going this route.
December 29, 2014 at 12:56PM, Edited December 29, 12:56PM
This is a real slider...
December 29, 2014 at 2:22PM
Yeah, you're absolutely right. I didn't now a better way to say a slider manufactered by a proper company.
December 29, 2014 at 3:33PM
Well, I've got one of these...
http://www.amazon.com/StudioFX-Camera-Slider-Dolly-Stabilizer/dp/B00BOGO...
For an additional 35$ you get the added ability to mount the slider horizontally, you've got a knob to give it more or less resistence, you've got adjustable and removable feet and a carrying bag...
Of course I can't compare the smootness of both systems.
December 29, 2014 at 3:29PM
*vertically
*smoothness
December 29, 2014 at 3:32PM
I love this tutorial.
I can't wait to build one myself.
One question though. Do you think this would be mountable on a single tripod?
If so, how would you go about creating a bracket that can mount it on a heavy duty tripod?
Thanks so much guys. Can't wait to see what you come up with next.
December 29, 2014 at 2:45PM, Edited December 29, 2:45PM
We'll discuss it and maybe create a tutorial down the road for something like that. The big danger with less stability (especially with this DIY system) is that a small slant means your carriage and camera will move quickly and run the risk of falling off the slider.
December 31, 2014 at 9:56AM
While for the $75 price range I will stick with a manufactured slider, but I will say that in a pinch, this would be a great substitute. And if you wanted to, you could get the rails at practically any length and build a long stinkin' slider. And you could take their idea further and with a little ingenuity, you could turn it into one that could go vertical as well. A lot of possibilities here.
December 29, 2014 at 5:37PM
For DIY sliders the V-Slot system takes some beating. I've constructed a couple using this stuff, both have an Edelkrone style dual action movement along with adjustable panning action and motor drive. Using fast and slow motors, I use them for time lapse and video.
http://uktripper.com/visits/diy-time-lapse-and-video-camera-slider/
http://uktripper.com/visits/diy-time-lapse-slider-with-panning-action/
December 30, 2014 at 11:27AM
Agree all around on buying a prefab slider at this price range, but the foundations of what they're doing here is an amazing starting point for, say, a dolly+rails set-up on a miniature scale, which comes in handy for those miniature-budget shoots! I putting this one in the toolbox for future reference.
The catch with all DIY stuff in general is that for only a little more $ (sometimes) and a lot less man-hours (always) you can get yourself something manufactured, tested and reviewed. Also, unless you're shooting your own flick, showing up on set with DIY stuff does not make one look like a professional.
December 30, 2014 at 11:22AM
Pro tip: slap Bogen stickers on all your DIY gear.
December 30, 2014 at 2:01PM
Brilliant!
January 1, 2015 at 12:00PM, Edited January 1, 12:00PM
I would be interested to see what kind of tripod head they used and how they attached it. That's really the one thing missing from this video. Can anyone share some other tutorials on properly mounting a tripod head to a slider like this? I just got a 65mm ball head and don't want to break it just yet.
Also, I am sure that the price is higher than it should be because of the skateboard wheels and bearings. As a skater, I have extras lying around my house, so it should be way cheaper for me. Wheels and bearings can cost around $40 at the cheapest.
December 30, 2014 at 12:43PM, Edited December 30, 12:43PM
At 9:35, there's a closeup of the connection. Looks like they pulled the heads off the tripods and just used the 1/4 or 3/8 stud at the top. If you wanted to use a nice bowl head, couldn't you just pull off the quick release plate and wing nut that to this slider - or leave the QR plate on the head, line up the 1/4" stud that would normally go into the camera through that hole?
December 31, 2014 at 9:39AM
Griffin, we were using a 3/8th's inch bolt (spaced with washers) to attach the tripod head. If you wanted to attach a camera directly, you'd want a 1/4-20 inch bolt (also spaced with washers).
And you're right, the skateboard wheels and bearings DID cost us $40, so this slider would be WAY cheaper if you already had that stuff.
December 31, 2014 at 10:02AM, Edited December 31, 10:02AM
Second-hand stores have inline skates for dirt cheap.
January 2, 2015 at 6:31PM
I find it amazing that a guy who makes a living making sliders would make a tutorial on how to make a great slider cheaper than the ones he sells.
December 30, 2014 at 1:21PM
It is amazing :)
Though to be fair, and honest, it has nothing on our sliders in terms of quality, functionality, or how long it will last. But we wanted to create and share something which worked when you had no other option, or were on a really limited budget. We don't really expect to see professional videographers using this DIY option unless their in a real bind or want a 'disposable' slider for one reason or another (think using it in saltwater, for example...)
December 31, 2014 at 9:59AM
Another thought, I bet a system like this would be really easy to upgrade to a curved track. This would be good for macro shots so you don't lose focus on your subject at the ends of the track.
December 30, 2014 at 2:02PM
I dig this DIY slider, too, and I wonder what's the best approach to make the kind of camera platform that is similar to Dana Dolly's. The wheels swivel on the Dana Dolly, which makes it better to use for curved tracks.
December 30, 2014 at 11:37PM
A lazy susan bearing might be a good solution.
January 3, 2015 at 11:23AM
Camonwheels has some affordable u groove wheels. In order to be able to use on pipes, I just replaced the wheels on a Pico dolly.
January 1, 2015 at 6:41PM
I made one with L-channel as the rails. It allowed me to mount a center plate for single-tripod use.
Second-hand stores have inline skates for cheap or you can use castors in a pinch that are cheaper than skate wheels and have a variety of mounting options.
January 2, 2015 at 6:34PM
Inspired in your project, here are my cheap version of Camera Slider. Only $8 USDhttps://www.youtube.com/watch?v=gYcdmeezMyA
June 26, 2015 at 3:40PM
Inspired in your project, here are my cheap version of Camera Slider. Only $8 USD.
https://www.youtube.com/watch?v=gYcdmeezMyA
June 26, 2015 at 3:41PM
Nicely done. I made a tutorial for making a motorized slider with a parts list. Check it out: http://www.midwestlenticular.com/diy-camera-slider
September 4, 2015 at 4:45AM, Edited September 4, 4:45AM