[Editor's Note: No Film School asked Timur Civan to conduct an exhaustive LED shootout.]
Last year, I compared 11 LEDs on this site, merely out of curiosity. I was looking to buy LEDs, but, having used some of the older classic LED panels, I was concerned about the quality of color; LEDs at the time were not known for color accuracy. There were tons of reviews online, but very few direct comparisons between the brands, and not much actual data about the color quality available. So I borrowed a C700 from my friends at Sekonic and went to B&H—the only place with a showroom full of LEDs—and I started metering the lights. I purchased the brand I thought performed the best and shared my findings here.
LED lights for filmmaking are trying to achieve a few things: match Tungsten, match daylight, or create RGB blends to for pure colors.
This year, as a follow-up, I wanted to go a bit more in-depth to seek accurate results with a wider variety of lights. Not everything on my wishlist made it to the set, but we got a wide range of lights from all price points, covering the major manufacturers—both legacy and newcomers.
What to Expect
In this post, you'll watch videos of the tests and then have the chance to read some of my thoughts on each light. The videos are self-explanatory, for the most part, but here is a quick breakdown:
The Main Test
The first video starts with the control light for each group, daylight and Tungsten. Then, it cycles through the different lights, one after another, full screen with the C700 readings displayed on the right side, so you can see what is happening with regards to the spectrograph and magenta/green readings.
Direct Comparison
The second video is a direct, side-by-side comparison of each light versus the control. For example, the daylight or Tungsten control shot will be on the left side of the screen, and the LEDs will cycle through as they did with the first video, but this way you can directly compare the color quality versus the control group. This is where you really see the differences.
Color Correction
The third video is similar to the second, but this time, halfway through each LED clip, the LED images will be manually white balanced with the dropper tool using the gray card to neutralize the color. This third video is intended to show you the possibilities of what the light can look like when simply corrected to neutral in post. At the top of the "data" section, you can download R3D stills of each light as well as the Waveforms and RGB data sheet if you want to examine anything more closely. Your eyes will be the best judge overall. Do your best to watch on a calibrated monitor.
The Lights
Here are the lights we tested (in ascending price order). More specs for each are listed at the bottom of the post:
- The Sun - Free
- ARRI: 1k Tungsten - $599
- Aputure: Light Storm LS-1 - $695
- Ikan: Lyra LB10 Bi-Color - $799
- Westcott: Flex X-bracket Bi-Color - $899
- Hive: Wasp 100-C Omni - $999
- Westcott: SkyLux - $999.90
- Dracast: LED1000 PRO Bi Color - $1220.63
- Rayzr: 7 - $1,269
- Litepanels: Astra BiColor - $1,350
- Quasar Science: QLED - $1400 ($250 per bulb, we had an array of 4 with Housing)
- F&V: Ultra Color K8000 2x1 BiColor - $1,679
- Light and Motion: Stella 10,000 LED - $1970.80
- Fiilex: Q500-AC 5" Fresenel - $1,995
- BB&S Lighting: PipeLine Remote Phosphor 4' LED Bank - $1,997.45
- Cineo: Maverick (Tungsten & Daylight units): $2,150,50
- Zylight: F8 LED Fresnel : $2,250
- BB&S Lighting: Area 48 - $2,269.95
- ARRI: L5-DT Daylight - $2,338
- Kino Flo: Select 30 DMX - $2,386.88
- Mole Richardson: Junior LED 200W Tungsten DMX - $2,409.95
- Fiilex: Matrix Bi Color Panel Light - $2,495
- Hive: Wasp Plasma Par - $3,279
- Outsight Creamsource: Doppio+ Bender Bi Color 2x1 LED - $3,695
- Cineo: HSX Color Tunable Fixture - $3,735.33
- Kino Flo: Celeb 401 DMX - $4,628.95
- ARRI: Skypanel S60-C LED Softlight - $5,625
- ARRI: M18 HMI - $10,515
The Meter (and how to read it)
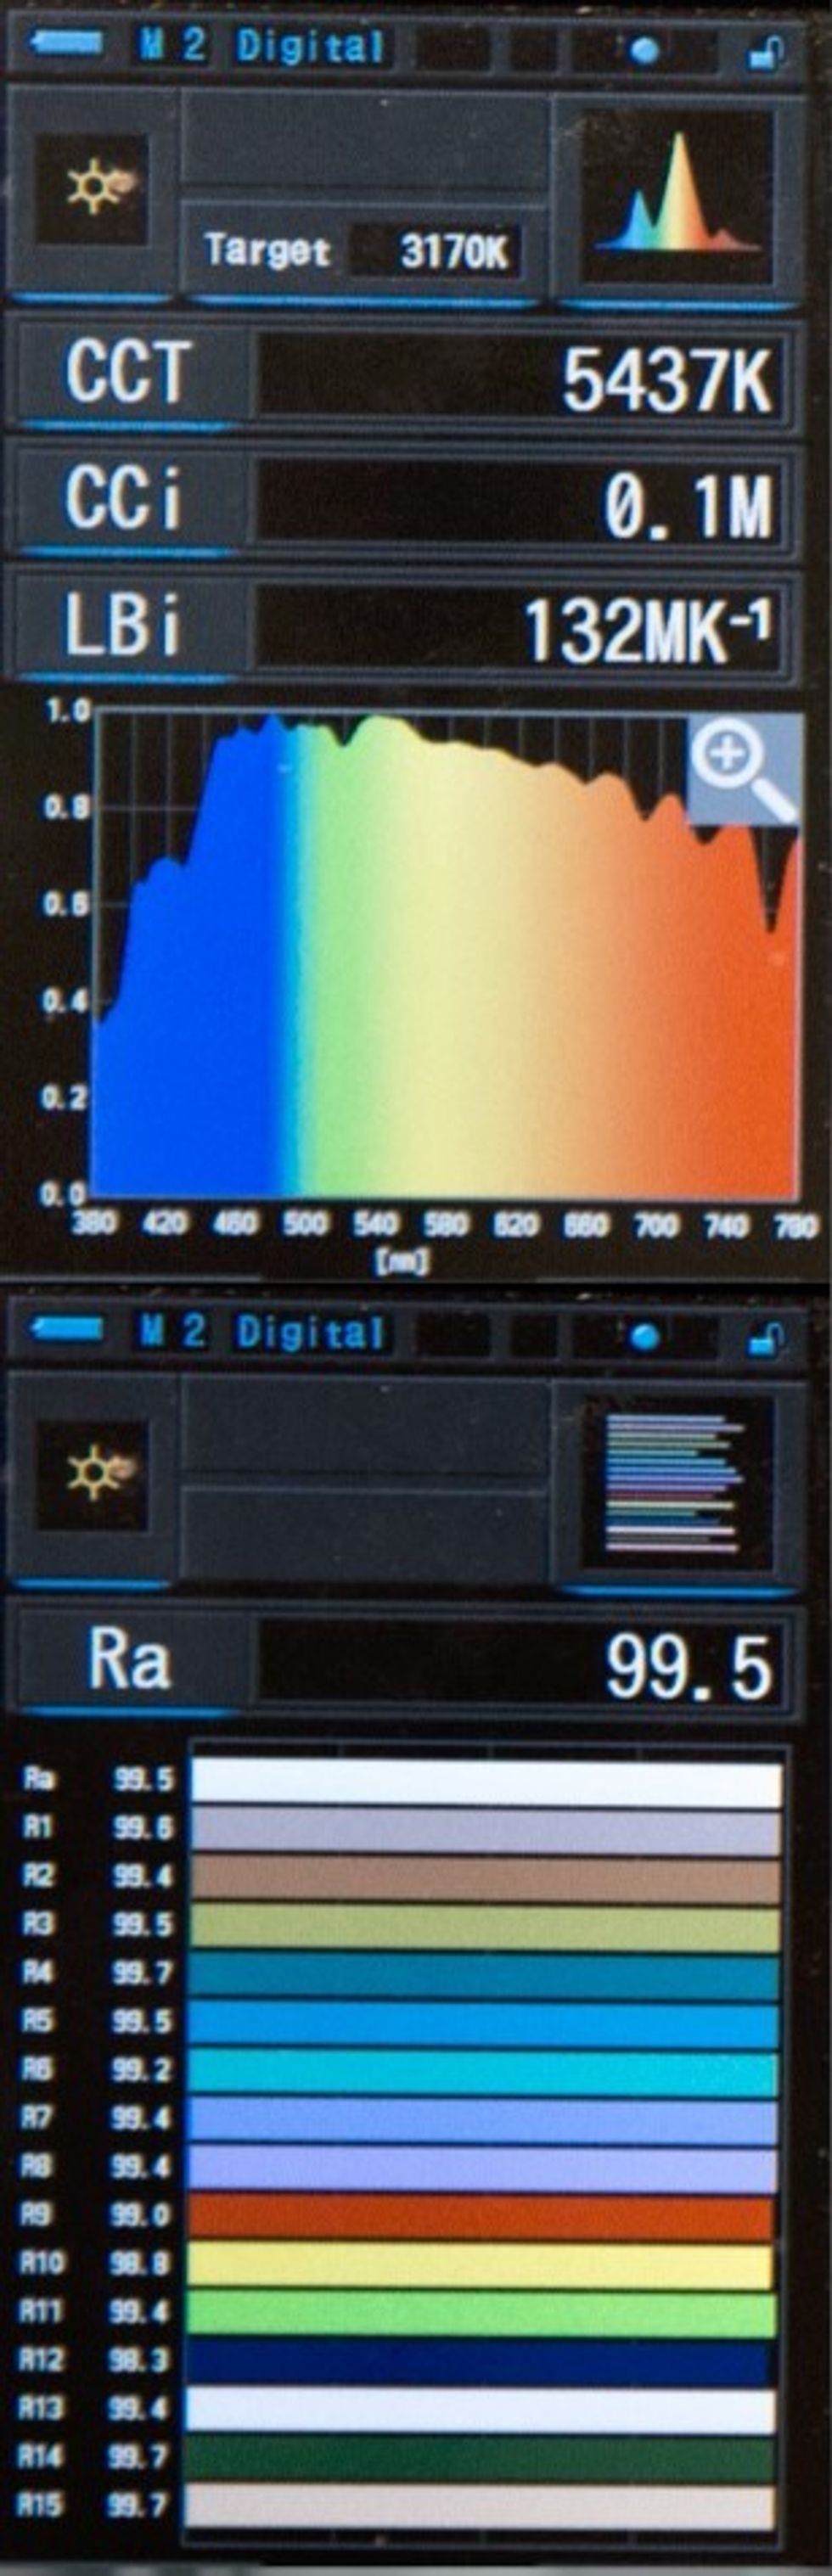
Next up: the Spectrograph, a graph plotted on two axes. The horizontal is the wavelength ranging from 380nm (nanometers) to 780nm. The vertical height is the saturation of that specific wavelength. Theoretically, a perfect light source would be a full rectangular block of color, fading slowly through the rainbow from blue on the left, to red on the right. Real life doesn't quite work that way, so you will see waves, spikes, and bumps in the curve indicating that certain wavelengths are being represented differently. The atmosphere, pollution, and water vapor all affect the sun's rays, hence the slight warbling of the graph. I suspect that if you took the C700 into the vacuum of space, the whole graph would be a rectangular block of solid spectrum.
We are interested in the quality of "white light" color being output by an LED system, and how closely it can mimic Tungsten or daylight sources.
The last thing to look at is the CRI, which is not critically important here. I go into why a bit later, but essentially, the very nature of the way CRI registers color is that it averages the illumination on the 15 color chips you on the bottom bar graph. It doesn't really measure the way LEDs work. All LEDs have a discontinuous spectrum that can fool a CRI meter. That said, it's not altogether useless—just not refined.
The Videos
The Method
LED lights for filmmaking are trying to achieve a few things: match Tungsten, match daylight, or create RGB blends to for pure colors. In this examination, we are interested in the quality of "white light" color being output by an LED system, and how closely it can mimic Tungsten or daylight sources.
I set out to achieve this by shooting two control groups: daylight and Tungsten. In the frame is a standard color checker chart, gray card, white card, and three live models. Each model represents a skin tone you will likely encounter on various sets: one dark-skinned model, one middle-toned model, and one fair-skinned model. This variety of standard charts and models will show you how color rendition can be affected by the discontinuous spectrum of LEDs.
We pointed an ARRI 1K fresnel at the scene. Then, we again set up the charts and models under the noon midday sun with a southern exposure and metered the color temperature of both scenes with a Sekonic C700-U Color Meter. The Tungsten unit metered at 3165K. We rounded up to 3170, because the digital target temperature in the meter only operates in increments of 10 degrees Kelvin. The sun metered 5437K and I rounded up to 5440K as a target temperature on the meter.
On the slate, we recorded the control color temperature permanently for ease when making the comparison. Essentially, you can tell the meter what color temperature you are trying to hit, and it will give you a sense of how far off the mark you are in terms of temperature and magenta/green shifts. This is useful because it shows you how much green or magenta you need to add to the light to correct it to your target reading. (This information will be displayed on the meter under the CCi reading.)
We wanted the LEDs to be used as they would in real life—either as a supplement or in some cases the primary lighting source in a scene.
With this baseline data, we wanted the LEDs to be used as they would in real life—either as a supplement or in some cases the primary lighting source in a scene. This means that you want your LEDs to match other sources so that there are no strange color shifts that can poison the look of a scene or create an unnatural skin tone. Using the target color temperature we selected on the C700-U, we used all of the tools on the LEDs lights themselves to dial them in to match the color temperature as closely as possible. This way, the LED had a fighting chance to perform at its best.
Some LEDs represent daylight as 6000K on their dials and Tungsten as 2900K—rather far off from the actual 3165K of a real Tungsten light or the 5437K of the actual sun. However, using the bi-color abilities, you can tune the color temperature to your liking. Most units allow for fine-tuning, others are rougher, and some are fixed at one color temperature. Turning the dial all the way to blue doesn't necessarily make daylight; sometimes you need cooler or warmer to match what's actually in the environment. This is why the meter is so important: it allows you to dial in as close as possible color wise.
At this point, once we knew the actual control color temperatures, we took the camera, a RED Weapon Helium 8K, set to RedLogFilm/DragonColor2, and manually white-balanced in RCX from a still frame off of the white card. Our DIT Thomas Wong took the RedLogFilm image into Resolve and build a simple LUT that made black touch black and white touch white without touching any other color settings. That newly corrected image was the baseline from which the different LED units would be compared; it was completely neutral (manual white balance), accounting for any color from the lens, a Sigma ART 85mm F1.4, the sensor of the camera, OLPF, or anything else.
The Goal
There will be no winners picked here. Different lights have different uses, price points, and form factors. This is simply a way to see how the different lights look side by side. Some people prefer the color of one system over another. Sometimes a light's features are what's important. The perfect LED that's nearly $5000, 4' wide, and 25 lbs isn't going to help the action cinematographer documenting a Mount Everest ascent; he or she may need the self-contained, battery-powered lights that are the size of a soup can and can be thrown into a backpack before heading off for adventure. This test is intended to help you find what works for you and what you shoot.
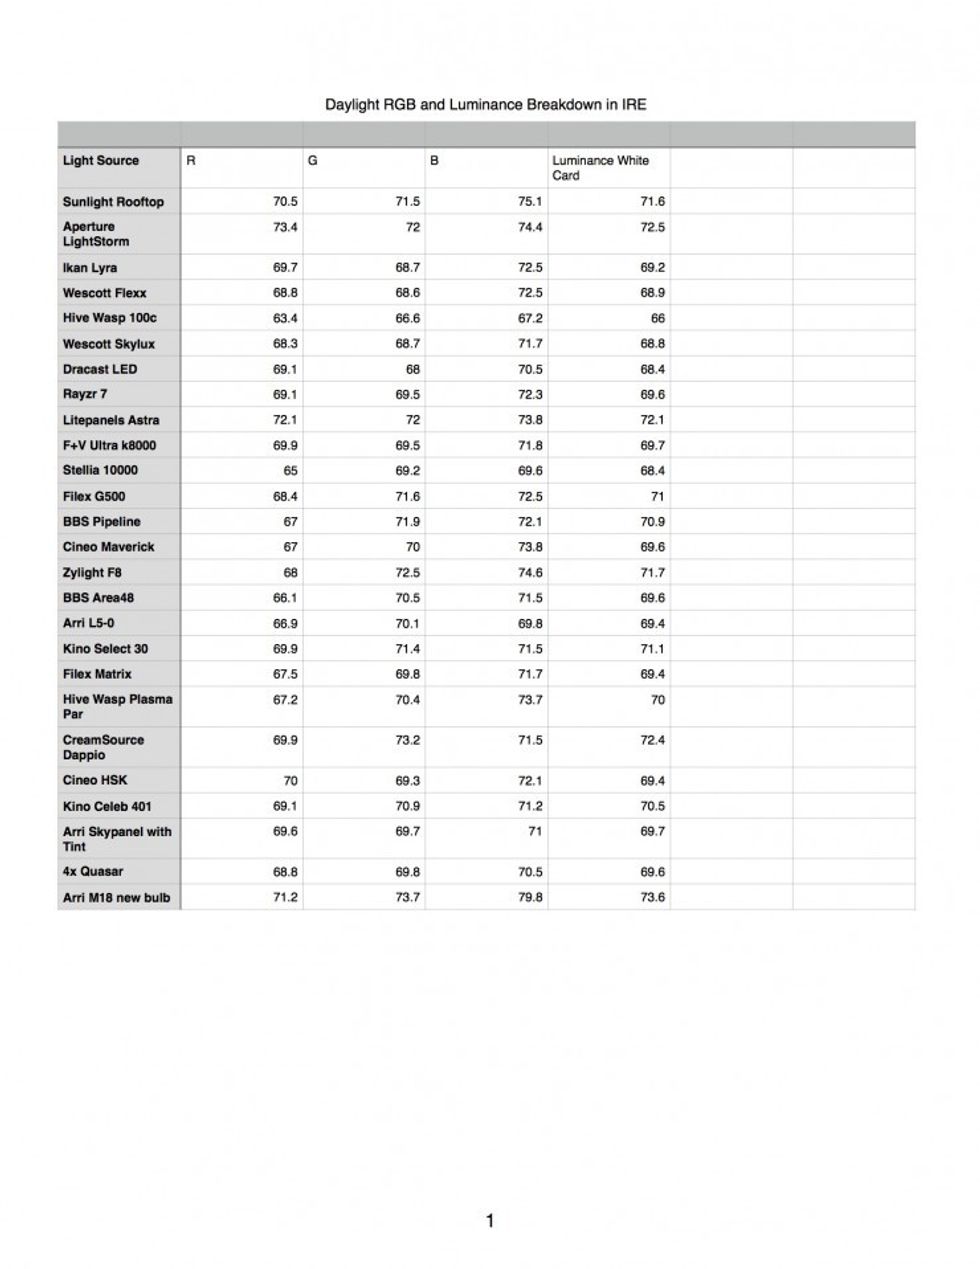
The Data
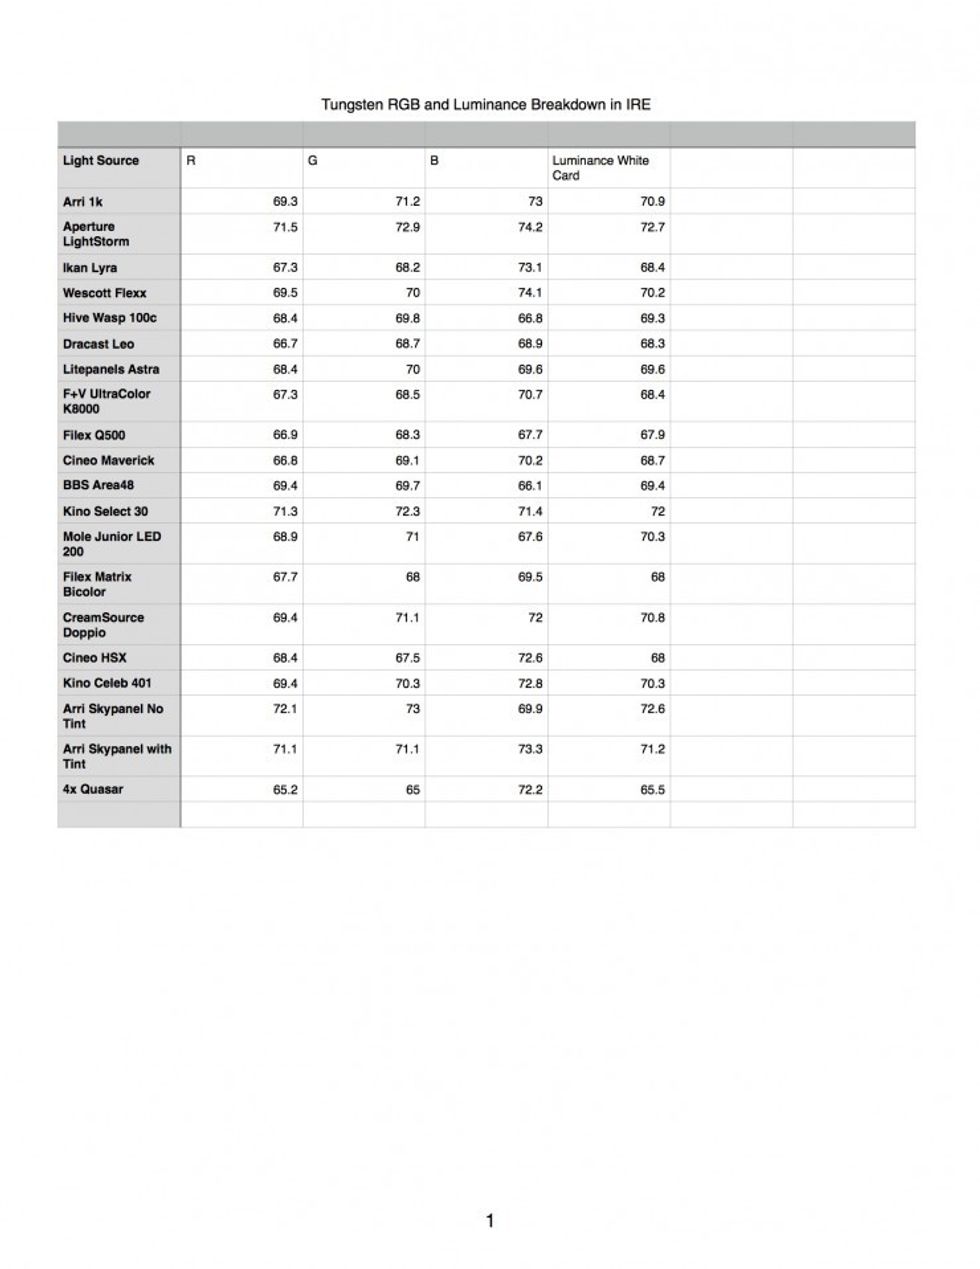
You can download a data packet here that contains LederScope RGB Waveforms, the RGB values in IRE datasheet, and RED Weapon 8K R3D stills so you can see how they grade. These are in 8K RedcodeRAW 5:1 compression and the native RedLogFilm. The LUT used on set can be found here.
In our previous test, we relied on the CRI rating and the visual look of the light hitting the scene. In this test, we rely a bit less on CRI and more on the DIT's analysis using a Leder Scope, spot-metering the white card. What you are looking at in the data below are the three RGB points on the white card that make up "white" on a color image. The values represent IRE on a scale of 0-110 IRE. The exposure on the white card was about 72IRE, with some fluctuation.
We put less emphasis on CRI because LEDs have a discontinuous spectrum. Much like with fluorescents, the spectrum will have sudden and drastic gaps and spikes.
Each light had a different falloff pattern. Our exposures were set to the 18% Gray chip in the middle of the scene. The different falloff patterns led to slight variances in the final exposures of the white chip on the left of the frame. The three RGB levels, when blended, will make up the normal "white light" color image. What you are looking for here is a similar to daylight balance between three colors. The readings for natural daylight, for example: R: 70.5IRE, G: 71.5 IRE, B: 75.1 IRE. This is the baseline: red being weakest, green slightly above red but overall matched pretty closely, and blue having a distinct strength. You are looking for a similar pattern from the LED: Red/Green pretty close to each other with a strong blue a few points higher to balance them out.
The readings on the LEDs were taken after all the white balances had been done for the control groups, daylight and Tungsten. The white card was reading roughly 72 IRE, with the Gray card reading 50 IRE after the LUT was applied. Bear in mind, if either the Red or Green seem to overpower the other in a way that breaks the pattern established by the Tungsten or daylight, it's going to affect the image. A strong green channel or a weak red will look green. A weak green channel looks magenta. A weak red will make the image feel cool; a strong red, warm. The three work together to create the colors we see in an additive color method. It's all about balance. There is a chart below that lists all the RGB values for each light.
These three numbers speak to the true sense of accuracy in the recorded image. If the LED can put out numbers similar to the sun, it will look similar in color quality. We put less emphasis on CRI (Ra rating on the meter) because LEDs have a discontinuous spectrum. Much like with fluorescents, the spectrum will have sudden and drastic gaps and spikes that can be too small be detected on the spectrograph, without specialized, high-sensitivity equipment.
These gaps and spikes, depending on where they line up on the spectrum, can fool a CRI meter into giving a high CRI reading, simply because the gaps happen to not be where the CRI detection chips are looking. CRI was initially an 8-color detection pattern. Then, seven additional chips were added to increase its accuracy. But in the electronic nature of LED, and how suddenly and sharply its spikes and gaps can appear, they can sometimes go undetected or over-represented in a CRI reading. It's still okay for a ballpark judgment, but I wouldn't use that as the one and only determining factor.
Using the Leder Scope method, in conjunction with our eyes, and to some extent CRI, you get a fuller picture of what the light is doing on a technical and perceptual level. In this case, we trusted a DIT, his eyes, and the data from his Leder Scope in conjunction with the other pieces of information the C700 gives us: magenta/green shifts, and accuracy to color temperature in Kelvin.
 You are looking for how closely each light mimics the daylight control. (*Quasars are out of order because they were last minute arrivals and tested 2nd to last)
The Controls
1: Daylight: The sun
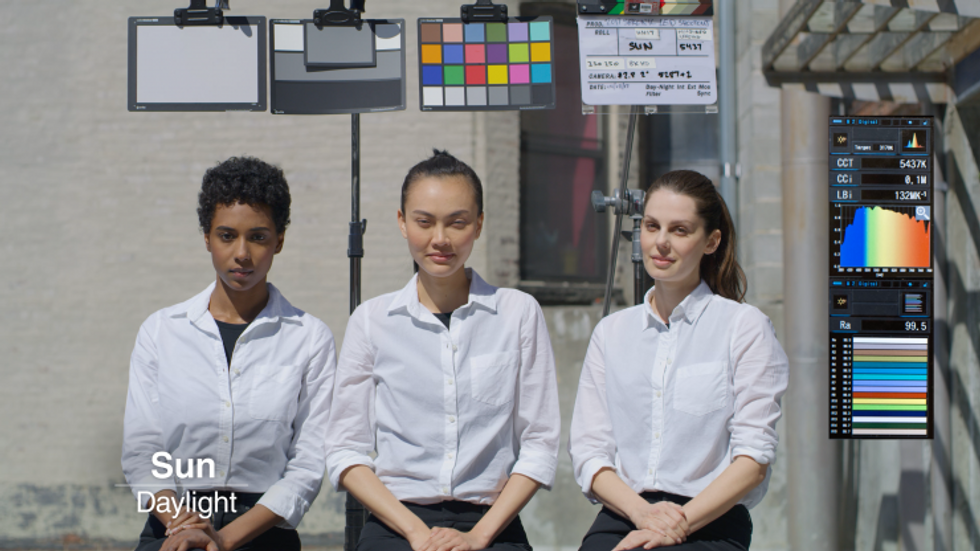 The sun. Fusion based light source. It's really bright.
We shot at about 1PM on a cloudless, clear day in NYC, facing southeast so the sun was at an angle matching that of the LED units. It metered at 5437K. As you can see, it has a rich, fully saturated (the vertical vector on the Spectrograph) range of color. It has heaps of every visible wavelength. It is the purest form of light we have. All three models look perfect. Their skin tones are beautiful, the white in the shirts, white card and gray all look great, not to mention the richness of the color checker.
The sun is essentially completely neutral. Only at dawn or sunset does the angle of the atmosphere affect the color of the sun and cause it to be dramatic. What is important here is the saturation of the blue and red channels on the spectrograph. There is so much light on those ends of the spectrum, and that's what gives the feeling of rich colors. The spectrum is fully balanced. Take note: the LEDs just can't reproduce the density of light in those ranges. This is why there will always be an overall warm feeling from the LEDs, regardless of manufacturer. The blue end of the spectrum is just so strong.
Distance to Chart: 93,300,000 Miles.
RGB Values: R70.5 G71.5 B75.1 This is the baseline for daylight.
2. Tungsten: Arri 1K - $599
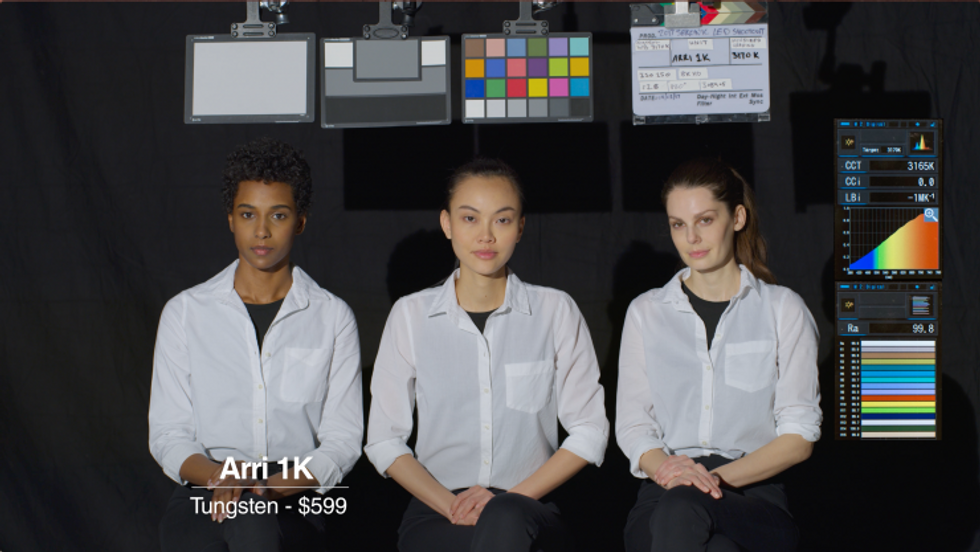 ARRI 1K
If you could get the Tungsten filament up to 5600 degrees Kelvin, the light would appear to match daylight. The filament in the 1K is burning around 3165K according to the meter, and as we all know, Tungsten lights get hot. The density of the red side of the spectrum you are seeing is the heat, the infrared spectrum gradually turning into visible light. This is why its spectrograph reading is so straight; it's essentially beginning to produce all the colors of the spectrum, but its physical temperature isn't high enough it make all of them. The consistency is remarkable because it's completely organic—just a function of heat turning into light.
Distance to Chart: 12'6" to achieve 50 footcandles (fc)
RGB Values: Tungsten; R69.3 G71.2 B73. Notice the nice, smooth steps between the levels. The blue is stronger the green middle and red weakest, because it's the opposite of the strengths of the spectrum of actual Tungsten. Look at the Spectrograph: it's countering the red, which is strongest, and boosting the blue channel, which is weakest, to maintain balance.
The LEDs
Here is my take on each light, based on the tests. The daylight examples are on top; Tungsten below. For a reference on how bright the lights are, I noted their distances from the chart to achieve 50fc, our at-key exposure for the camera set up at 250ISO and an F2.8 on the lens. The greater the distance from the card, the brighter the light. Most lights average 8-10 feet undiffused. Some were almost triple that.
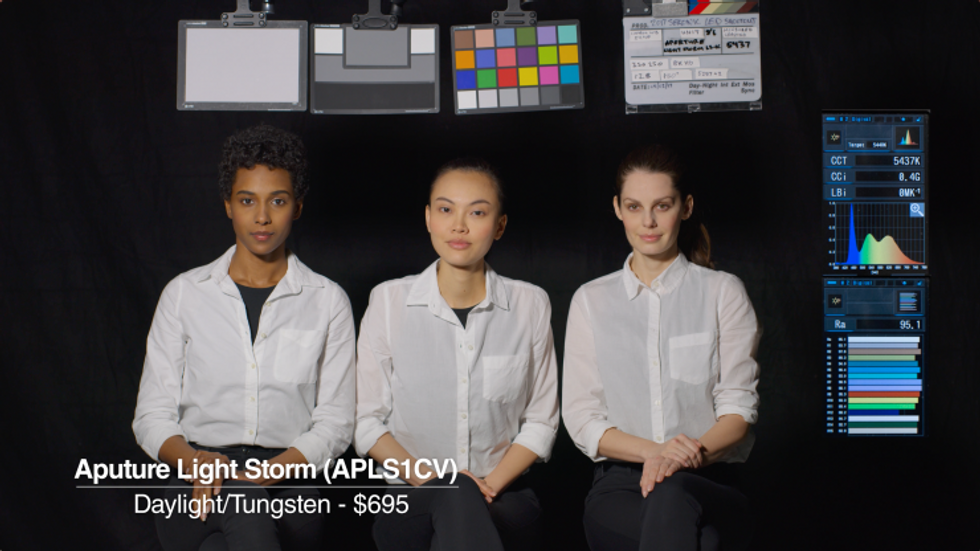
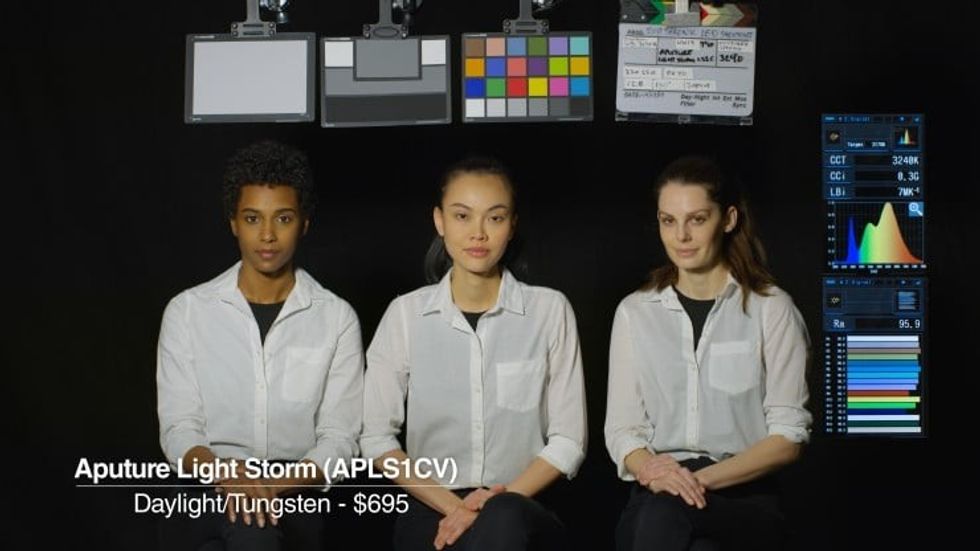
1: Aputure Light Storm - $695
 Daylight
 Tungsten
The Light Storm seems to be doing a decent job, considering the price. Mild magenta tint on the daylight example, with the Tungsten example feeling a bit green. It has an interesting physical design. The body is built like a heat sink—thin, but sturdy. This is a good case to talk a bit about how CRI can be somewhat misleading. The 95+ CRI the meter registered should mean a very accurate light. I found the green and magenta to be more visible in this example than some of the other lights that scored lower CRI ratings.
Distance to Card: 8'6" 50fc
RGB Values: Daylight: R73.4 G72 B74.4. The slightly lower G value, is why magenta seems to creep into the image. Tungsten: R71.5 G72.9 B74.2
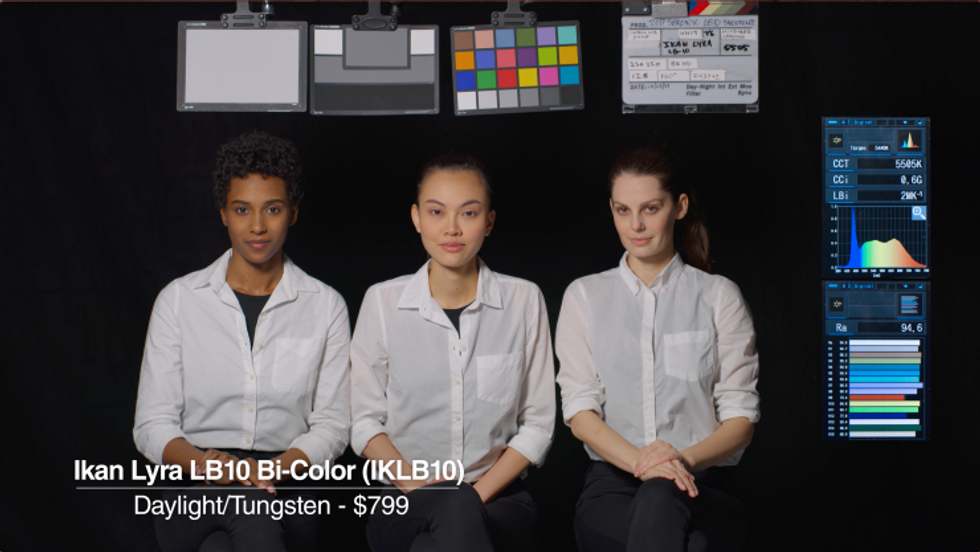
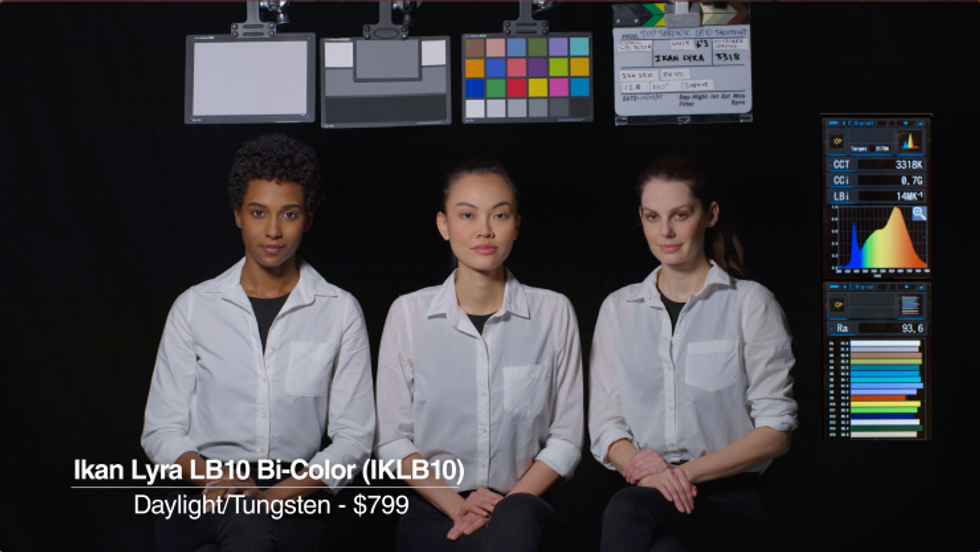
2: IKAN LYRA LB10 - $799
 Daylight
 Tungsten
The Lyra LB10 is a decent performer—somewhat magenta overall, but is consistent about that across daylight and Tungsten. It's a simple LED panel with silver barn doors. This can intensify the light output somewhat but makes it difficult to control the spill.
Distance to Chart: 7'6" to 50fc
RGB Values: Daylight: R69.7 G68.7 B72.5. Slightly weak G channel gives it the magenta tint. Tungsten: R67.3 G68.2 B73.1 It's a ttiny bit weak on blue, hence the warmth.
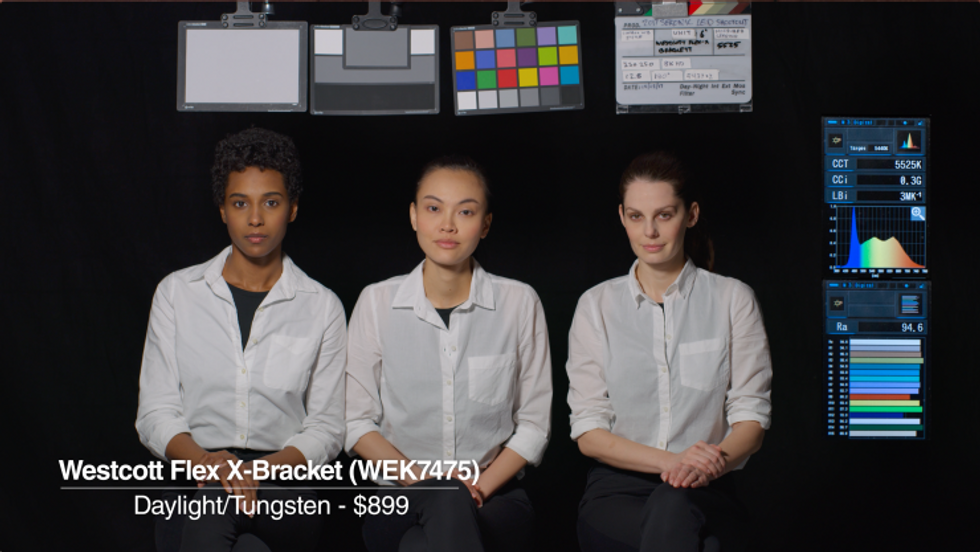
3: Wescott Flex X-bracket - $89
 Daylight
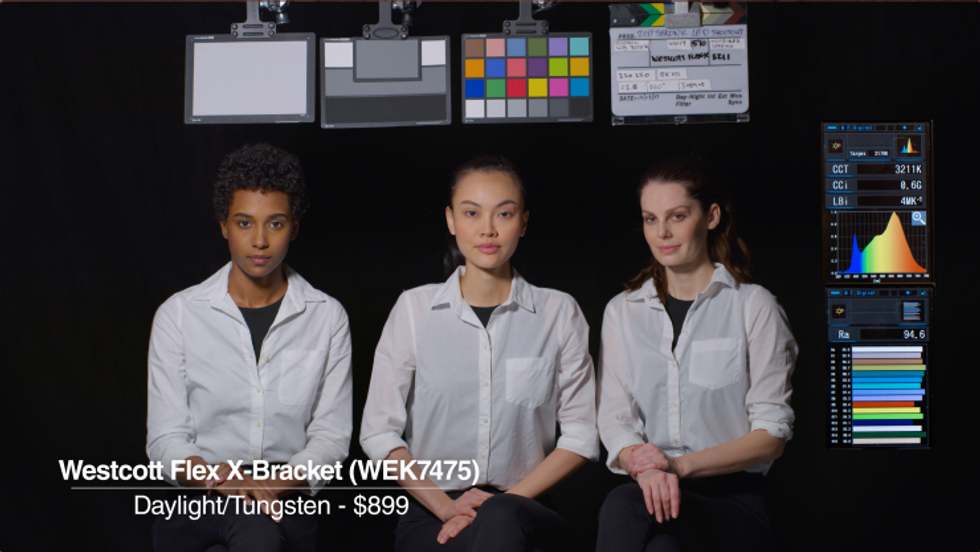 Tungsten
Distance from Chart: 6'0"
RGB Values: Daylight: R68.8 G68.6 B72.5 - Pretty good. Notice the lack of Magenta/Green shift, because the R/G values are so similar. This is a well-balanced light. Tiny bit light on the blue, hence the bit of warmth, but that's not a huge deal. Warmth is easier to correct than M/G. Tungsten: R69.5 G70 B74.1 Again very well matched R/G values.
4: Hive Wasp 100C - $999
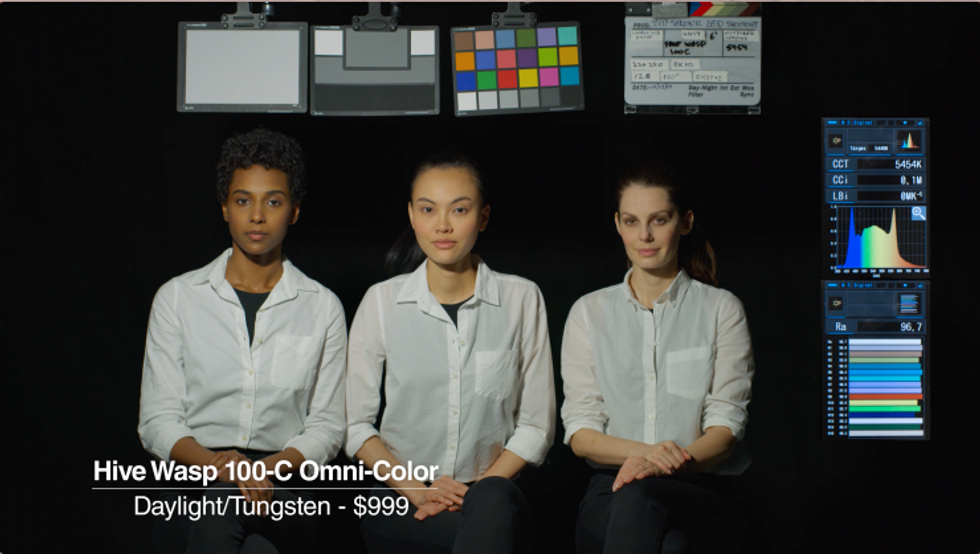 Daylight
 Tungsten
Distance to Chart: 6'0" to 50fc
RGB Values: Daylight: R63.4 G66.6 B67.2. You can really see the lack of blue channel and the yellow spike come together to bring out the yellow in the image. Tungsten: R68.4 G69.8 B66.8. Again, the lack of blue channel isn't there to counteract the yellow spike.
5: Wescott Skylux - $999
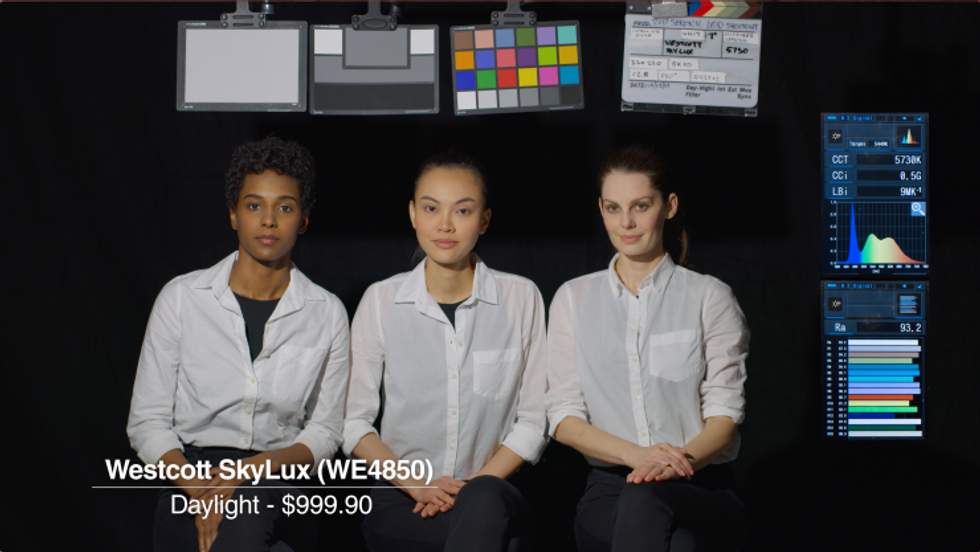 Daylight
Distance to chart: 7'0" to 50fc
RGB Values: Daylight: R68.3 G68.7 B71.7. Solid performer overall.
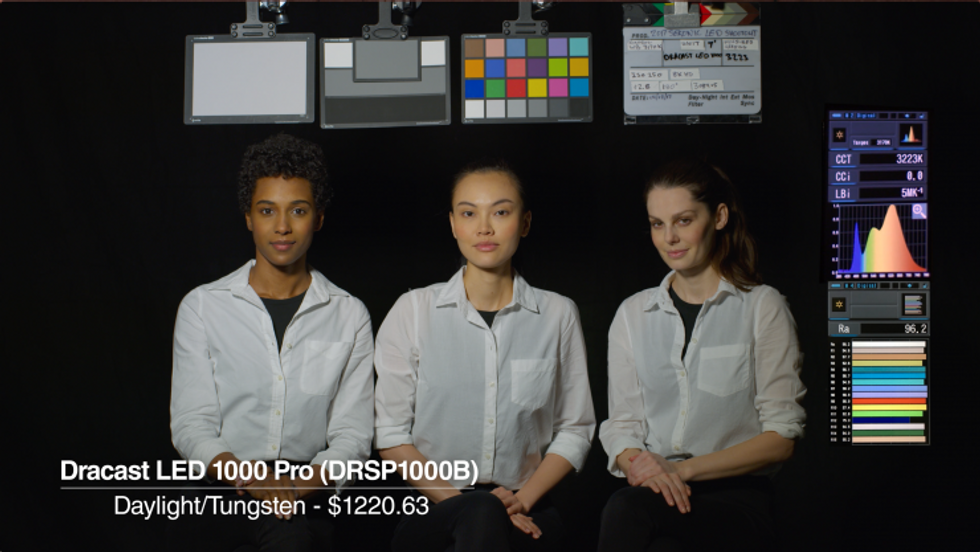
6: Dracast LED1000 PRO - $1220
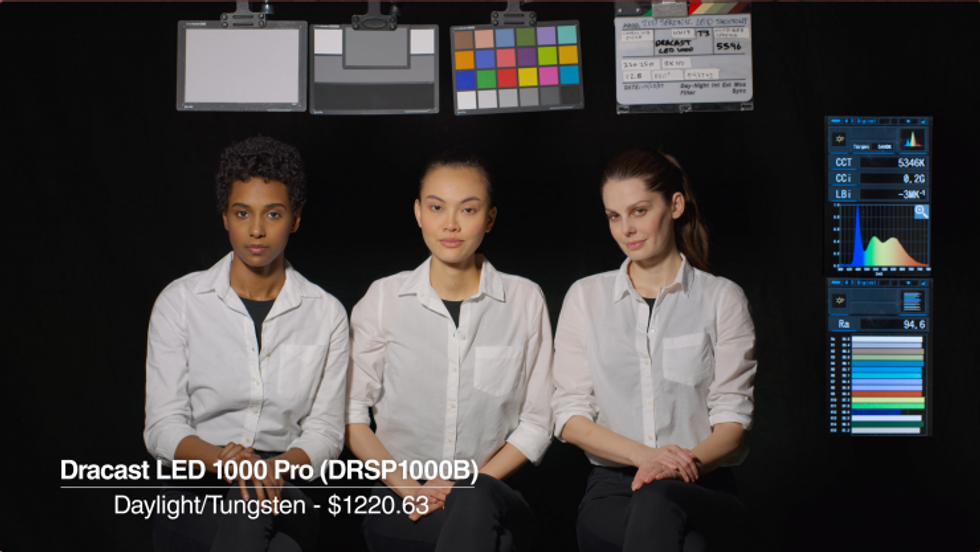 Daylight
 Tungsten
Distance to Chart: 7'3" at 50fc
RGB Values: Daylight: R69.1 G68 B:70.5. The slightly weak green channel is the culprit for the tiny bit of magenta shift. Tungsten: R66.7 G68.7 B:68.9. You can see how the image takes on a bit of green with a weaker red channel.
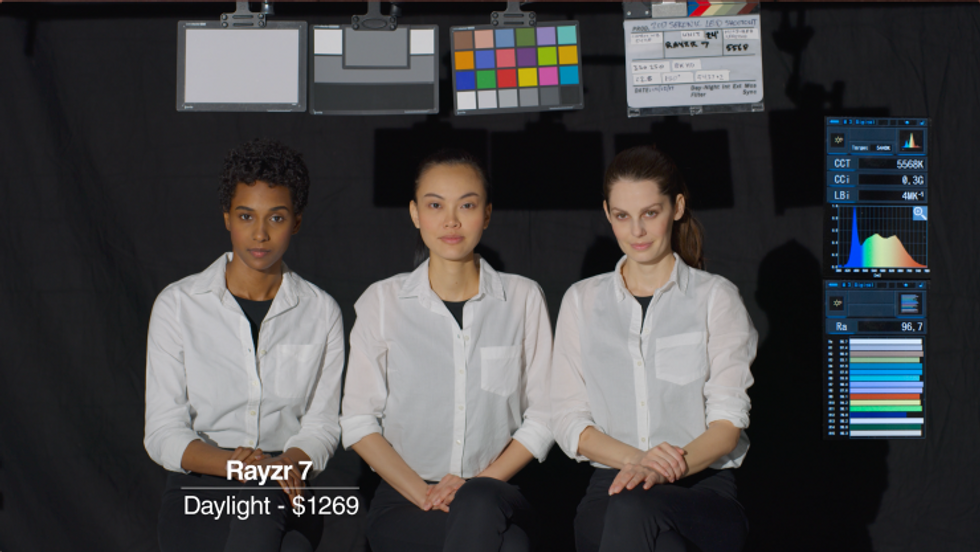
7: Rayzr 7 - $1269
 Daylight
Distance from Card: 24'0" to 50fc
RGB Values: Daylight: R69.1 G69.5 B72.3 Good numbers.
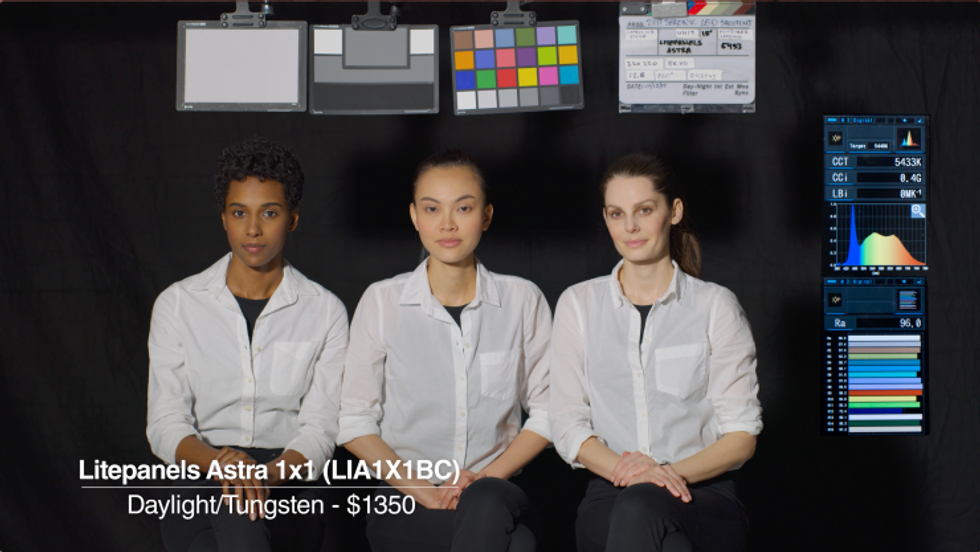
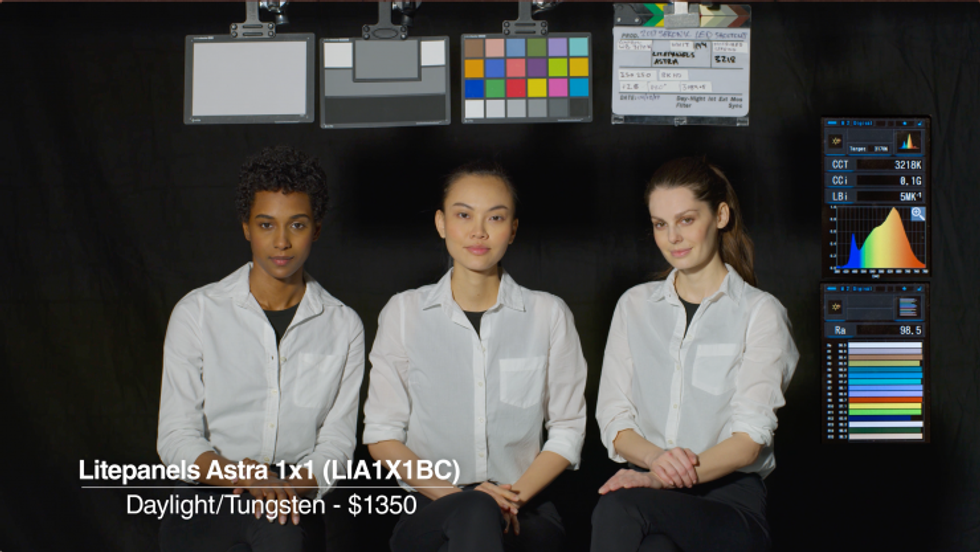
8: Litepanels Astra BiColor - $1350
 Daylight
 Tungsten
The Astra is an industry standard for a reason: great color performance, good price, and extremely flexible. Considering that it is also extremely bright but can still run on standard camera batteries just checks all the boxes of a classic. Minimal M/G shifting, and nearly spot on color temperature really makes you appreciate how far the Litepanels company has moved forward in its technology.
Distance from Card: 15'0" to 50fc
RGB Values: Daylight: R72 G72 B73.8. Picture-perfect R/G balance, though a touch warm with a strong R/G and a tiny bit underwhelming blue channel. No M/G shift at all. Tungsten: R68.4 G70 B69.6. I think in this one case, there may be a spike somewhere that isn't represented by the meter's spectrograph. The lack of red and blue should mean a bigger shift towards green, however the image just looks great. That said, the meter wants .1M to correct out the green, yet sees a 98.5CRI; that's one point lower than the sun, the highest CRI I've seen from a LED, period. Yet the RGB values seem to tell a bit of a different story.
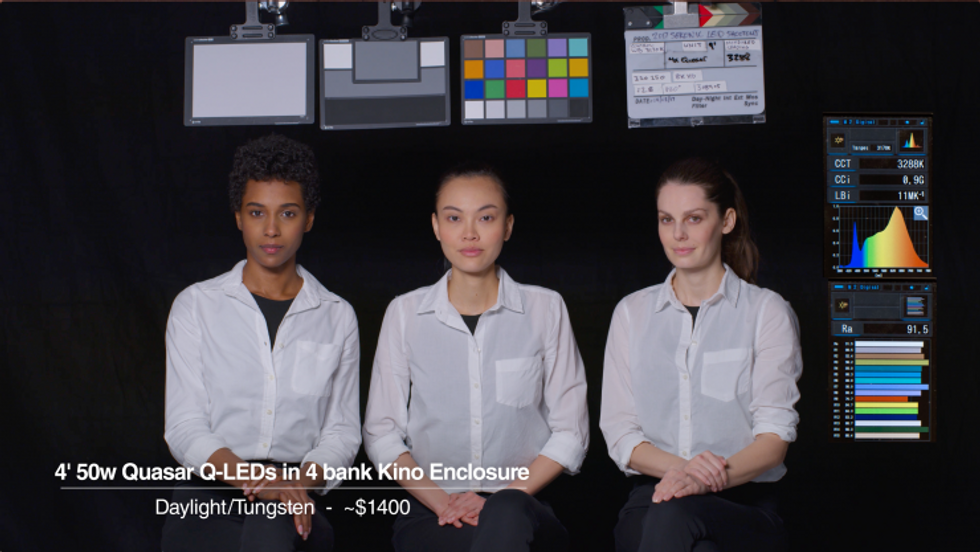
9: Quasar QLED - $250 per bulb
Note that the price depends on how you use them. In our configuration of four, it was roughly $1400 for all four lamps and the Kino bulb holder.
 Daylight
 Tungsten
Distance to Chart: 10'0" to 50fc (4x quasars)
RGB Values: Daylight: R68.8 G69.8 B70.5. The lack of blue is likely why they feel warm compared to daylight. Tungsten: R65.2 G65 B72.2. The spectrograph seems to indicate that there is a lot of color coming out of these—the band is wider than most lights. Overall, the magenta and cool tones are as a result of a lack of R/G end of the spectrum.
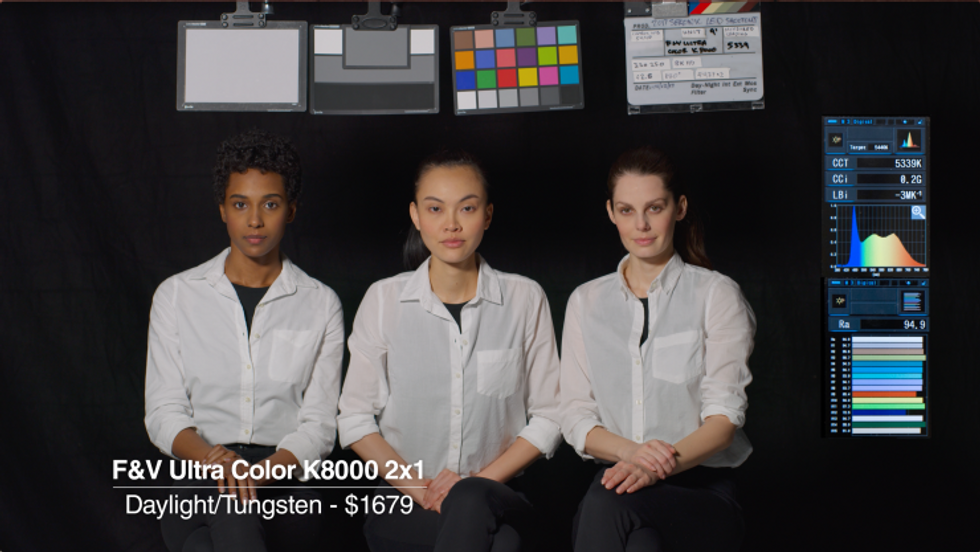
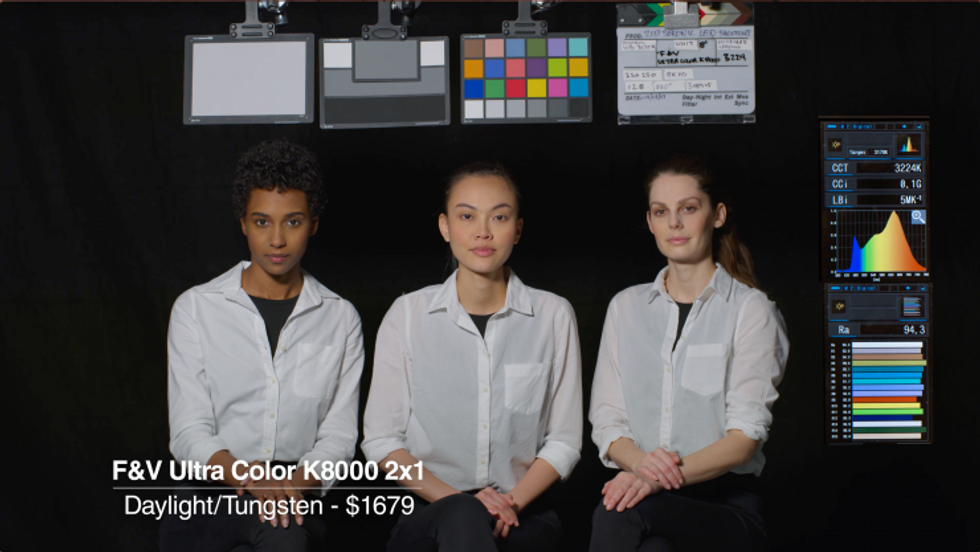
10: F&V Ultra Color Soft K8000 2x1 panel - $1679
 Daylight
 Tungsten
Distance to Card: 9'0" to 50fc
RGB Values: Daylight: R69.9 G69.5 B71.8. Great balance. A tiny bit warm with the lean blue channel. Tungsten: R67.3 G68.5 B70.7. Mimics the Tungsten slow climb in even steps pattern, hence the performance.
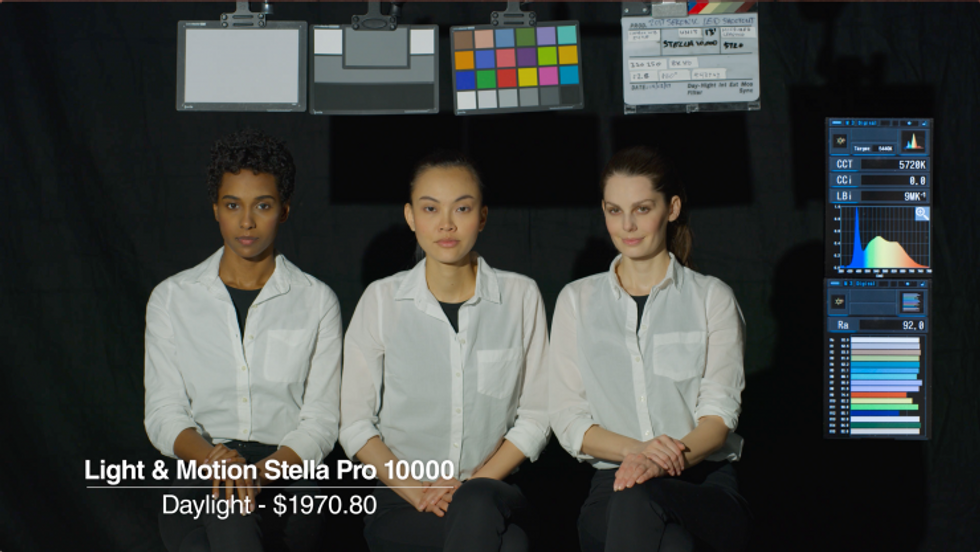
11: Light and Motion Stella Pro 10,000 - $1970
 Daylight
Distance to Card: 13'0" to 50fc
RGB Values: Daylight: R65 G69.2 B69.6. The thin red channel gives the impression of green in the image, but it's somewhat compounded by the fact that this light is unadjustable for color temperature. Unless we white balance to its color temperature, we won't see its true potential. Watch Video 3 up above to see it corrected in post to neutral white.
12: Fiilex Q500 AC - $1995
 Daylight
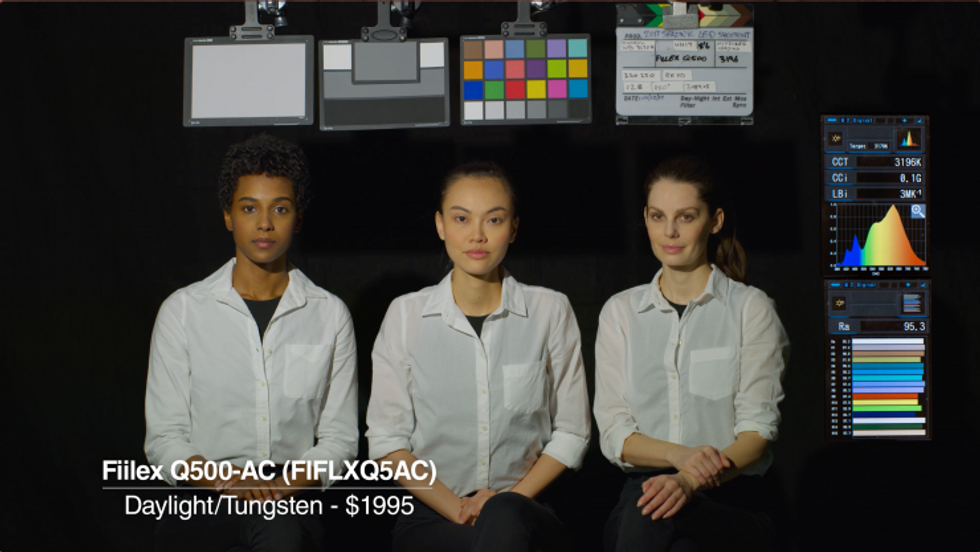 Tungsten
Distance from Card: 10'0" to 50fc
RGB Values: Daylight: R68.4 G71.6 B72.5. A tiny bit thin on blue gives it a touch of warmth. Tungsten: R66.9 G68.3 B67.7. Definitely feeling a bit of warmth here.
13: BB&S Pipeline 4' 4bank - $1997.45
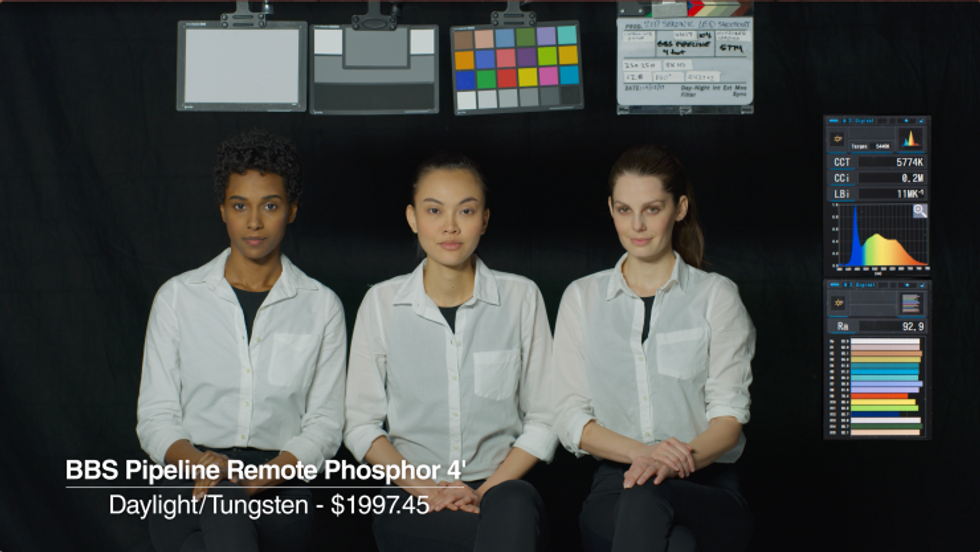 Daylight
Distance to Card: 10'6"
RGB Values: Daylight: R67 G71.9 B72.1. You can see the stronger green channel here slightly overpowering the red channel.
14: Cineo Maverick - $2150
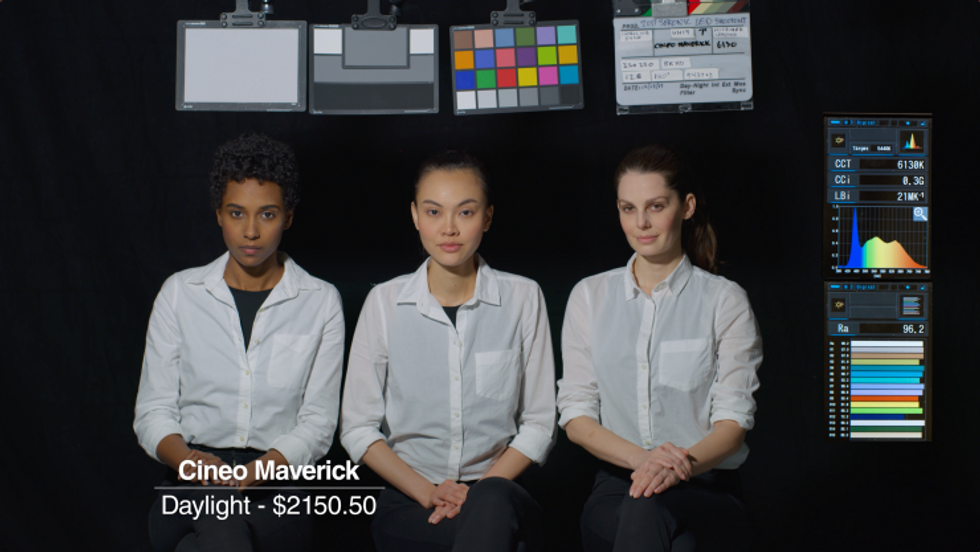 Daylight
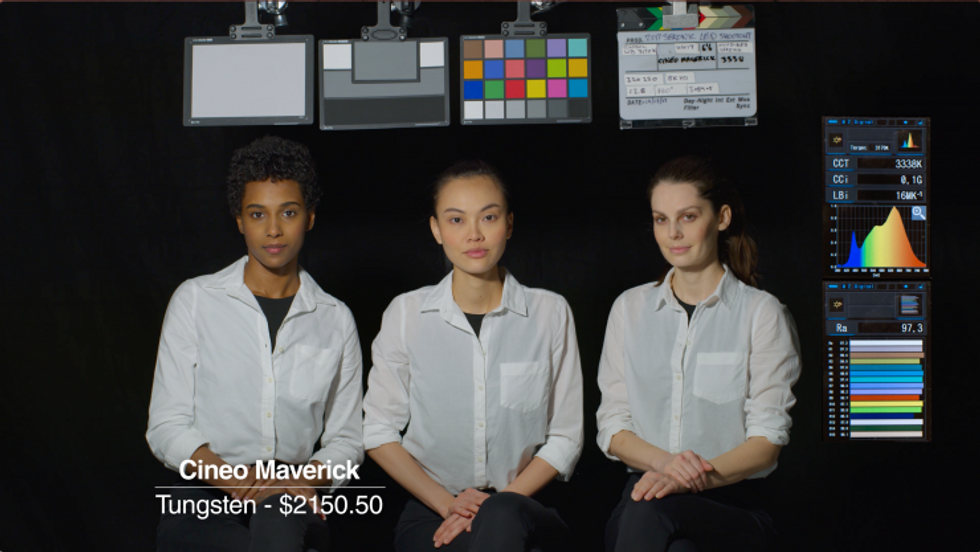 Tungsten
Distance from Card: 7'0" to 50fc
RGB Values: Daylight: R67 G70 B73.8. Nice values spread. Tiny bit green is likely in the signal, but it is hidden by the warm color shift in color temperature. Tungsten: R66.8 G69.1 B70.2. Similar assessment as the daylight panel.
15: Zylight F8 Fresnel Daylight - $2250
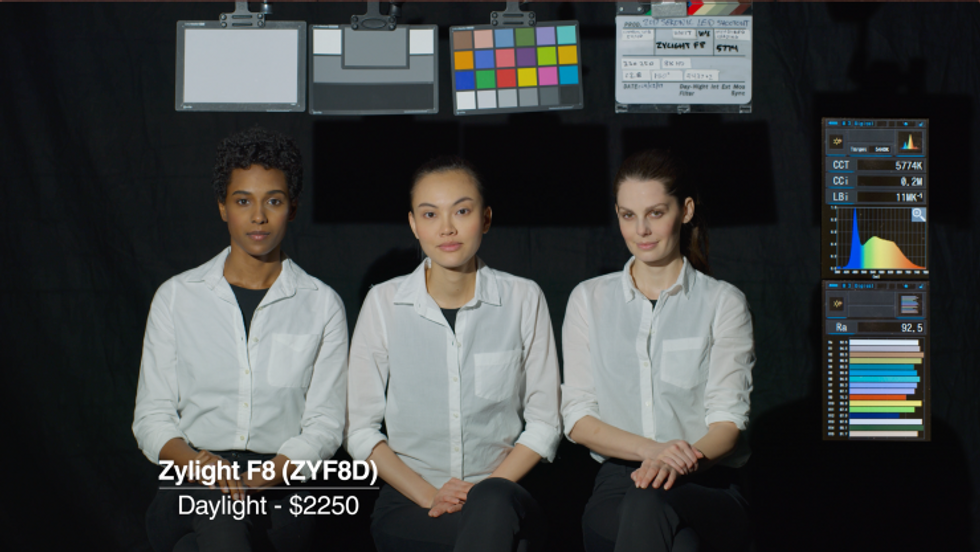 Daylight
Distance from Chart: 10'8"
RGB Values: Daylight: R68 G72.5 B74.6. The stronger green channel produces the slight green in the light.
16: BB&S Area 48 - $2269

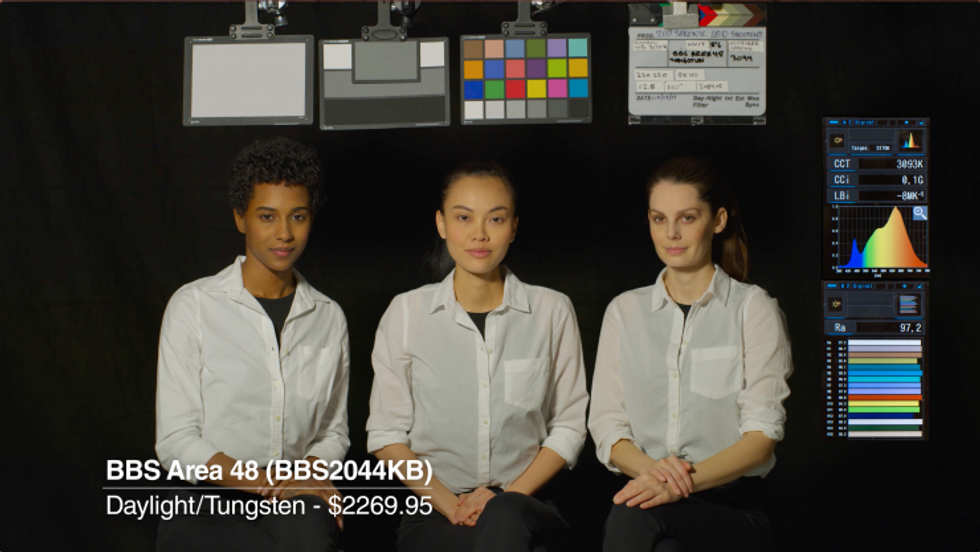 Tungsten
Distance from Chart: 9'0" to 50fc
RGB Values: Daylight: R66.1 G70.5 B71.5. Sometimes the RGB seems to put up numbers that would indicate a significant green or magenta shift, but visually, it does not. This may be due to discontinuous spectrum anomalies. Considering the green channel is 4.5IRE stronger than the red, I would think the green would be stronger in the image. Yet, somehow it seems to affect certain lights more than others; the green doesn't seem to be that noticeable. Tungsten: R69.4 G69.7 B66.1. The low blue channel, indicative of a warmer image, definitely shows itself here.
17: ARRI L5-DT - $2338
Note that this is mislabeled in the videos as an L5-C.
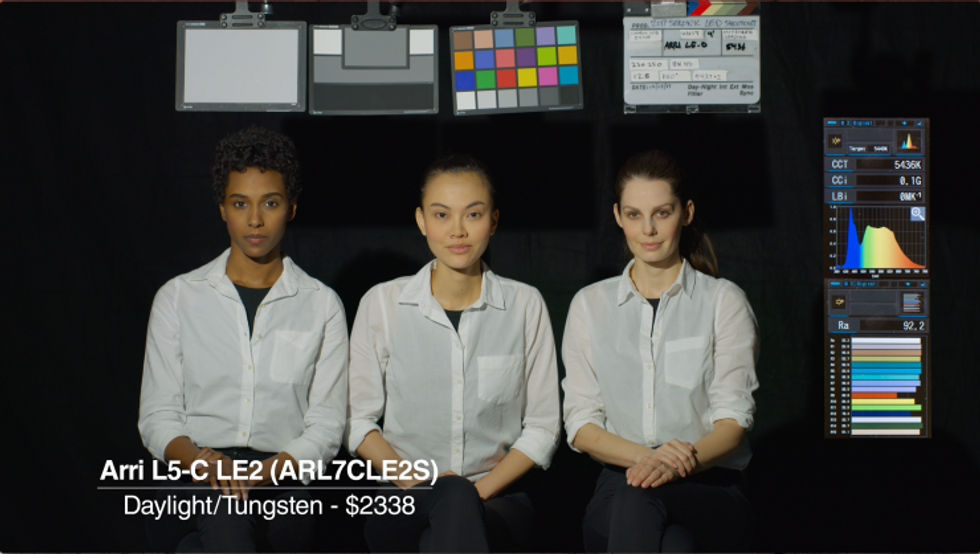 Daylight
Distance from chart: 9'0"
RGB Values: Daylight: R66.9 G70.1 B69.8. Here, you can see how low the red channel is.
17: KinoFlo Select 30 - $2386
 Daylight
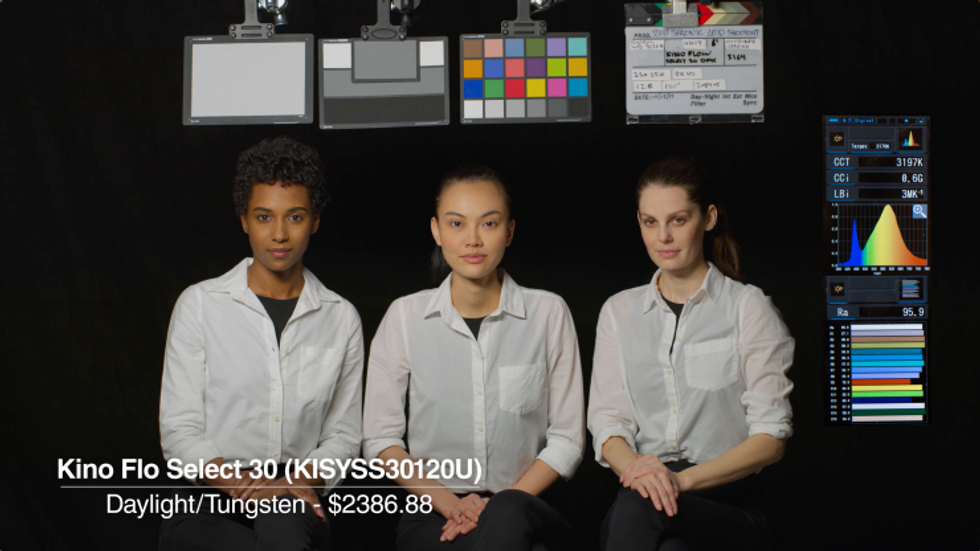 Tungsten
Distance to Chart: 7'0"
RGB Values: Daylight: R69.9 G71.4 B71.5. The balance is good; the touch of green comes from the slightly weaker red channel. Tungsten: R71.3 G72.3 B71.4.
18: Mole Richardson Junior LED 200w - $2409
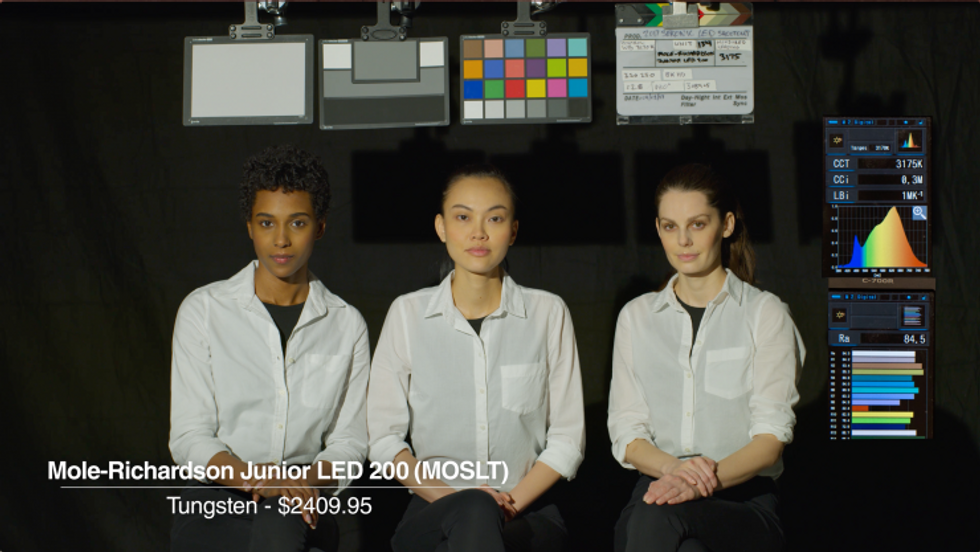 Tungsten
Distance from Chart: 13'4"
RGB Values: Tungsten: R68.9 G71 B67.6. The green channel is definitely the strongest of the three.
19: Fiilex Matrix - $2495
 Daylight
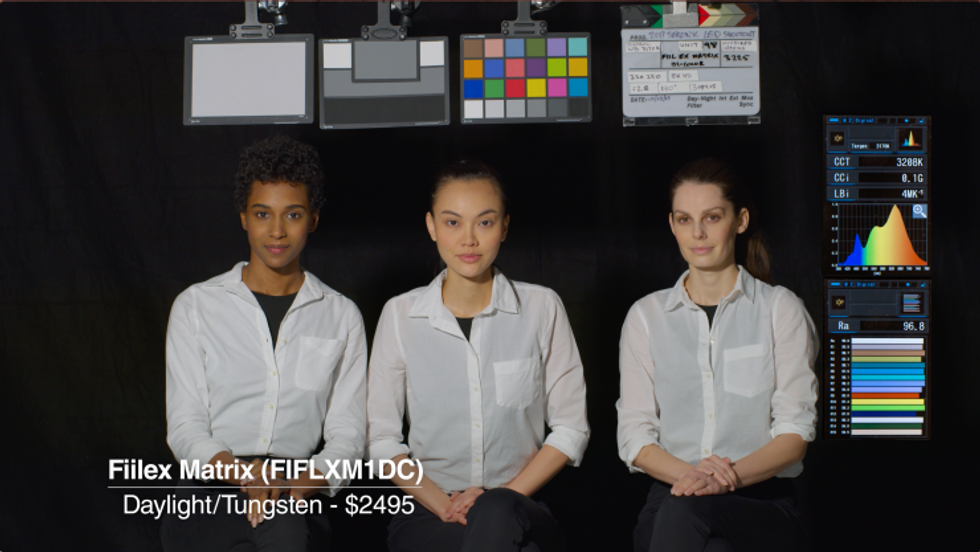 Tungsten
Distance to chart: 11'0"
RGB Values: Daylight: R67.5 G71.4 B71.7. Tungsten: R67.7 G68 B69.5.
20: Hive Wasp Plasma - $3279
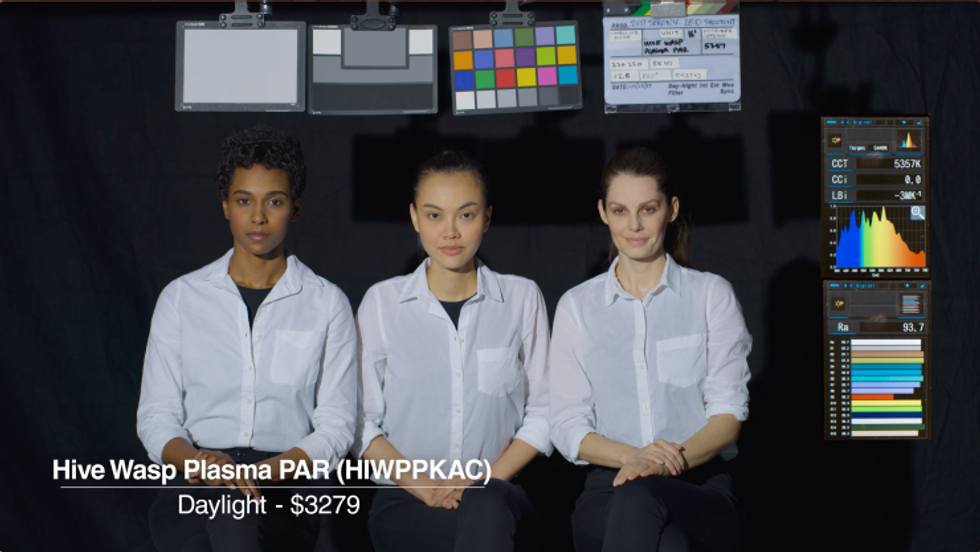 Daylight
Distance to Chart: 16'0"
RGB Values: Daylight: R67.2 G70.4 B73.7
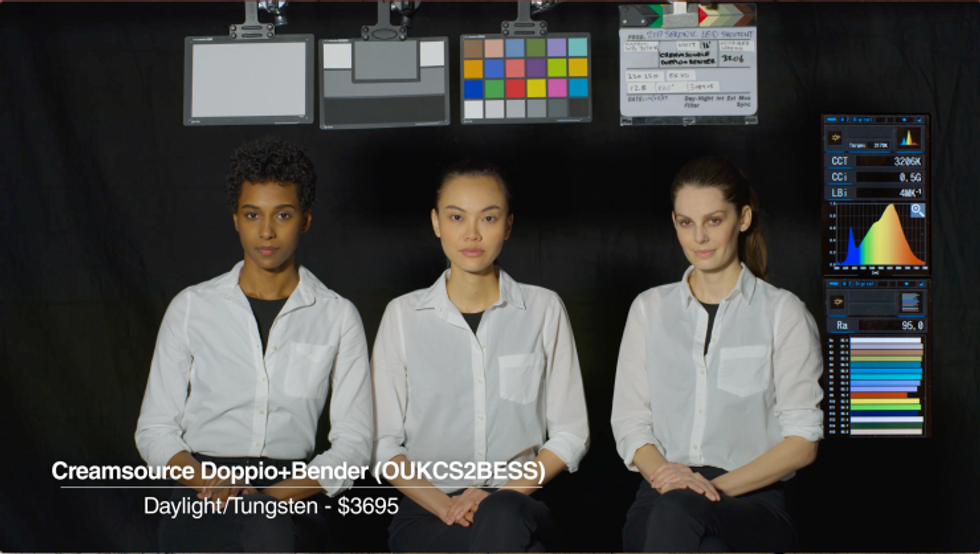
21: Creamsource Doppio+ Bender
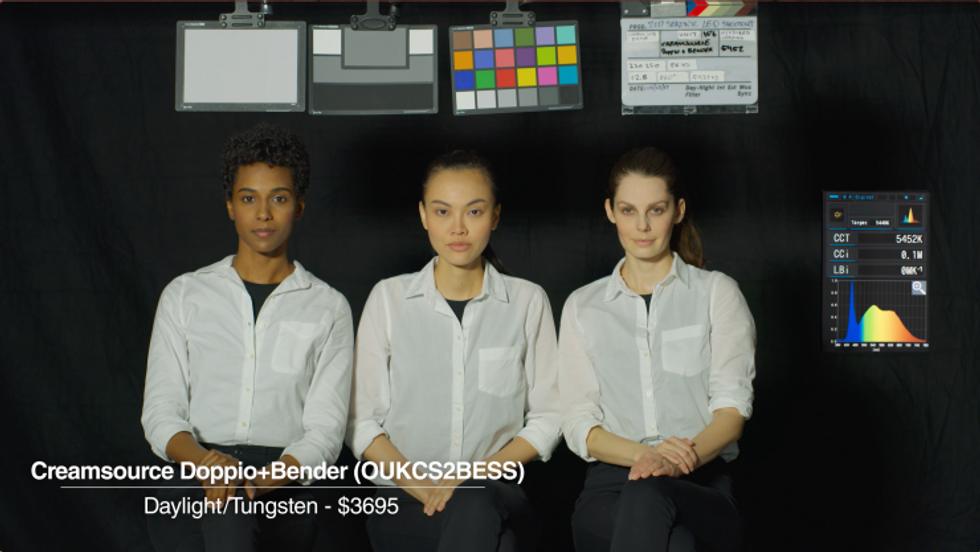 Daylight
 Tungsten
Distance to Chart: 15'6"
RGB Values: Daylight: R69.9 G73.2 B71.5. Tungsten: R69.4 G71.1 B72
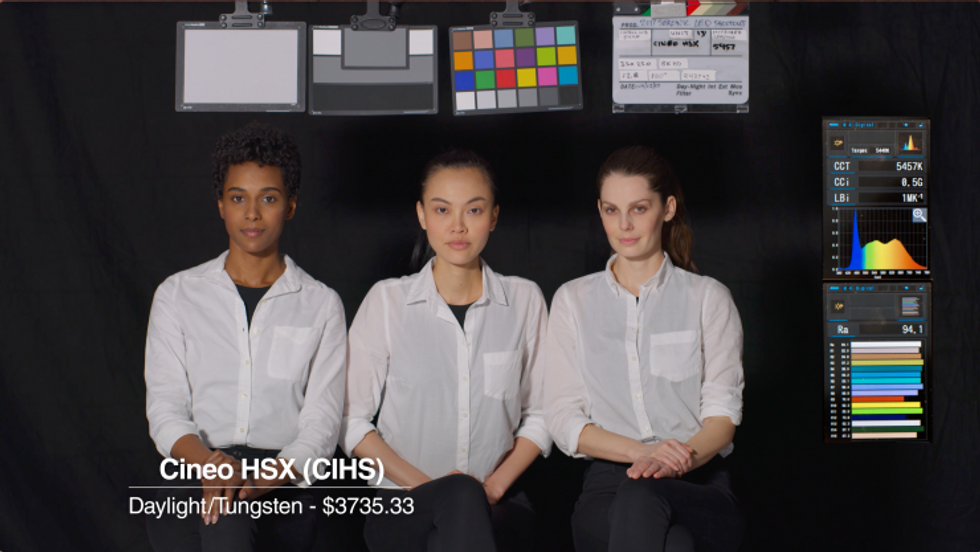
22: Cineo HSX - $3735
 Daylight
 Tungsten
Distance from Card: 13'0"
RGB Values: Daylight: R70 G69.3 B72.1. Tungsten: R68.4 G67.5 B72.6
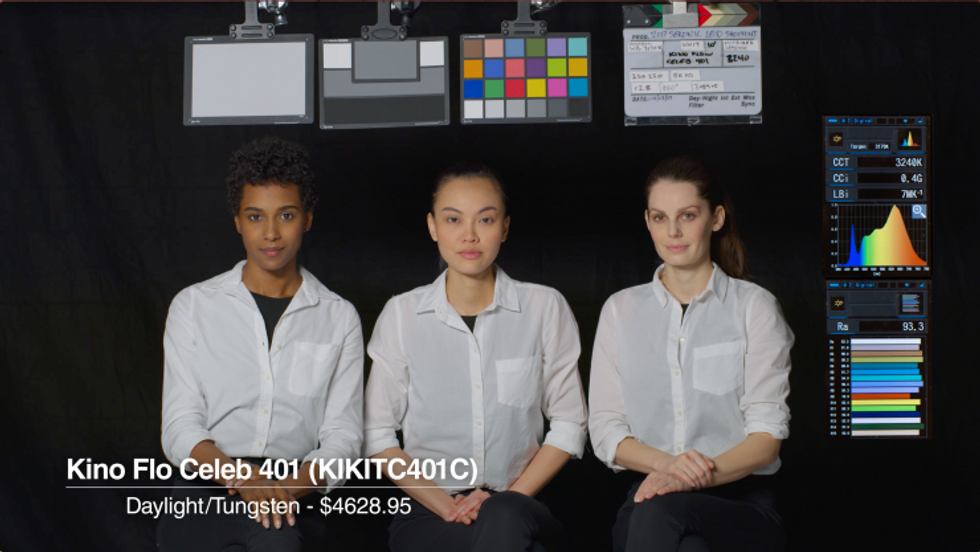
23: KinoFlo Celeb 401 - $4628
 Daylight
 Tungsten
The Kino Flo Celeb 401 isn't the brightest light ever made, but there is just something about the way Kino Flo designed or sourced their LED diodes that makes them look right. They are completely neutral to my eye. All three skin tones look exactly as they should, and the models look bright and healthy. I may not buy them, but I would rent them with no hesitation and know that no matter what I'm using— whether it's Tungsten, the sun, or HMI—I would have little problem matching the look from these units. They do have a bit of magenta, but as I mention in the video, I find a slight bit of magenta when coming from an LED seems to make it feel neutral, as it combats the natural green spikes.
Distance to Chart: 10'0"
RGB Values: Daylight: R69.1 G70.9 B71.2. Tungsten: R69.4 G70.3 B72.8.
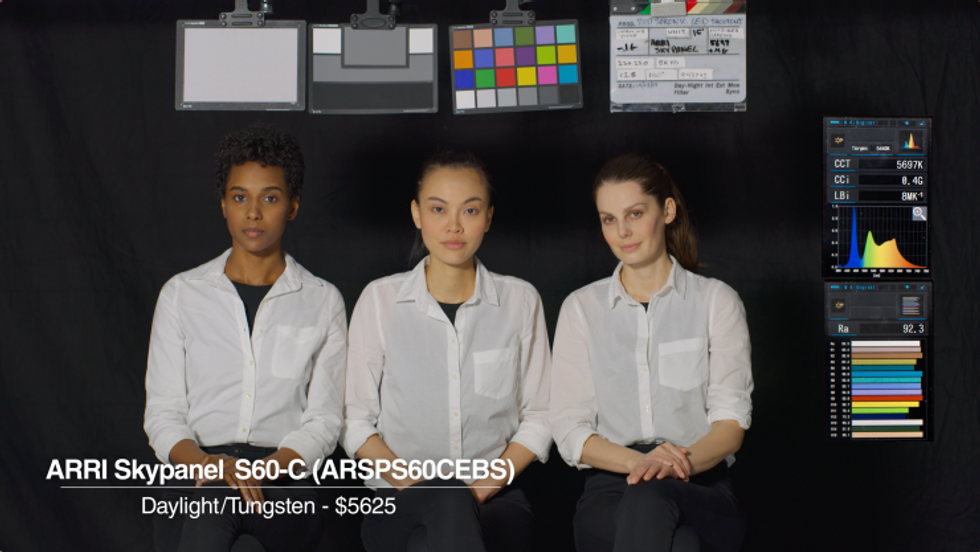
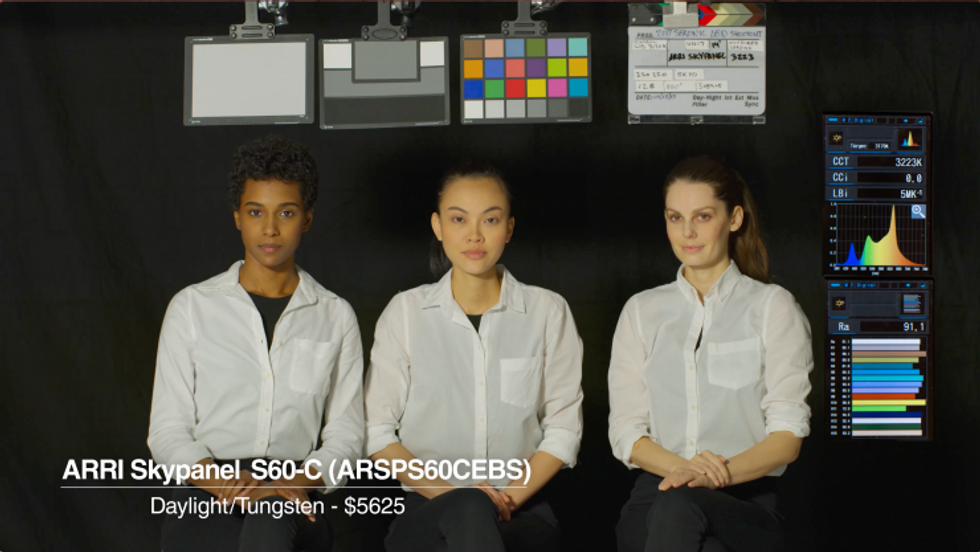
24: ARRI Skypanel S60-C : $5625
 Daylight
 Tungsten
Distance to Card: 15"
RGB Values: Daylight: R69.6 G69.7 B71.2. Tungsten: R71.1 G71.1 B73.3
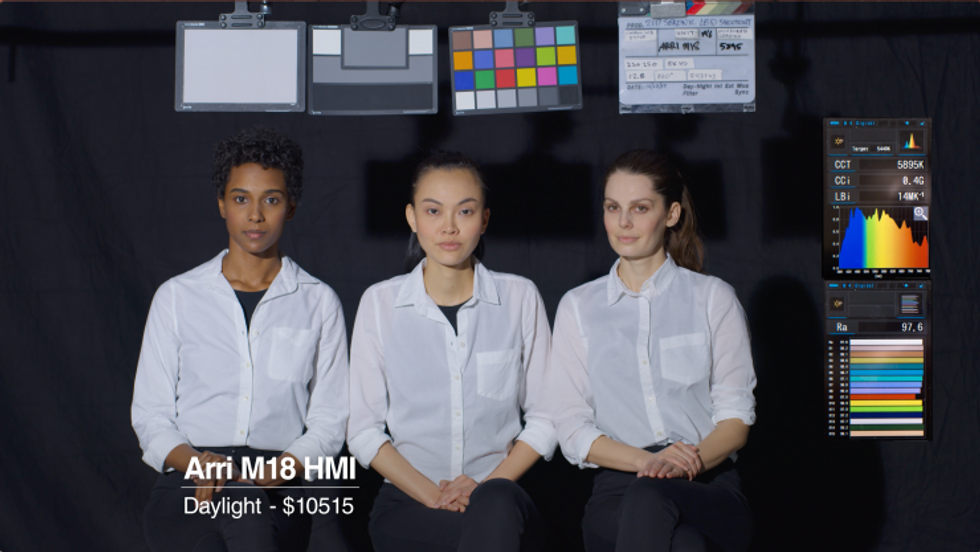
25: ARRI M18 HMI - $10,515
 Daylight
Distance from card: 19'6" (with 4 stops of steel scrims in the head)
RGB Values: Daylight: R71.2 G73.7 B79.8
Conclusion
After seeing so many lights in action and having examined the results, I feel have an understanding of what to expect from not only certain manufacturers, but also from certain technologies. Whether it is the convenience of a lightweight BiColor 1x1, the raw output power of some of the bigger fresnel units, or the need to produce pure saturated colors, LEDs are certainly up to the task. I hope this gave you a window into what is out there available in the industry and how it can help your productions.
The Team
Finally, I want to thank our sponsors for this test: Sekonic, B&H Photo Video, RED Digital Cinema, NoFilmSchool, and, last but not least, my producer, Ab Sesay. Without them, this wouldn't have happened. Thanks also to the whole team that was involved:
- Bhavani Lee Civan - 1st AD
- Gary Wilkins - Gaffer
- John Hudak - Key Grip
- Andrew "Tank" Rivara - Grip
- Chris Aran - Camera Operator
- Tom Wong - DIT
- Ali Cengiz - 1st AC
- Jeff Dietz - Photographer
- Dan Marsico - Editor
- Richard Patterson - Behind-the-Scenes DP