Become a Workflow Master, Part 2: Edit to Final Delivery
The key to mastering workflow for any project is organization.

In the first part of this series, we laid the groundwork for mastering workflow with the key theme being organization. Although we can perhaps all agree that workflow is not the sexiest part of the job, it’s also pretty common knowledge that having an organized post-production process has many benefits that last even beyond the completion of each project.
The first three steps we went over were media ingestion and management, organization, and importing. Here, we will get into workflow for steps 4-7: editing, color grading, special effects, and final delivery, plus some extra considerations.
Workflow can be as simple or complex as you make it.
As a reminder, our production company Fractal Visuals uses Adobe’s Creative Suite and Premiere Pro, but the general principles mentioned here should apply across various software and capture formats. We are using our music video for Baron Pulitzer's TIME as a sample project.
4. Editing
Once all of your footage have been imported into Premiere, it's time to begin the editing process. When you're editing, it's important to complete a full draft of the video before you start to move on to the color grading and Adobe Dynamic Link After Effects portion.
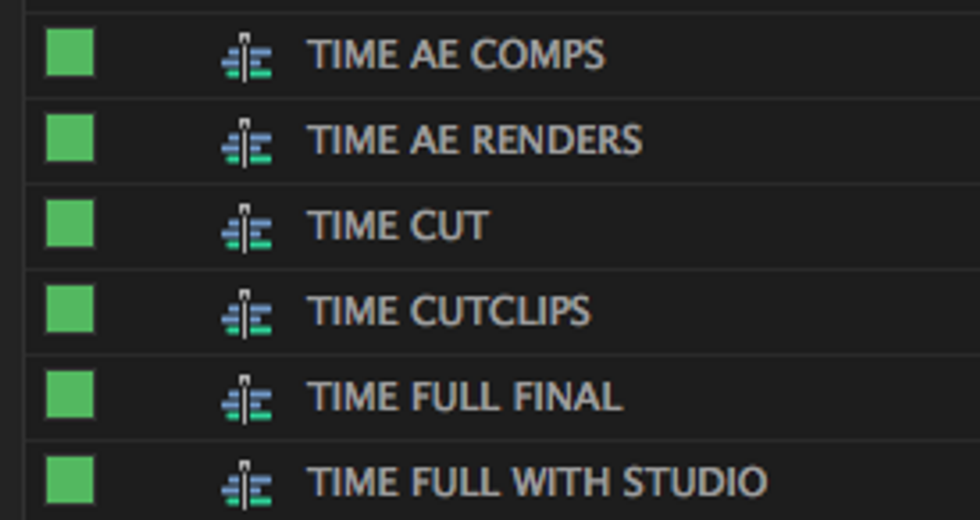
Typically, we go through many revisions of a project before picture lock. Throughout each of these stages, before any significant modifications are made to the edit, we’ll duplicate the timeline with a date and other identifying information so it can be referenced if needed in the future while also preserving and keeping a backup before the major edits happen.
- “CUT CLIPS” are the trimmed raw footage.
- “CUT” refers to a full cut version of the project.
- “AE COMPS” are the dynamic linked clips after picture lock.
- “AE RENDERS” are the rendered and replaced clips.
- “FULL WITH STUDIO” was a cut version of the music video with the studio shots of the artist
- singing overlaid in the music video.
- “FULL FINAL” is the completed and final cut of the project.
5. Color grading
Once we have a fully picture-locked edit of the entire video, the next step is color grading. We use DaVinci Resolve for color grading because of its incredibly diverse set of coloring tools as we typically use very complex color grades.
My team works with RED footage and we want to maximize the color information available throughout the editing process. We have to go through color grading before special effects work because After Effects and Adobe Premiere cannot export back into the original R3D code video format, and exporting into any other kind of video format will lose the raw video flexibility the R3D code raw provides.
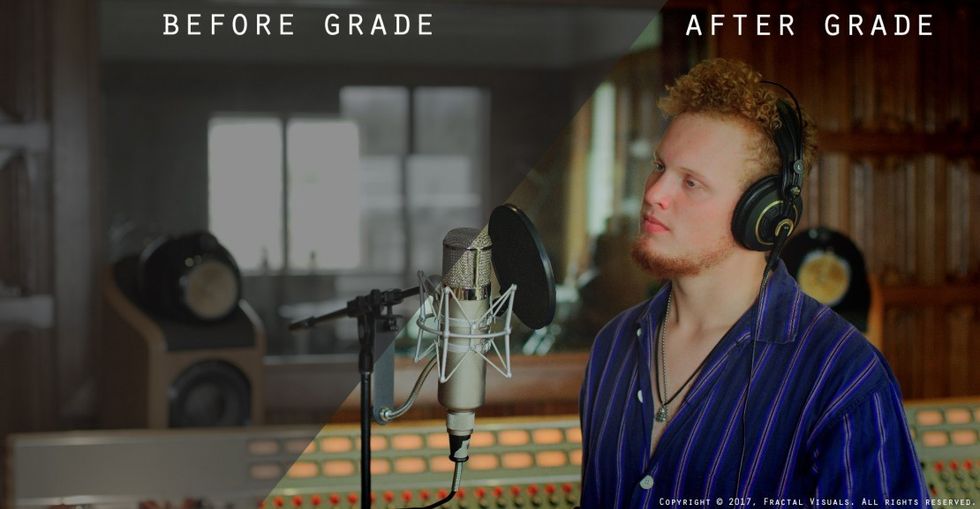
We export Final Cut Pro XML from Adobe Premiere and import it into DaVinci Resolve. There, you can fully color your project, and when the coloring is completed, you can export it back into your Premiere Pro project by using the Premiere Pro round trip export. This enables you to have an XML file that can easily be imported directly into Premiere Pro after the coloring is completed, which maintains the same ordering and edits in the original exported version of the file. That way, you don't have to click and drag the colored clips one by one, which saves a ton of time when your projects have hundreds of cuts.
We render all of our colored files to the “RESOLVE” folder in the main project file. You could also title this folder something like Graded Clips or Colored Clips; it doesn't really matter as long as you and your team can identify what it is.
Once we've reviewed and compared the color graded version of the video to the uncolored version to make sure that all of the edit marks occur in the same places and all of the clips were properly rendered, the next step in my workflow is creating special effects through After Effects.
6. Special Effects
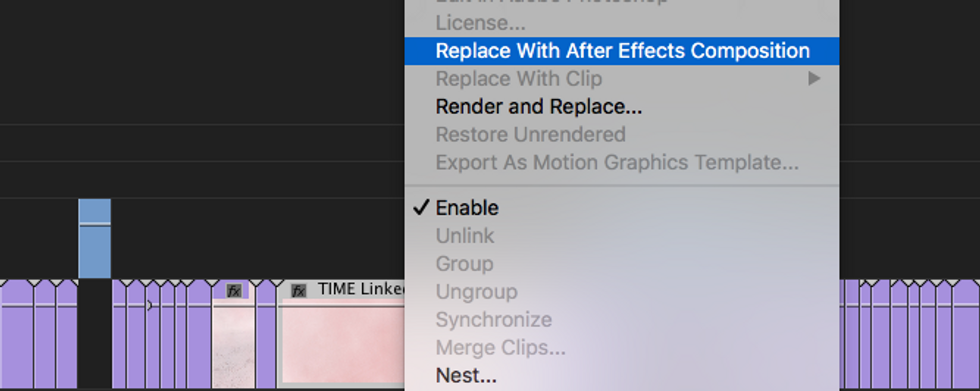
We opt to use the Adobe Dynamic Link option which replaces the clips with After Effects compositions in Premiere. This will take the exact clip and time code of a clip in Adobe Premiere and automatically create a conformed After Effects composition that is the right resolution, the right frame rate, and the right duration of the clip.
Adobe will automatically default to naming the first clip that you choose to replace as an After Effects composition as “____ Linked Comp 1”; therefore, it makes sense from an ordering perspective to have the first clip or first shot in your edit to be clip 1, and the final clip in your edit or the ending shot to be the final composition.
This will also make it easy in the end stage of editing when you're replacing all of your After Effects compositions with the rendered files. It removes the need to hunt for where “clip 36” because you know it will always be between 35 and 37. Seems like common sense, but if you replace your clips with AE Comps out of order you'll end up with a mess and will waste many hours ordering your clips because the numbers are all jumbled. I’ve been there; it’s not fun.
If you replace your clips with AE Comps out of order you'll end up with a mess.
Moving into Adobe After Effects
Our special effects shots can sometimes consist of hundreds of layers and, in some cases, it can take days to render a two-second shot. To address this challenge, part of our workflow incorporates reducing our render times by exporting different aspects of the project in individual layers that can be later be composited together.
In many special effect compositing scenarios, there are background layers, foreground layers, atmospheric layers, light modification layers, and so on, but not every one of those layers needs to change and be rerendered with every revision of a shot. It’s much faster and easier to render those layers individually and recompile them to reduce your render times.
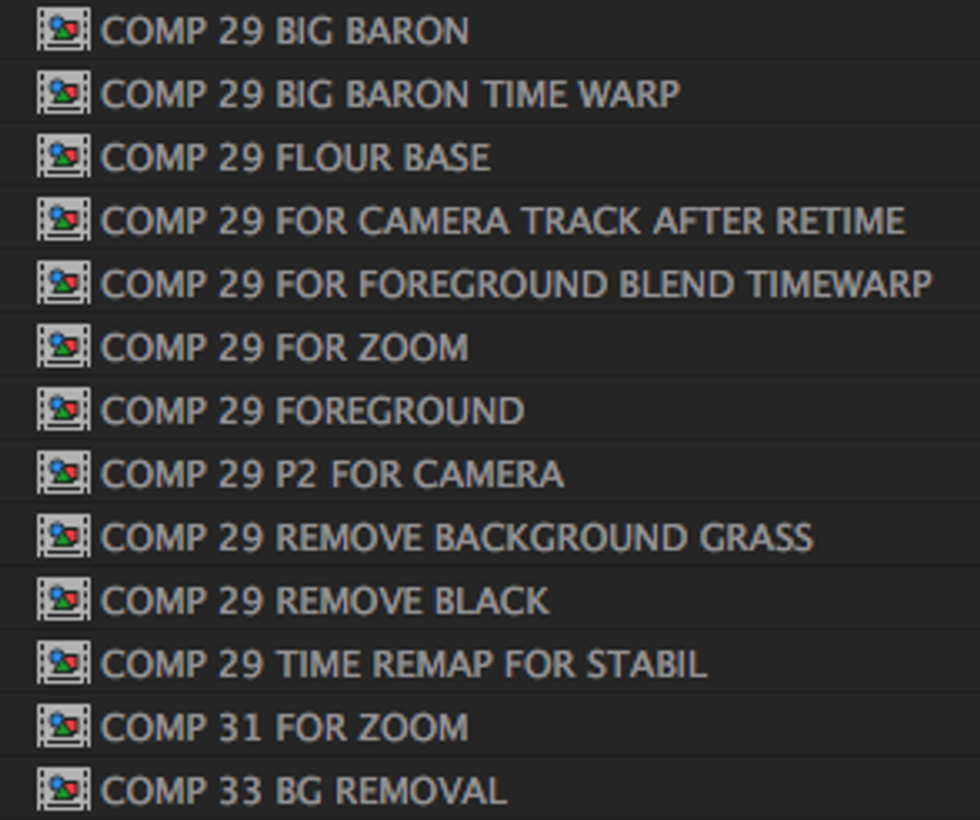
To maximize searchability, we always title these layers in the same way as follows:
COMP___composition number___ (so that that number corresponds with the number on the clip)__Keyword for that layer___ (Background Layer, Foreground Layer, ZOOM, CAMERA TRACK, etc.)
The result would look like this:
COMP 29 FOREGROUND
COMP 38 ZOOM
COMP 7 FOR STABILIZATION
This ensures that each of the compositions is ordered in a way that can be easily searchable within a project file in After Effects. Our naming conventions may not make sense to someone outside the team, but again, the key is consistency.
7. Final Delivery
Once all of your special effects have been completed and your After Effects compositions have been rendered, you can import the clips back into Adobe Premiere from your After Effects render folder in your project file and begin to place them in order. If you followed the steps outlined earlier in this workflow, everything should be easily added in order.
Once that's completed, you can finish working on the audio side of your project. For our music videos, this just means adding the master audio track to the timeline, and then we move on to the final delivery and export stage.
Having 6K or 8K master files is beneficial to future-proof the projects.
Whenever we export a file from Adobe Premiere, I use Adobe's Media Encoder application. We save presets for the resolution, bit-rate, and codec to export our files within all of the Adobe applications. This further increases our efficiency because we don't have to search through all of our settings to get the right one.
When I export my files, I make two versions. One is a master file that is encoded using ProRes 422 HQ in max resolution, and the second file is a web-friendly .MP4. This guarantees that, no matter what may happen to the raw footage, there will always be a high-resolution master file that can be kept off-site or at a separate location to ensure the final product will be protected.
At Fractal Visuals, we film everything in 6K and 8K resolutions using RED cameras. Most video content platforms are just starting to accept 4K as a standard resolution, but eventually, this will change, so having 6K or 8K master files is beneficial to future-proof the projects. It also allows for flexibility so you don't need to re-export the original video timeline when changing resolutions. Instead, you can take the ProRes master file and re-encode it to whatever the new video content format or resolution may be.
A few more workflow considerations
What to do with your final exports
When we export the videos, we place them in two locations. First is a “MASTER COPY” folder, which houses all of the master files from all of our projects for easy access. We also save a version of the two files within the main project folder, in this case TIME. This ensures that no matter what folder may be moved to different hard drives, there will always be both versions of the completed project ready to go.
Storage considerations
Storage is probably one of the hidden biggest concerns when considering workflow. When your workflow is clean, you will also save hard drive space because it eliminates duplicate or old versions of files.
Usually, when we render from After Effects during the special effects process, those files will go through multiple different versions, and sometimes, we've had clips that go through 10 iterations before they're completed. Because of the large file size, 10 versions of the same clip, even if they're only a couple seconds long, can easily add up to 30, 50, or even 100 gigabytes in file size.
To eliminate this problem, I'll use a method of replacement where I structure my file formats as follows: I'll have my main After Effects render folder (AE RENDERS) where all of the current versions of clips will be housed. I will also have a subfolder within AE RENDERS, which is titled “NEW RENDERS”. This is the folder is where new versions of the clip are rendered to. Once the new version is rendered and the consensus is that it is better than the older version of the clip, we will drag and drop the new version of the clip and replace the old version. This ensures that at most, we only ever have two versions of one of the renders.
Autosave
I am a big believer in the use of autosave. When you're working quickly and doing rapid turnaround times, even a couple minutes of lost progress can make a world of difference, so we set up autosave on both Adobe Premiere and After Effects to keep 200 versions of a project and have it autosaved every one minute (In some cases, I'll adjust this to two minutes, depending on how long it takes to save the project).
Overkill? Maybe. But when you're working with huge files, crashes are inevitable, and one of the most frustrating things is when you've done something that looks amazing and your file crashes, and you lose it because it can’t be precisely recreated in the same way. This may not happen very often, but when it does, it's devastating, and autosave is a great function that helps reduce its likelihood.
Export presets
Presets are a lifesaver—or at least a big timesaver. I use two main presets in my After Effects rendering queue. Because we master all files in ProRes 422 HQ and ProRes 4444, I created two presets for these different settings. This allows me to quickly and easily activate those presets depending on what the file may be to further improve my efficiency. 4444 is for special effects layers that need an alpha channel, and 422 is for the completed rendered clips.
Workflow can be as simple or complex as you make it. Every team is going to have a different preference for workflow structure. However, it's very important to start thinking about these different aspects as soon as a project begins, as they can improve your time management and allow you to focus on more important aspects of the production process.
Now, go become a workflow master.
Did we leave out any tips? What are your workflow best practices? Let us know in the comments.
Check out the first post in this series, Become a Workflow Master, Part 1: Before the Edit.


 'Aliens'CREDIT: 20th Century Fox
 'Promising Young Woman'CREDIT: FilmNation


