Create Beautiful and Realistic Animations with Google Earth Studio
Explore and capture amazing videos of Earth without ever leaving your office.
You’ve probably already seen Google Earth animations in documentaries or on the news. These videos are generally created with Google Earth and then captured via screen-recording software. With Google's new Earth Studio web application, users now have a plethora of options for creating , customizing, and exporting animations.
And with Google's massive collection of 3D and satellite imagery, these videos can look very realistic. Today we're going to take an up-close look at the brand new Google Earth Studio.
Requirements
First things first—there are a few requirements you need to meet before using this browser-based animation tool. At the moment Google Earth Studio is still in preview release, so you'll have to send in a request to gain access to the program. My request took exactly one month to be approved. You’ll also need a Google account, have the latest version of Chrome running, as well as WebGL. If you don’t know what WebGL is, don’t worry as they have a link in their documentation where you can check to see if you have it or not.
Google modeled Earth Studio off of industry-standard animation tools, so animators and motion graphics artists are going to have no problem getting up and running quickly. If you are new to animation, never fear—there are a number of quick start modes, including Zoom-to, Point-to-Point, Orbit, Spiral, and Fly-to and Orbit. Animating in these quick start modes is as easy as manipulating a few sliders and pressing a render button. If you do have animation experience, however, then you have beaucoup options.
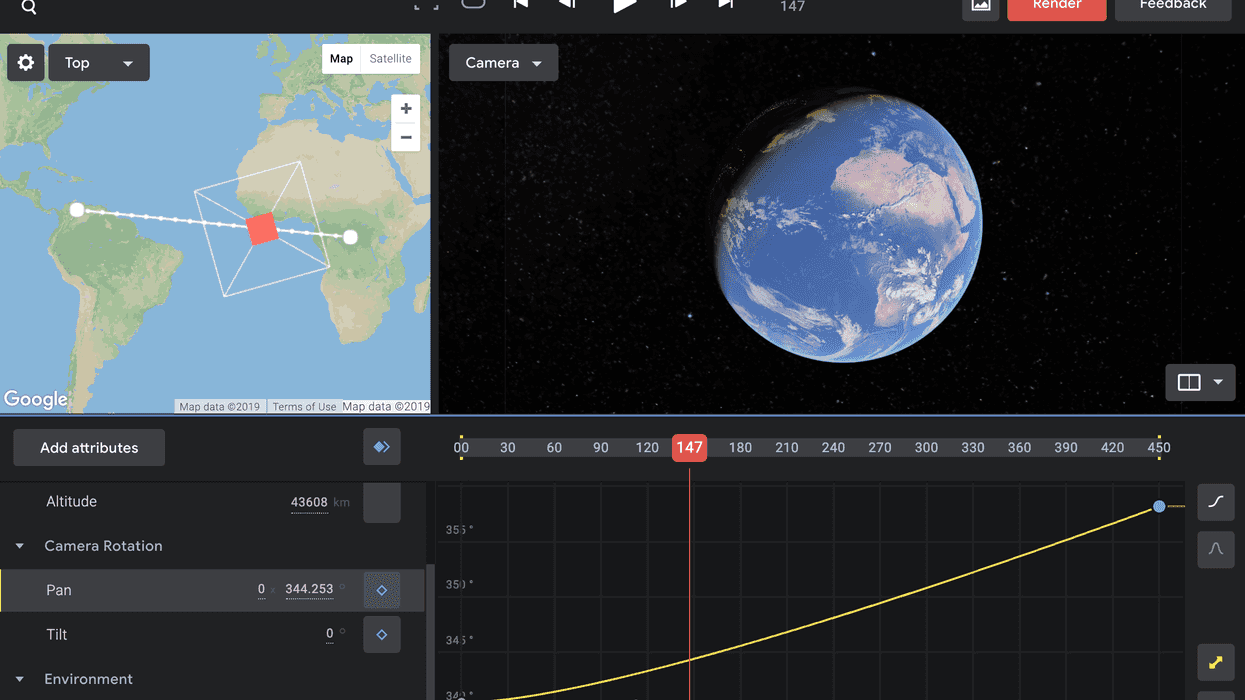
The Interface
Users can navigate and explore the Earth easily and comfortably via the viewport window. This is nearly identical to the standard Google Earth layout but you have the added benefit of toggling between several multi-view layouts. These are very helpful when animating in 3D space.
It's also extremely helpful to learn a few keyboard shortcuts to control the camera. For example, clicking and dragging will spin the Earth from its center, and scrolling the mouse wheel will zoom in and out. Hold the Ctrl modifier key while clicking and dragging to pan & tilt the camera. Use Alt to orbit around a target point. It might take a little practice to get completely comfortable flying the camera around Earth, so don't be surprised when you crash into a mountain or two.
Animating
After you feel comfortable navigating your way around the planet you can begin to add keyframes to a number of different attributes in the editor panel. Editable attributes include Latitude, Longitude, Altitude, Pan, Tilt, Camera Target, Field of View, Time of Day, Clouds and Ocean Overlay. If some of these sound extra cool, it's because they are.
To bring one of these attributes to life simply add a minimum of two keyframes—one to begin your animation and one to end it on the timeline. If you're an animation heavy hitter, then you can fine tune your movements via the Speed and Value Graphs.
Rendering
Once you're happy with your animation, click on the big red Render button at the top right-hand side of the interface. Google Earth Studio will export your animation as a JPEG sequence. You can make changes to the resolution, the number of frames exported, and where the required Google Earth logo will be placed on screen.
There are specific guidelines regarding how you can use videos made in Google Earth Studio, so be sure to check the documentation. But it's generally free reign for news agencies and nonprofits. Experienced Adobe After Effects users will be happy to hear that you can export 3D camera data as well as tracking points.
I'm only scratching the surface here in regards to what you can do with Google Earth Studio. Be sure to check out the corresponding video, and let us know what you think in the comment section.