Ah, rotoscoping. Scourge of the would-be VFX artist. Time-honored booster of production value.
Put simply, “rotoscoping” refers to the process of separating foreground elements from the background of a shot by drawing a series of mattes, frame by frame. While notoriously tedious, the technique can add visual interest to your project. Breaking a shot into individual layers allows you both to animate their properties separately and add additional assets between them, providing nearly unlimited creative applications.
Rotoscoping is simple in theory, but difficult in practice. Due to the frame-by-frame nature of the process, it’s easy to end up with “chattering” mattes whose jiggly edges destroy the effect. So how do you achieve consistency?
Whether you’re an animator, motion graphic designer, VFX artist, or videographer, you’ll probably need to rotoscope at least one shot in your career. In this post, we’ve gathered the resources you’ll need to get started with three of the most popular rotoscoping methods in Adobe After Effects: masks, the Rotobrush, and Mocha.
Before we dive into the details, let’s start with some guiding principles from VFX artist Scott Stewart (Iron Man, Pirates of the Caribbean, and many more):
 'Pirates of the Caribbean: The Curse of the Black Pearl' (2003)
Start with keyframes
If you’re like me, you might be tempted to start your roto efforts by drawing a matte on the first frame of your shot and then continuing chronologically. Stop that! There’s a better way.
Rotoscoping is technically a form of animation, so it’s helpful to apply traditional animation principles here. An essential concept in both disciplines is the idea of “keyframes,” the frames containing the most dramatic movements or poses. Character animators begin a sequence by drawing the keyframes and then going back to smooth out the motion with “in-betweens.”
Similarly, roto artists draw their first mattes around the keyframes—but the beauty of After Effects is that it generates the initial in-betweens automatically! Of course, they’ll need adjustment. Once you’ve drawn your keyframe mattes, manually refine the in-between at the center of each interval, then repeat the process until you have a result you’re satisfied with.
Why is this method better than starting from the beginning? Stewart says it best:
“Consistency! Your mattes will adhere to the motion of the element they were created for in a much more naturalistic and consistent way. In addition, because of the computer's ability to automatically interpolate between keyframes, it's less work for you. And that's always a good thing!”
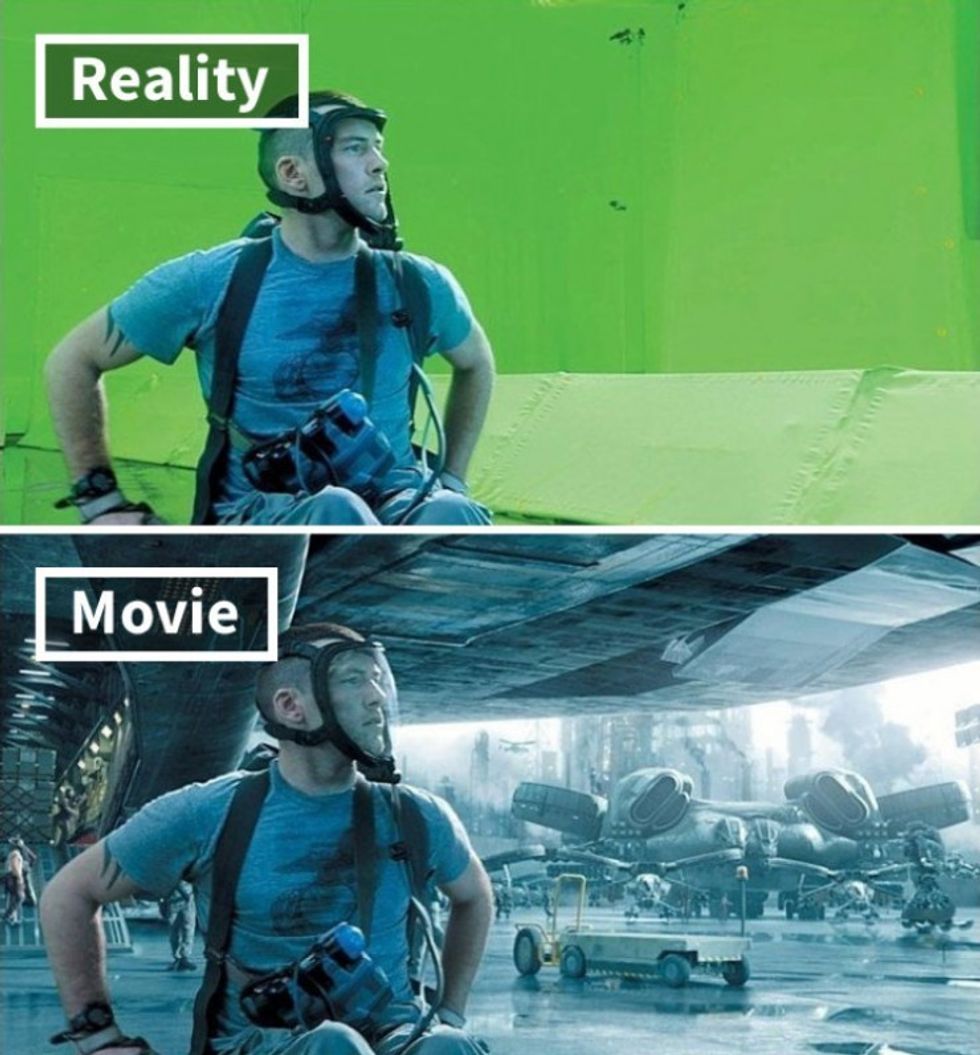 'Avatar' (2009)Credit: movies.effects
Use as few points as possible...
Every second of footage contains at least 24 mattes, and the more points you have on those mattes, the more likely it is that their edges will move inconsistently. This is what causes matte chatter, the jiggly edges that make your matte look like garbage. To minimize this chatter, go back to your keyframes. Generally, keyframes contain the most complicated shapes, which means they also need the most matte points. Once you’ve settled on a number of points, try to move those points in groups to preserve the matte’s shape.
...but use a LOT of shapes
Remember art class in elementary school? You probably learned to draw the human figure by drawing a bunch of circles, ovals, and rectangles—the basic shapes which make up the form.
The same concept applies to rotoscoping: since the shape of a shin or forearm doesn’t change much, by combining a bunch of simple shapes in your matte, you can roto complex movements without having to move a bunch of individual points around.
Here’s an example from Red Giant’s Stu Maschwitz:
With those foundational principles in mind, let’s open up After Effects and start rotoscoping!
Method 1: Masks
Masks are the oldest (and possibly most time-consuming) way to rotoscope in After Effects. They require a meticulous frame-by-frame approach, but if you value control over speed, this could be the method for you. For a quick introduction, check out this video from Robbie Janney at Shutterstock:
It’s worth mentioning one point that isn’t covered in the tutorial: while it’s definitely possible to use bezier curves with handles in this method, many roto artists advise against it. Returning to Stu Maschwitz’s twitter (a gold mine, by the way):
“Bezier curves are great for static shapes but terrible to animate. Not only do they tween weirdly, but (way more importantly), they are slow to manipulate.”
Adobe’s alternative to bezier handles is a tool called the Rotobezier, which automatically generates curves based on point placement. I personally haven’t used the Rotobezier that much, so I’m not sure how much it reduces chatter. It seems like the interpolation benefits you’d get could be nullified if you have to add a lot more points, but that’s just speculation on my part. For details on how to toggle between bezier curves and the Rotobezier, check out this tutorial from Sergei Prokhnevskiy:
Method 2: Rotobrush
If you’re looking for a faster roto solution, you might want to try the Rotobrush, which functions a bit like the magic wand tool in Photoshop. The Rotobrush uses AI to automatically detect the edges of a selection. From there, you can use additional brushes to add, subtract, and refine edges. This 20 minute tutorial from Teddy Gage does a great job explaining how the Rotobrush works and how to customize the parameters guiding its algorithm.
Here are a few quick highlights:
- The more contrast in your image, the better your selection will be. Make sure the Rotobrush is reading your color adjustments by placing it at the bottom of the effects stack.
- Customize the Rotobrush propagation settings. If your selection keeps jumping around, you might need to ditch the default settings. Start with the search radius, motion threshold, and motion damping.
- Use as few brush strokes as possible. Every brush stroke you make sends information to the selection algorithm, so if you slip, don’t try to correct it with any brush strokes. Just undo.
Method 3: Mocha
You might be familiar with Mocha as a tool for planar tracking and screen replacement, but it’s also great for rotoscoping. The plug-in has been bundled with After Effects since CS4 came out, and it uses splines for selections. These have several advantages over the bezier handles in After Effects masks; perhaps most notably, they allow you to change the number of points in your selection without dramatically affecting its shape. (Love!) This tutorial from Mocha’s YouTube channel covers the basics:
Tech is constantly changing, so whichever tool you choose, be sure to keep Stewart’s core principles in mind: start with keyframes, use as few points as possible, and use a lot of shapes. May your mattes be consistent and may their edges never chatter. Go forth and rotoscope!
Have any core roto principles of your own? Think I butchered my explanation of splines in Mocha? (I probably did.) Let us know in the comments!
Source: Scott Stewart