5 Ways You Can Edit Faster With DaVinci Resolve
Need to quicken your workflow on DaVinci Resolve? We have a few tips to help you do just that!

Editing is an extremely time-consuming discipline. With long hours spent staring at a computer screen, any shortcuts you can master are going to be crucial. Who doesn’t want to maximize efficiency and output?
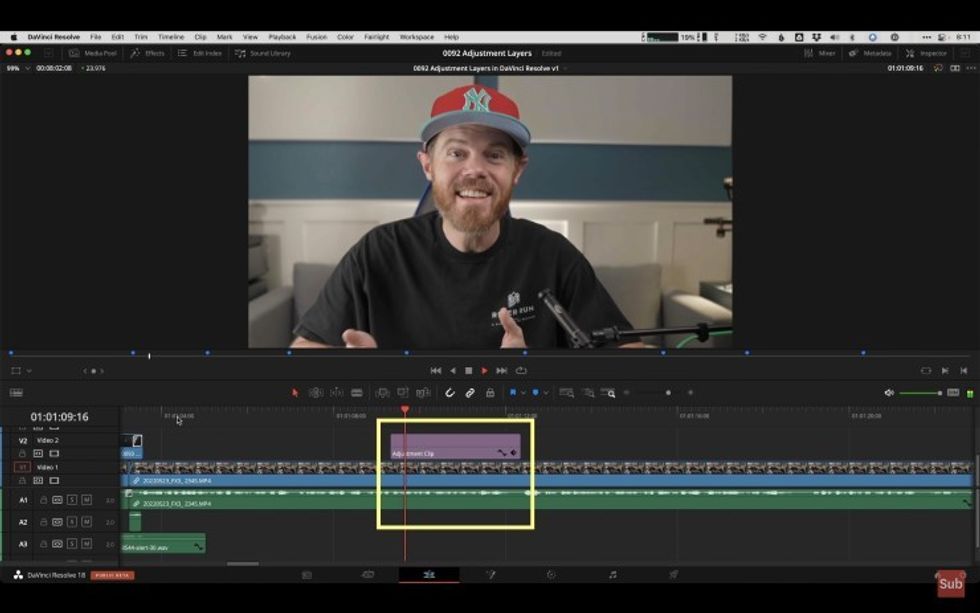
In this video, Chadwick from Creative Video Tips demonstrates five tips on how to use adjustment clips instead of nested compound clips in DaVinci Resolve, to create effects in your edit.
What is an Adjustment Clip?
But first… what is an adjustment clip?
An adjustment clip is a feature in video editing software that allows you to apply video effects, color grading, or other adjustments to a specific section of a video clip. It essentially acts as a layer on top of your existing video clip and enables you to modify the appearance or timing of a particular segment without affecting the rest of the video.
Adjustment clips can be used to add visual effects like blur or sharpening, adjust the brightness or contrast of a section, or apply filters to change the color or tone of a clip. They can also be used to add transitions or other effects that would be difficult or time-consuming to achieve by editing individual clips.
Adjustment clips are empty shells of clips that are useful for applying effects, changing, parameters, and applying color grades. Think of it like a “clear” clip that’s useful because it affects every other clip that is underneath it on a timeline.
Adjustment clips are commonly used in professional video editing workflows, and they are supported by the most popular video editing software, including Adobe Premiere Pro, Final Cut Pro, and DaVinci Resolve.

Tip #1: Punch In
If you’ve ever shot a talking head interview in 4K, looking directly into the camera, you can use a “punch-in” adjustment clip to give the appearance that you’ve changed to a tighter lens.
After you drag a new adjustment clip into a layer above your talking head, open the inspector so you can drag it to increase the zoom value. Play before the adjustment clip, and you’ll see the punch-in effect just like you’ve cut to a tighter lens.
You can keep the eye line in the clip at the same vertical position by adding the “grid effect” to another adjustment clip. Then, set the tilt parameter to match up the eye line in each of your shots.
Tip #2: Continuous Push
When using photographs as B-roll during an interview, a cool way to build energy or suspense is to push in slowly across multiple images in a sequence.
First, map the photos to the same size by using the transform effect.
Next, drag a new adjustment clip on top to cover the length of the entire segment of photos. Use the inspector’s video transform to set a start keyframe at the first frame, move the play head to the end of the adjustment layer, and set a new keyframe by increasing the zoom parameter.
Tip #3: Whip Pan
Everyone loves a good whip-pan transition.
Drop your adjustment clip above and across a cut of two clips. Now, open the infusion page. Open the transform tool and under the advanced options choose the edge behavior to wrap around. Then, set three keyframes: one four frames before the cut at an x-position of -1, one at the cut set to -.5, and one four frames after the cut set to 1.
Now, open the spline editor and select the position checkbox. Drag the mouse to select all of the keyframes and tap “S” to smooth them out.
Finally, turn on motion blur with the slider up to one.
Tip #4: The Cutdown Trick
Sometimes when cutting thirty-second spots you have to make a fifteen-second version, or a “lift” as they’re called.
A good way to audition different versions of these fifteen-second spots is to have a bunch of them that you can view on the same timeline. To get a bird's eye view, you can use adjustment clips that are set to exactly fifteen seconds on a track above the spot.
This allows you to visualize how much time you have to work on your timeline without continuously marking an in and out every time you make a quick trim.
Tip #5: Color Grading
An obvious creative use for an adjustment clip is to use it to color grade.
Let’s say you have a series of log-encoded clips that require the same base color correction to make them look a little more normal. All you have to do is drop your adjustment clip above, go to the color page, and start doing your tweaks on the adjustment clip.
Now that you’ve learned these helpful tips, you’re going to want to save your adjustment clips to quickly and easily use them in future projects.
For that, all you have to do is drag the adjustment clip from the timeline to a power bin and name it whatever you like.
Source: Creative Video Tips

 'Aliens'CREDIT: 20th Century Fox
 'Promising Young Woman'CREDIT: FilmNation


