I start watching a lot of movies, but I don't finish all of them. Sometimes I turn them off because I get bored, or begin to hate the story, but more often than not the movies I turn off are the ones who cannot sustain the reality of their story.
Makeup and special effects, especially practical ones, can make or break the audience's experience. If it's cheesy, it can take away from your world-building or just get someone to change the channel. But it's expensive to look super real as well.
That's the fine line you have to walk, getting this stuff within your budget but also not breaking the bank when money can be spent elsewhere.
So the question is, how can you have professional-quality horror makeup and special effects at a price point that allows you room to actually make a movie?
Well, we did a ton of research and tried to bring together the best of the tips, tricks, and makeup tutorials we could find on the internet.
Let's get started.
Horror Movie Makeup Ideas, Tricks, and Tips
The purpose of this article is to aggregate information. I'm not an effects artist, but I scoured many other articles and tried to bring the best information forward. I wanted to make sure we had professional advice and ideas that could help shape your work and ensure you got the respect and rapt attention your movie or TV show or short deserved.
First, let's speak generally about...
Horror Movie Makeup
Audiences today are savvier than they have ever been before. You need to convince them of what's happening onscreen with strong visuals. There are lots of professional makeup artists like Stan Winston out there doing amazing jobs teaching people how to do certain kinds of makeup.
I want to make sure we take a complete novice's entryway here. I had to learn within this post, and I think it can help people interested in doing this themselves too. I want to go over some general recipes and applications to begin to learn how to make your own special effects makeup.
Now let's get messy.
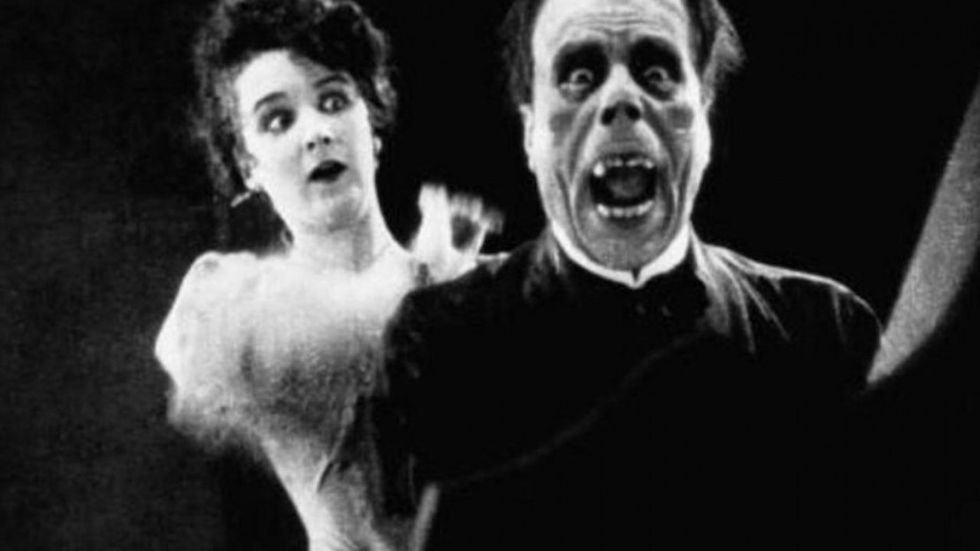 'Phantom of the Opera' (1925)Credit: Universal Pictures
When Did Special Effects Makeup First Start?
There have been all kinds of makeup work since the dawn of cinema, but in the mid-1920s, actor Lon Chaney pioneered special effects makeup by creating his own looks for The Hunchback of Notre Dame, The Phantom of the Opera, and many other films.
He showed what it was like to actually transform a person into someone else. Hollywood and audiences loved what they saw and quickly followed his trend.
The actual art of film makeup began to take off with the popularity of Universal's monster movies in the early 1930s. These monsters felt like they could jump off the screen and attack you at a moment's notice.
But they needed people applying makeup to achieve this success.
Jack Pierce was one of the leading innovators of this time. According to the New York Post, to create the monster’s look for Frankenstein, Pierce used cotton and spirit gum to make prosthetics and green makeup that would appear ghostly white on camera.
As cinema advanced, so did makeup. Color film led to more colorful techniques and tricks being employed. Eventually, there was such a demand that schools had to be founded to teach those interested in the art form.
Special Effects Schools
There are lots of special effects and makeup schools in the United States and across the world. Places like MUD (Make-up Designory) and the E.I. School of Professional Makeup bring in students and get them Hollywood-ready.
You'll take special effects makeup classes and learn a curriculum that will change with Hollywood's needs.
You can check out the Hollywood Reporter's list of the best special effects schools if you think that's an area you want to pursue.
If you're not in the US, check out Christine Blundell Makeup Academy—founded by Oscar and BAFTA-winning makeup designer Christine Blundell. It offers an industry-focused SFX (Special Effects) Makeup Course, training artists for film and television productions.
Special Effects Makeup Artist's Salary
According to Backstage, "Theatrical and performance special effects makeup artists earn an average salary of $64,250."
Alternatively, QC Makeup Academy states that “the special effects makeup artist averages $75,000/year,” which, as they point out, changes depending on “a number of variables,” including the scale of a production.
The earnings of a special effects makeup artist will vary based on the budget and location of the project, how many days/hours they put in, and your overall experience in the field.
This is a lucrative career that could allow you to open your own business and make a lot more as well.
Just ask Stan Winston.
Let's start with how to make your own special effects makeup for cheap. Easy special effects makeup is still hard if you don't have the recipes and techniques.
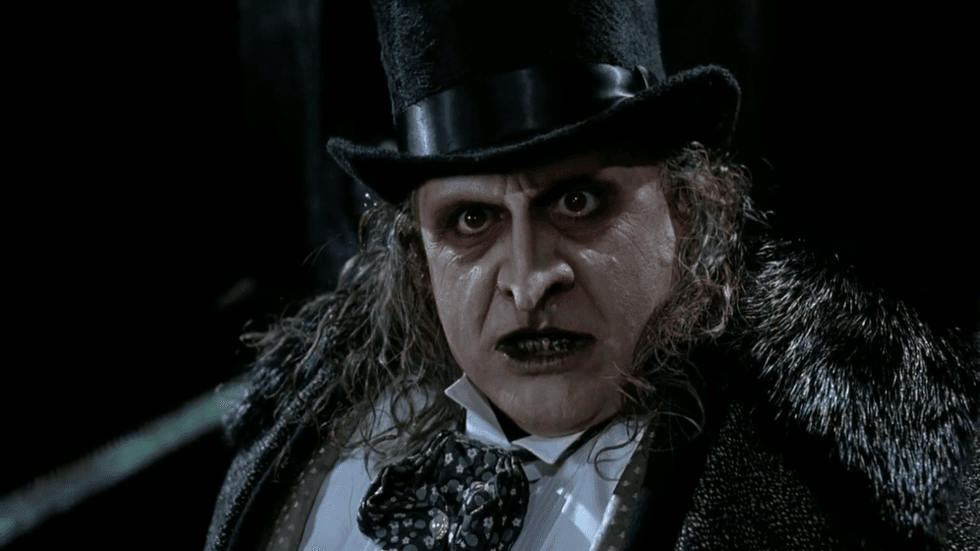 Stan Winston's Penguin makeup in 'Batman Returns'Credit: Warner Bros.
Five Special Effects Makeup Ideas for Beginners
Cheap special effects makeup is not an easy task. I rounded up the videos and recipes below, but I think the typical adage of "practice makes perfect" reigns true here.
So get to work on your friends and family. Hopefully, after some practice, you can be camera-ready.
1. How to Make Cuts and Wounds
It makes sense that in a slasher or any sort of horror movie people would be getting cut open. Those cuts need to look real and to be emotionally charged. When it comes to faking bloody gashes and open wounds, you're only going to need a few items...
To buy:
- Cotton pads
- White school glue
- Fake blood (keep scrolling for that recipe)
- Eyeshadow or paint (optional)
The above video shows how just a little glue and pads can be a great substitute for liquid latex. Also, I bought most of this stuff for under ten bucks, which is great for your budget. To speed up drying, use a blow dryer!
Use the glue to make elevated parts of your skin, then the holes or centers of the gashes can be filled in with the blood. Makeup does the rest for the blends. Color with red lip liner, eyeshadows, face paints, or even blush. You can match your skin tones at any drugstore.
2. Fake Blood Recipes
The title is hyperlinked to a longer post I did with recipes for the best blood. But this is the one I found to be the most professional.
The best blood recipe has not only to look real but be easy to use and recreate on-set if you run out of the sloppy stuff. It also has to be easy enough to use on your Halloween costume as well. These ingredients are all available on Amazon, and an FX person worth their weight and pay will carry most of this stuff in their toolkit.
Thanks to some awesome research by our intrepid writer, V Renee, we dug up VFX master Dick Smith’s (The Exorcist, Scanners, and Poltergeist III) ingredients.
Fake Blood Ingredients:
- (1 qt) Clear corn syrup
- (1 tsp) Methylparaben
- (2 oz) Powdered red food color
- (5 tsp) Powdered yellow food color
- (2 oz) Kodak Photo-Flo (WARNING: Toxic)
- (2 oz) Water
Steps to Make Fake Blood:
Mix the methylparaben with some of the corn syrup in a large bowl. Then pour in the red and yellow food coloring. Finally, mix in the water. You can adjust the color by adding more coloring.
This will come in handy as we figure out what color your movie requires. Here’s the catch with this blood recipe—you can’t eat it!
Repeat: This is NOT an edible recipe.
The ingredients are toxic, so make sure to keep it away from your actor’s eyes and mouth.
3. How to Make Scars That Look Real
What does a scar say about the character and how can you use them to build your story? Scars are really useful for characters. They can tell a backstory, or show that they've seen some serious shit. Here are some items you'll need to make your scars look real.
To buy:
- Eyelash glue
- Concealer or foundation
- Face powder, pink/red eyeshadows
This one seems pretty easy—and cheap! Basically, you paint the eyelash glue into the shape of the scar you want and use concealer and the foundation to cover it up, like you would an actual scar. Hit it with the pink and red eyeshadow if you want it to look more dastardly.
Either way, you'll have something that looks real for items you can buy at CVS.
4. How to Create a Burn with Gelatin and Glue
Burns cover some of our most famous horror villains, from Freddy Kreuger to Two Face. You might not have the CGI capabilities to replace someone's head, so instead, buy some of this stuff and get to work.
To buy:
- Gelatin
- Fake blood (you have this already)
- Face paints or red and black eyeshadows
One thing I learned from this video is that the gelatin people use for effects can be bought in almost any grocery store. It's the same one used for baking and cooking. You just make and mix the gelatin, then brush it onto the affected body part. As you see in the video, you glob it on, let it dry, and then paint and contour for effect.
Again, the painting is easier said than done. So keep at it.
5. Create an Exposed Bone
One of the grossest injuries is when you rip the skin so far back it exposes the bone. You can use this for someone who's stepped in a bear trap, or just someone whose flesh has been ripped clean off. To do this all you need is stuff you can get at the grocery store or pharmacy.
To buy:
- Liquid latex (or white glue/eyelash glue as a substitute)
- Tissue paper
- Face paint and/or eyeshadows
- Liquid foundation and fake blood (we got that covered!)
This one takes a lot of skill. You use the basic strategy for making a wound, spreading the liquid latex or white glue where you want to show an exposed bone. After making your outline, you let the glue dry. Then use the foundation or face paint to cover it.
You then cut out the area you want the bone to be—now your skin should have an elevated look.
You then roll the tissue paper into bone shapes. Use the glue to form them as well. You lay them where your bone should be, color in with liquid blood and paint to create the muscle and viscera, and dry.
Again, that's the basics. The true artistry comes in the painting after, but you have to admit the end results look great.
Wrapping Up the Techniques for Beginners
All the ingredients above can be inside a special effects makeup kit for beginners.
We can't all be a professional horror makeup artist like Stan Winston. But if you want to be, maybe attend his school.
A Professional Makeup Artist's Special Effects Makeup Kit
We went over the basics of DIY horror makeup. Now let's look at the way the pros do it. Turns out, they have expansive kits they use to pack in the products they need to create movie magic. So what's in their kits?
Here's a list of some special effects makeup kit essentials.
A Makeup Kit Checklist
- Airbrush compressor and gun
- Mehron CreamBlend Sticks
- Ben Nye Latex
- Kryolan Vulconised Clear liquid latex
- Alcone 3rd Degree Silicone Modeling Compound
- Elmer’s Glue
- Ben Nye’s Neutral Set Colorless Face Powder
- Ben Nye Blood
- Mehron Pro Color Ring - Bruise
- Pros-Aide
- Ben Nye Nose and Scar Wax
- Kryolan Fresh Scratch Effect blood
You might also need cream makeup palettes, types of bloods, setting powder, tooth paints, hair white, fake hair, setting spray, SFX makeup brushes, types of sponges, cotton swabs, a powder puff, Liquid latex, gelatin, spirit gum, rigid collodion for making scars, pre-made prosthetic wounds, types of wax, prosthetic sealer, types of makeup remover, and brush cleaner.
This is not a total list. There are things like Q-tips, pads, brushes, blenders, and all sorts of other materials. You can buy those kits on Amazon or all over the internet. Just Google them and see what you need.
More Halloween Special Effects Makeup
Now that we have some general stuff, I want to look into some cool special effects makeup that can be used for monsters and other horrific entities.
Zombie Special Effects Makeup
I don't know about you, but from George Romero to The Walking Dead, I love the zombie subgenre of horror. There's so much to say about society and to scare with these kinds of movies and TV shows.
To nail these kinds of characters, you're going to need supplies for the basic zombie look.
To buy:
- White face paint
- Eyeliner
- Eye Shadow
- Fake blood or gray/black lipstick (or make your own)
To buy if you're willing to spend more:
- Zombie/Halloween face paint (or other high-quality face paint)
- Liquid latex
- Fake scabs and/or other prosthetics
The basic gist here is to wash your face and get it ready for makeup. Color yourself in a dead color, like a ghastly blue or black. Blend it into your neck and other exposed skin. You should also darken around your eyes, so they have a sunken look.
Then all you have to do is apply the fake wounds and blood as necessary. Show us where that zombie bit ya!
Wolfman Special Effects Makeup
Ready to howl at the moon? This one is harder than all the other makeup applications we've covered. There are so many different ways to do it. You can buy fake fur and prosthetics to make it look more real, or just wear a wolf mask. You can also paint your face to resemble a half-man half-wolf character.
I would recommend checking out a wolf tutorial for the makeup.
A lot of that is just drawing, which I can't really teach since I am not good at it.
So look at this video online for an expert to help you along with this mission.
Vampire Special Effects Makeup
There are so many different kinds of vampires out there. From the ones who shimmer like Edward Cullen to the ones who are actually little old ladies disguised as children like in Interview with a Vampire. Once you know the kind of vampire you want to create, you can fine-tune this tutorial as needed.
Again, makeup should match the tone and story you're trying to tell.
So what will you need?
To buy:
- White face paint
- Eyeliner
- Eyeshadow
- Fake blood (or make your own)
- General beauty makeup
One thing people forget about vampires is that aside from looking cold, they also need to look human. So you want to have a real beauty kit around to make sure you still look human-like. Even if you are dead on the inside.
Some vampires will have face prosthetics, and all of them will need fake teeth, but here are some general tips to creating the face you want.
Start with a pale foundation all over your face, neck, and all exposed body parts. Blend with your skin so you look cold. If you want more definition, start with a grey or black color and put white over it to come off contoured.
You then want to apply eyeliner and shadow. For women, you can go with the Morticia Addam look, and for men, you can go anywhere from Richard on Lost to Tom Cruise in Interview.
Red eyeshadow can look like blood. Black and purple can be more Transylvanian.
Also, don't forget the lips. Will you go seductive and dark red or virtually colorless?
Contact lenses can also help in your pursuit of terror, but you can't make those at home.
Summing up Horror Movie Makeup Ideas, Tricks, and Tips
Whether you're using tofu as a substitute for brains or spreading fake blood by the gallon, creating your own VFX is one of the most fun things you can do as a filmmaker. We know that horror is a reliable genre where a lot of people make a big splash as directors.
Your budget can be tens of millions or tens of dollars, but the proper VFX can help the audience get into the story and buy into the world you want.
Whether it's shooting in black and white and using chocolate syrup as the blood, or painting your vampires to look extra white, or using clever editing techniques to sell your Wolfman transformation, you can do the work yourself with a little practice.
I know I didn't cover everything, and there are people way more experienced than I am who read this site every day.
Let's use the comments section to post links to help one another and brainstorm ideas of how we can help the NFS community kick some ass with their practical effects.
I can't wait to see the gruesome and gory things you come up with.
Scare on!
- How to Create Your Own DIY Horror Movie Monster ›
- How to Create Convincing Gore Practical Effects ›
- Learn Some Horror Makeup Techniques from Oscar-Winning SFX Makeup Artist Rick Baker ›
- Horror Movie Makeup Ideas, Effects, and How To Make Your Own Special Effects Makeup ›
- Gross-Out Gags and Gritty Realism: How 'Code 3' Found Comedy in Realistic Gore | No Film School ›