
The creative DIY filmmaker sees new possibilities in everything around them. This most certainly includes old, outdated, or cosmetically damaged gear. Giving anything in your arsenal new life is easy if you know what you're looking for.
This tutorial requires some soldering skills—if you're young or unfamiliar with soldering, we recommend the supervision of a parent or a pal.
Check out the tutorial from Kamil Keenan Visuals below!
DIY LED Softbox Tutorial: What You'll Need
Softbox lighting is incredibly versatile. To give any softbox in your kit a little bit of an attitude adjustment, we recommend using it as housing for a bunch of LED light strips for quick, lightweight illumination you can bring with you anywhere.
To build a DIY softbox with LED light strips, you'll need all of the following tools and materials:
- An empty softbox body with arms
- A speedring (as well as an adapter, something that will allow you to connect the speedring to a light stand or C-stand)
- A sheet of diffusion, or the one that came with the softbox
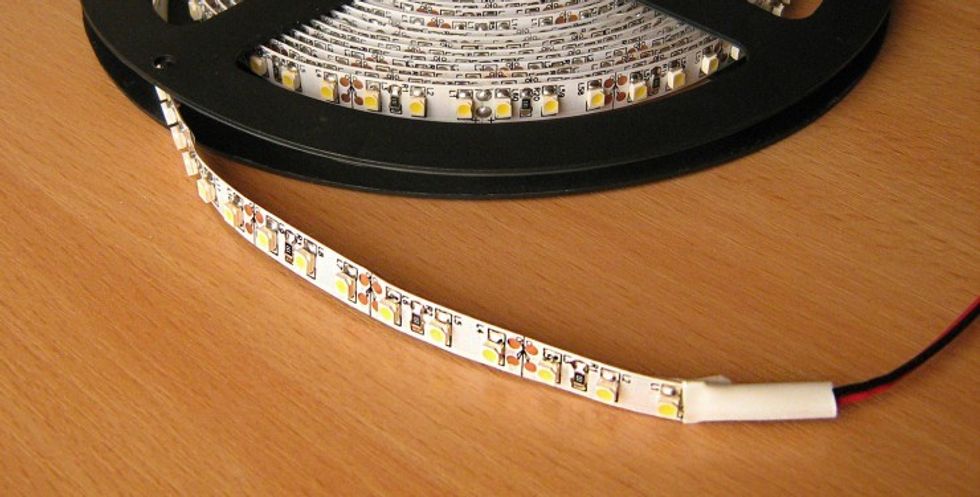
- LED strips, enough for 16 pieces of equal length
- A DC power supply contact and a power supply cable with a male Edison plug
- Insulated stock wire
- A soldering iron
- Solder
First, measure out each strip of LED for the inside of the softbox. You'll need two for each "spoke" of the inside.
Next, we're going to link them all up into one continuous string.
 Credit: Andrey Gvrv
Soldering LED Light Strips
This will be the most involved phase of the operation—soldering each of these 16 LED strips together, creating one continuous line of conducted electricity for all of them to share.
- Solder two insulate input wires into your first LED strip. Lock them in with an insulated soldering sleeve.
- Test both contacts against your DC plug power input. Label positive and negative accordingly.
- Solder each contact to the appropriate prong of the DC input adapter. Heat-shrink this point of connection, as well.
- Plug it in to ensure that the connection is sound.
- Grab two more insulated stock cable pieces. Piggyback another of your LED strips off of this first one. You'll end up with eight pairs of strips soldered together.
- Daisy-chain each pair together, creating eight two-strip loops for each section of the octagon softbox.
Once you've successfully linked up all eight pairs of LED strips, you're ready to attach them to the inside of the softbox. This part is much simpler.
 Credit: Igor Korzh
How to Use LED Strips in a DIY Softbox
Because LED lights remain cool to the touch, even after prolonged use, we're able to affix these LED strips using anything—either the peel-offs adhered to their backsides or with any ordinary adhesive. This includes tape, hot glue, or anything else sufficiently sticky and long-lasting.
Arrange them all in a circle, distributed evenly and radiating outward from the center of the umbrella housing. Be sure to manage all of your wired connections so that they sit comfortably with each LED light strip after they've all been stuck on. Your DC power adapter should pop out through the back for easy access.
Diffusing LED Lights
Once you've got the entire production up and running, you can add your layer of diffusion material to the edge of the softbox, just as you would when using it with an ordinary LED light.
Because these LEDs won't melt or burn through the diffusive material, you're totally free to experiment with your configuration—you can play with different types of diffusive material and adjust the distance that you allow between the LED strips and the diffusion in front of them.
For a punchier source, you can clip heavier material like a thick plastic sheet much closer to the center of the softbox.
For quieter lightfall, build the softbox as usual and drape the full length of a light, white bedsheet between the unit as a whole and the subject. When arranged with care, this is one great way to mimic the look of early morning or dusk.
DIY LED Lights: Flood the Room, All on a Dime
Thanks to your talent and local hardware store, you've now got an incredible amount of output at your disposal. This new unit is lightweight, cool to the touch, continuous, takes no time to set up, and draws little power, making it the perfect thing to have on hand when shooting low-budget and under the gun.
This DIY lighting project transforms an old softbox, a random umbrella, or even just a cardboard box into one of the most versatile LED lights that we've ever had the privilege of using. Try it today with anything that you have lying around the house and collecting dust.
Source: Kamil Keenan Visuals


