Let’s Make a $5 DSLR Camera Stabilizer
Camera equipment can be unnecessarily expensive, so let’s just build it ourselves.
We’ve all almost had heart attacks due to the camera slipping out of our hands. Cameras that are made for video have nice, huge handles to make sure we have a good grip on the camera, but DSLRs don’t come with that luxury. It’s an inevitable issue that, eventually, the camera will slip out of our hands. To avoid dropping our cameras, a good stabilizer comes in clutch.
If you’re afraid of dropping your DSLR, a fig rig is the best way to make sure you’ll always have a good grip on your camera. Fig rigs vary in price, but they typically cost around $300. To save your camera and your wallet, CineFix walks us through an easy and affordable way to create your own fig rig for under $5. Check out their tutorial.
Here is what you’ll need to create your fig rig at home:
- A drill
- A ¼ inch drill bit
- Rubber mallet (optional)
- PVC glue
- Tape measure
- PVC cutters or hacksaw
- 4-foot long ¾ inch PVC pipe
- 4x ¾ inch PVC elbows
- 2x T-joins
- A ¼ inch machine bolt 3” long
- A ¼ inch machine bolt 2” long
- 2x ¼ wing nuts
Now that you've got all the tools, let's start building this fig rig!
First, grab your 4 foot long PVC pipe and use the measuring tape to mark where to cut the pipe. Measure out two pieces that are 11” inches long, then four pieces that are 4 and ¾” long, and you will be left with a leftover piece that is the perfect size for an optional handle. Once you’ve measured and marked where to cut the PVC pipe, use the PVC cutters or hacksaw to cut the pipe.
Next is the assembly.
Before you put everything together with glue, map out where each piece will be and make sure it all fits together. You’re making a square with the pipe, so take the PVC elbows and pop them on the sides of the 11” pipes. If you have a rubber mallet, tap in the elbows to secure them to the pipe. If you are working without a mallet, you can use any sturdy flat surface.
For the top and bottom, connect the 4 and ¾” pipes to the T-joints. The bottom T-joint should be facing the inside of the square while the top T-joint is facing upwards from the square. This upward-facing T-joint is where the optional handle piece will go. Do not glue the optional handle piece in because there may be times when you film using the fig rig when you don’t need or want a handle.
Once you’re sure everything fits and is exactly the way you want it, take it all apart and glue it with the PVC glue. Remember: don’t glue the handle!
Now, it’s time to drill. One spot will be where the camera will attach to the rig, and the other spot is to hold on to the optional handle. Mark the spot on the bottom of the T-joint that faces towards the center of the square. Then, enter the optional handle, and mark a spot on both sides of the T-joint that is not too close to the T-joint edge, but still catches the pipe. The 2” bolt will be going through this T-joint. Then, drill out the marks with a small bit, and then re-drill with a large bit. Test to see if the bolts will fit through the space. On the optional handle area, the 2” bolt will go through the newly drilled hole and use one of the wing nuts to keep the bolt in place.
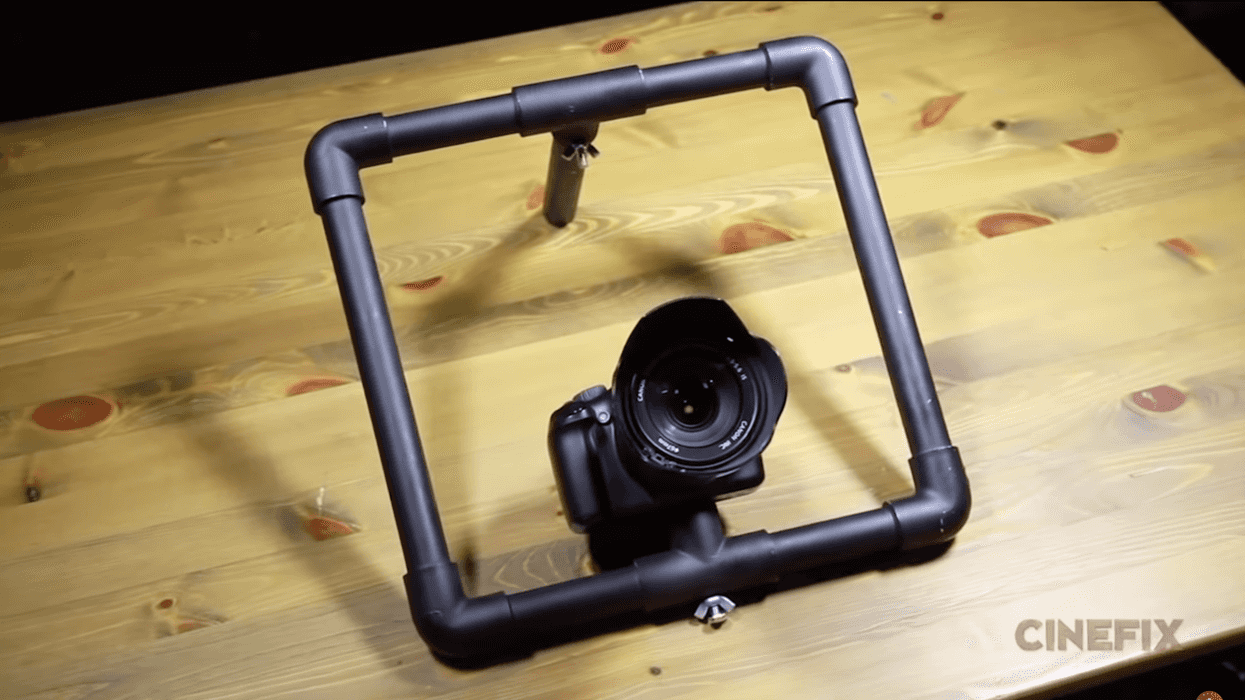
Boom, now you’ve got a homemade square fig rig!
All that’s left to do is attach your camera to the rig. To do this, use the ¼” bolt with a wing nut on it, facing upwards, and put it through the hole on the bottom T-joint. Then, thread the bolt into the camera of your choice! Make sure you’re threading the bolt all the way to make sure the camera is stable, then tighten the wing nut for the extra secure connecting.
This fig rig is perfect if you don’t have a dolly and need a dolly shot or just need that extra security for your camera. You can create a lot of great movement with this fig rig, and there is so much more you can add to this homemade rig if you’d like. The possibilities are endless with this DIY project.
Did you create this DIY fig rig? Let us know how it worked for you and if you have personalized it in any way in the comments below!
Source: CineFix - IGN Movies and TV


