Object Removal Made Easy with Content-Aware Fill for After Effects 2019
Perform quick object removal inside of After Effects with this brand new feature.
NAB 2019 is here and Adobe just announced the latest updates to Creative Cloud. One of the biggest features is the addition of Content-Aware Fill to After Effects. That’s right—you can now use the popular Photoshop feature on videos.
If you’re new to the object removal game, then let me explain. Content-Aware Fill in Photoshop removes a selected area of your image, replacing it with an automatically generated background via sampling adjacent pixels. The new feature in After Effects does the same, but since we’re working with multiple images instead of just one, it also samples from adjacent frames. Let’s take a closer look at how it works.
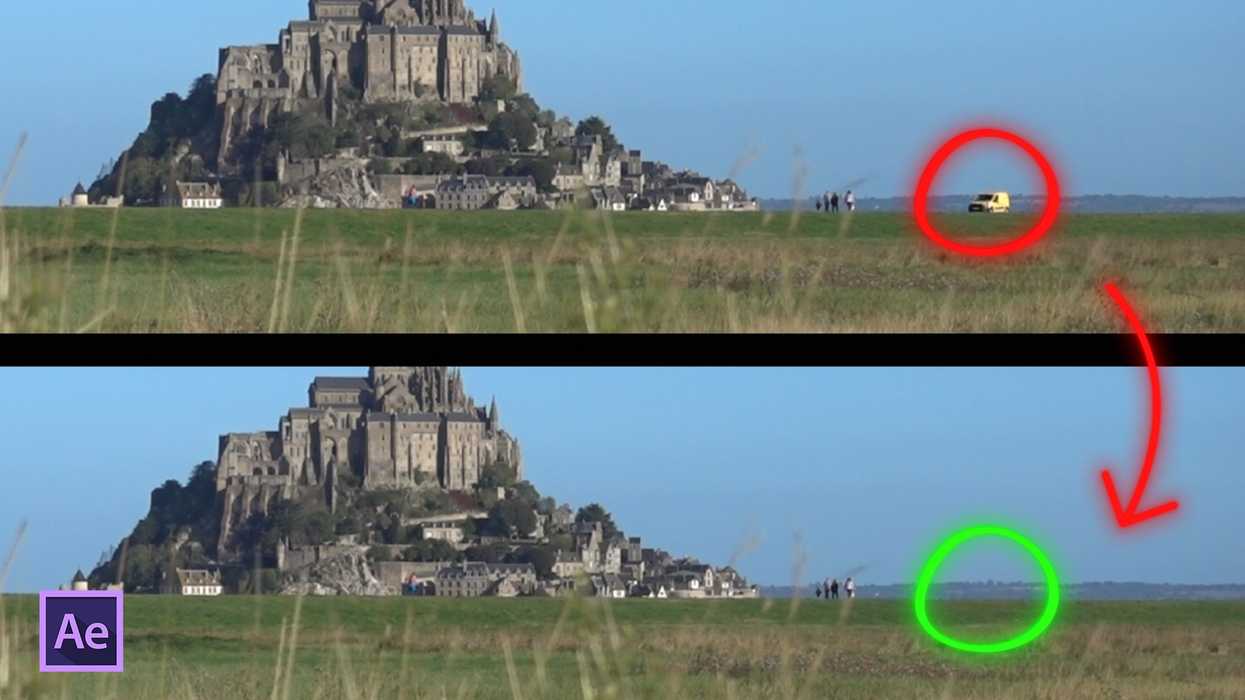
For this tutorial, I’ll be removing a vehicle that’s cruising through my shot. This eleven-second landscape clip of the lovely Mont Saint Michel in France looks nice, that is until a bright yellow van rides into frame. Removing it is quite simple with the new Content-Aware Fill feature.
Step 1 - Create an Area of Transparency
For the first step, I need to isolate the van and make it transparent. I can use whatever method I like, whether it’s the rotobrush, or mask tracking. The key is to make the area transparent, as Content-Aware Fill only fills in transparent areas.
First, I’ll grab my Ellipse tool and create a small selected area around the van. I’ll change the mask to None, just so I can easily see everything. Next, I’ll animate the Mask Path to follow the vehicle as it moves through screen. This is relatively easy, as the van is moving in a straight line. For more difficult objects, I can track the mask. Once my mask is animated, I’ll switch the mode to Subtract.
Step 2 - Generate the Fill
With my mask and transparency in place, I’ll go to Window > Content-Aware Fill. The panel has a number of options. First, I’ll see a preview of the Fill Target, which I can expand via the Alpha Expansion slider bar. Once again, it will affect any and all transparency, so you can mask out multiple objects at the same time.
Next, I’ll choose from between three different Fill Methods. Here’s how they work—
Object—Removes an object from the footage. Fills the transparent area by synthesizing pixels from the current and surrounding frames. Best for replacing moving objects, like a car on a road.
Surface—Replaces the surface of an object. Similar to Object in that it fills the transparent area by synthesizing pixels, but it does not estimate the motion of the surface. Best for static surfaces, like a sign on a wall.
Edge Blend—Blends surrounding edge pixels. Fills the transparent area by sampling pixels at the edges of the transparent area and blending them together. Renders quickly. Best for replacing static objects on surfaces that lack texture, like text on paper.
Since I’m removing a vehicle, I’ll select Object and press the Generate Fill Layer button. After it’s done analyzing and rendering, a new image sequence will show up on top of my layer. One of the main downsides to this feature is the fact that the image sequence files are quite large. This particular sequence is over 4gb for just an 11-second 1920x1080 clip.
Step 3 - Refining the Fill
With the fill generated, my shot looks absolutely great until the car cruises behind some objects in the foreground. And still, Content-Aware Fill almost pulled that off as well.
Getting this feature to work is a matter of selecting the right Fill Method as well as practice. For more complex shots, you can actually generate reference frames via Photoshop. The Generate Reference Frame button will automatically launch Photoshop with the current frame. Once you edit the image in PS and save it, the reference frame will show up underneath your layer on the AE timeline. These frames help you to get the look you want when the default fill just isn’t cooperating.
So what do you think? Have you used this new feature yet? Let us know if it works for you in the comment section! And be sure to check out the tutorial video above, where I also go over how to perform some basic skin retouching work with this tool.


