DaVinci Resolve is a robust piece of software for those working in post. It brings editing, coloring tools, and audio together in one user-friendly application. With every new version released, our workflows get easier, faster and much more reliable. Did I mention it’s also free?
Fairlight is DaVinci Resolve’s audio mixing panel. It was first integrated with update 14.0, allowing filmmakers direct access to formats like 5.1, 7.1, and Dolby Surround. Since, it’s gotten even better. Here are five Fairlight features you need to know to speed up your creativity.
Intuitive ADR Recording
Fairlight’s ADR panel has all the bells and whistles (or more aptly: beeps and streamers) to set up a streamlined, talent facing recording session. There are a slew of customizable options for visual cues including font type and color indicator line, as well as audio cues that allow you to change the duration and frequency of the beep if your talent is sensitive to the frequency.
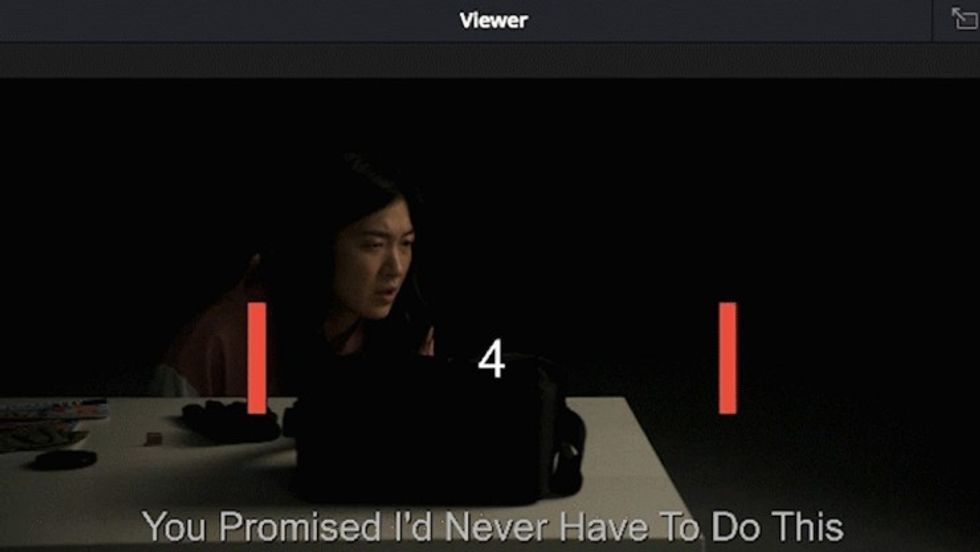
In the record tab, you will find the cue list ready to go. Click on a cue to jump to that point in the timeline and mark them as done as you go along. Use the rehearse button to preview the process to talent and hit record when ready. The takes populate the tab and you can rate them using stars. The recorded takes sit on top of each other in your chosen track.
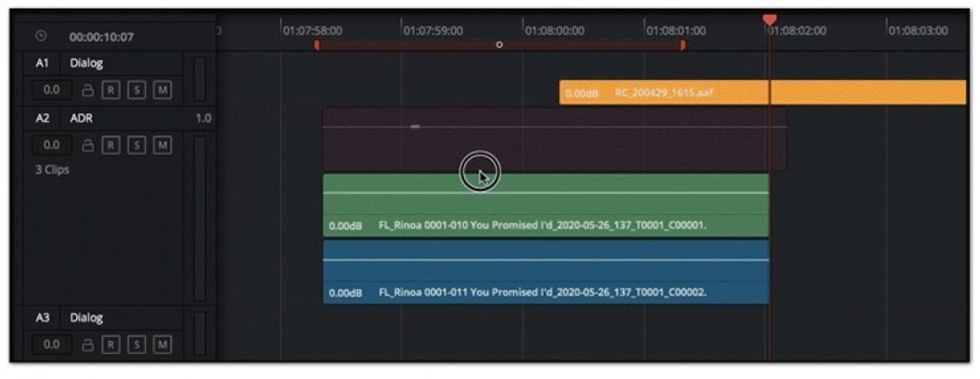
Working in Layers
In the View menu, enable Show Audio Track Layers. Within one track, you can stack multiple clips on top of one another. Inside layers, you can keep all your ADR takes for a line, apply different effects, or try alternate line readings to get approval. There is also an option to crossfade pieces of music to minimize tracks. With layers, only the top layer will play, similar to stacking video tracks with 100% opacity. Except here, you’re saving real estate and keeping things neat. You can also use this feature in the edit page.

Searchable Sound Library
If you’re anything like me, you’ve probably amassed quite a sound library over the years. Once you find the best way to organize and label them, it’s time to create a searchable library within DaVinci Resolve. You can import a folder of sound effects to create your very own library interface. After doing so, it becomes searchable and taggable.
If you’ve only tried the library in the Edit panel, you are missing out on the Audition and Set Sync Point features found only on the Fairlight page. The Audition button places an effect in your timeline without committing, allowing you to try different iterations. The Set Sync Point button lets you set a sync point in the effect so that when you bring it into your track it lines up with the playhead rather than the start of the clip or marked range.
If don't have a sound library, start with Blackmagic’s free Fairlight Sound Library 1.0. The file paths and metadata of the sounds you load are stored on the database so they are accessible in all your projects. To scroll through all sounds in the library type *** (three asterisks) in the search bar.
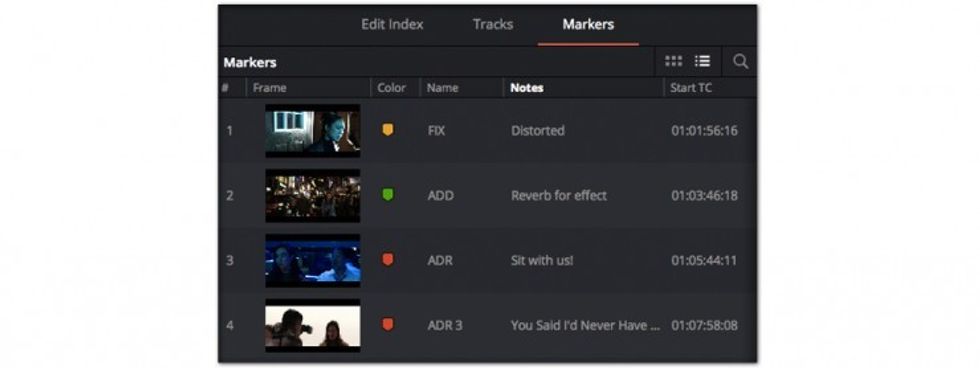
Easy and Clear Spotting
Using markers to spot isn’t new, but the great thing about Fairlight’s interface, is the video thumbnails next to the markers. Color code and organize by columns.
The track index similarly could become your best friend while editing. Blackmagic Design recently added track reordering functionality and track controls using sweep. You can also quickly refocus your view using the index.
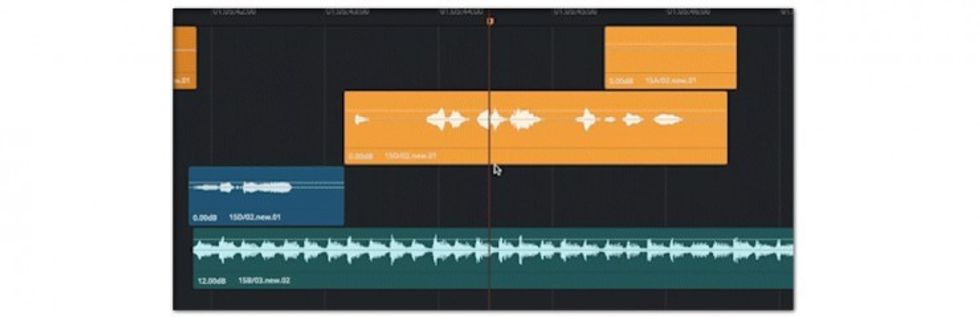
Like Elastic Audio in ProTools, Fairlight has the Elastic Wave tool, which allows you to dynamically re-time your audio clip. Instead of inputting a percentage to slow down or speed up a clip (which you can currently still only do in the edit page) you're able to subtly squish or stretch a clip while maintaining pitch, either as a whole or within constrained key frames.
Enable Elastic Wave in the right-click menu of the clip. Hover over the clip and slightly before the trim edge, then the mouse will change to the elastic icon. You can then set time keyframes by command clicking to re-time constrained parts of the clip.
Do you have any Fairlight tips creators should know about? Share them in the comments below.