Understanding The Exposure Triangle [FREE Exposure Triangle Cheat Sheet]
When it comes to fundamentals of filmmaking, one of the first things any aspiring DP should learn is the Exposure Triangle.
The “Exposure Triangle,” as it is often referred to, is a handy way of interpreting the major components involved in the process of capturing an image.
It can be very overwhelming the first time you grab a hold of a camera. Iso settings, aperture and shutter speed, exposure compensation. Plus a million little buttons and switches with detailed menus and complex navigation.
It is easy to get lost in the very basics of what these incredible machines ultimately do, which is create imagery.
It can be tempting to let the camera make all the decisions and just shoot on automatic mode, but if you really want to truly get the best image possible, you will need to shoot manually.
Whether you are an aspiring DP, or a writer/director looking to shoot a sizzle to go with your next pitch, the ability to shoot the images you have in your mind's eye is critical. Today we're going to learn the basics of exposure, and the Triangle is here to help!
What is the Exposure Triangle?
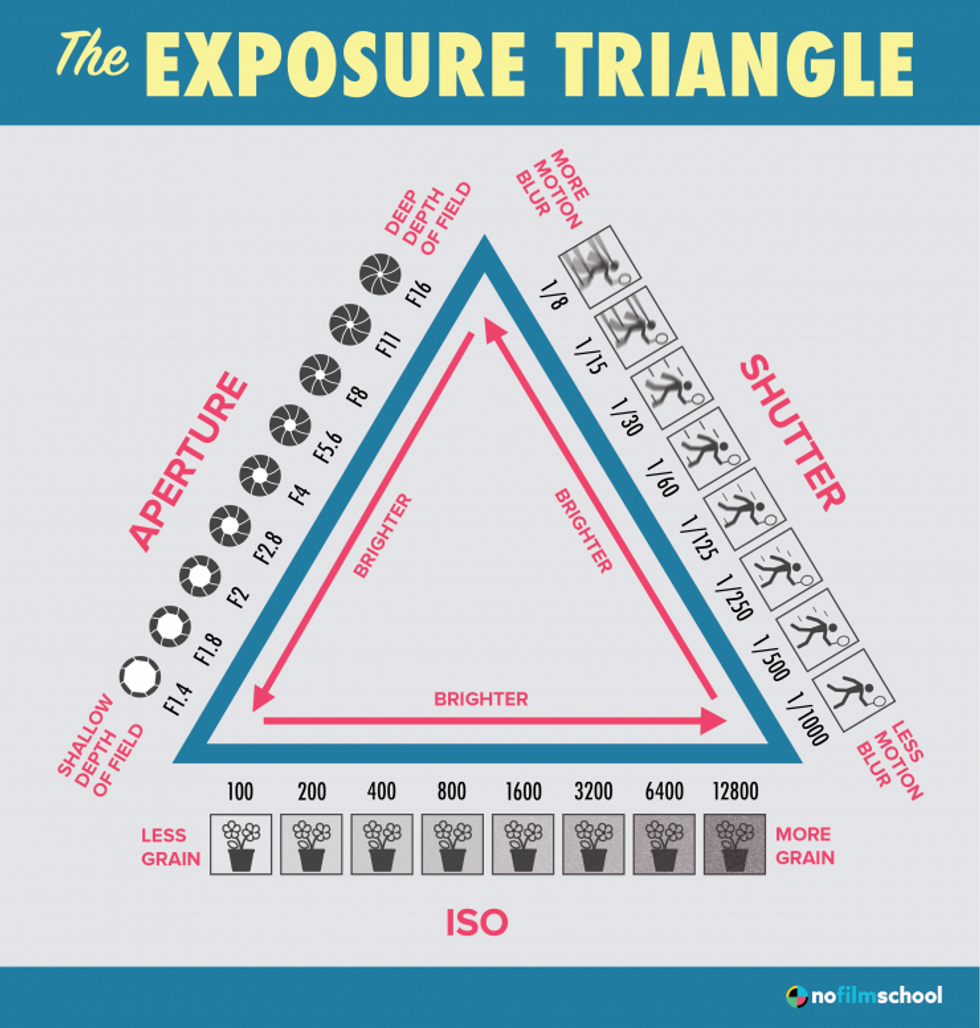
There are three main elements in the Exposure Triangle, which just so happen to be the three most primary camera settings you will need to address as you begin down your path to well-exposed shots. They are:
- Aperture
- Shutter Speed
- ISO
We will begin by breaking down each of these items to discuss what each one does, and how it’s affecting your final image, before moving on to discuss how you should tackle setting up your shots.
Aperture
And here we go! At the top of the Exposure Triangle sits aperture, most likely because of how big of an impact this setting will have on the overall aesthetic of your work.
Simply put, aperture refers to the specific setting of your lens’ iris.
Iris
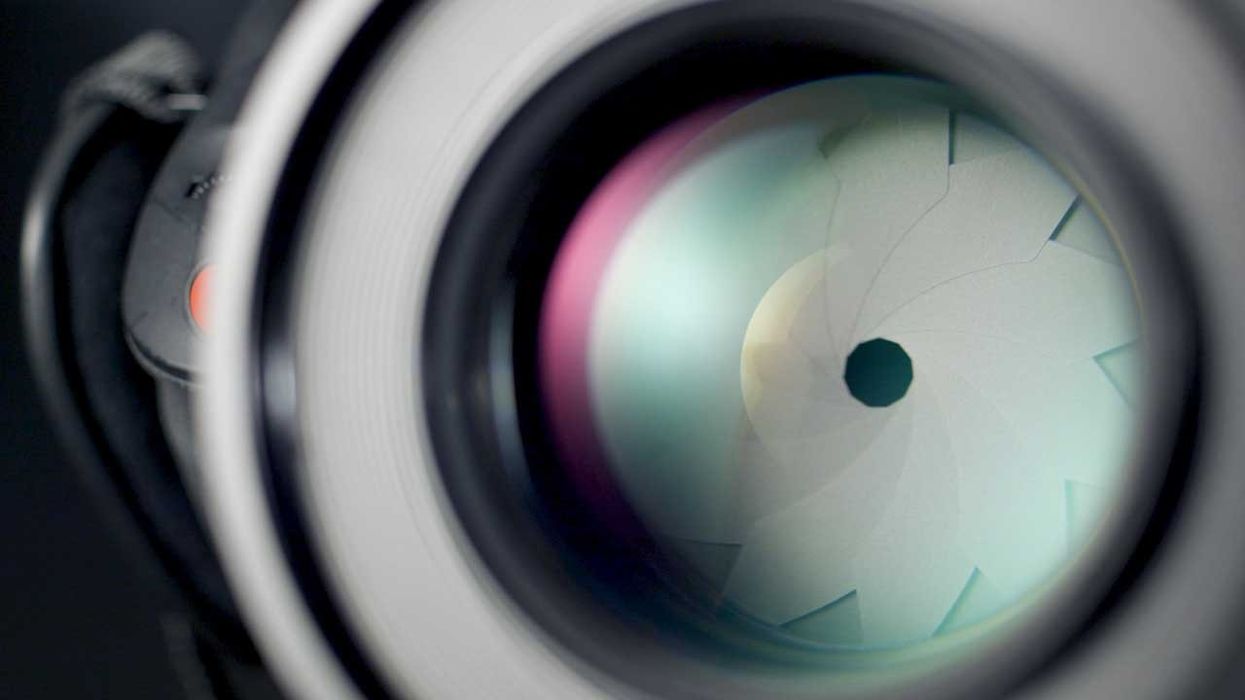
The iris is a mechanical, multi-bladed device inside of a camera lens that controls the amount of light that is allowed through to the camera’s sensor behind it. Much in the way the human eye works, the iris can open to allow more light to enter the lens. Likewise, it can also restrict to reduce the amount of light.
While it may seem like an easy answer to adjust the exposure of a shot is to simply swing the aperture dial open and closed, the iris setting is not just controlling the amount of light passing through the lens. The aperture of a lens also affects its depth-of-field.
Depth-of-Field
So what exactly is “depth-of-field” anyways?
The term refers to the plane of focus you will have to work within your shot.
- A wider aperture provides a more shallow depth-of-field, rending soft backgrounds that really separate and draw attention to your subject.
- A smaller aperture creates a greater depth-of-field, allowing more of a scene to be brought into the field of focus.
Because the aperture setting has such a huge impact on the look of your image, you don’t really want to use this as much to control the amount of light coming into the camera, it’s better to think of it as using the aperture to set the depth-of-field, knowing the impact it will have on your overall exposure.
Still with me?
Great! Moving onto our next point on the Exposure Triangle.
Shutter Speed Explained
What does shutter speed do?
It actually does what it sounds like; it controls the speed of how quickly the shutter will open and close for each exposure.
Often times, we see this number represented as a fraction of a second, something like 1/60. This comes from the photography world and refers to the physical opening and closing of the mechanical shutter, the opening of which is the inciting incident to creating an exposure, and allows light to strike the film or sensor and begin writing its image.
Photo-graphy = light-writing.
How Shutter Speed is Written
In the cinema world, more traditionally you’ll often find this number represented as a degree, as in 180°.
Although it may sound illogical to refer to time as a degree, the reasoning for this has to do with the way that the mechanical shutters were produced for use in motion picture cameras. The shutter mechanisms themselves were essentially a spinning disk, actually more like a half-circle, and the speed which that disk would spin controlled how long each piece of film would be exposed before advancing to the next frame.
How Shutter Speed Affects Images
Because shutter speed has an effect on the amount of time each frame is exposed, it also ends up affecting the characteristics of motion. Allow me to explain by offering the extremes:
- A fast shutter speed setting, something like 1/250 or 45°, results in each frame having much sharper detail, but also more staccato, jumpy movement.
- A slow shutter speed, something like 1/24 or 360°, results in very smooth and fluid movement, but also tends to blur details unless both the camera and the subject remain perfectly still.
The goal of finding a correct shutter speed is to ensure that motion is represented accurately and looks similar to the way that we see with our eyes. While we can deviate from this “normal” shutter speed for effect, like creating tension during a fight scene by speeding up the shutter speed, most of our work will be shot with one shutter speed. Finding this normal setting depends on the frame rate that you are shooting, but thankfully, there is a handy way to figure out the speed you should be using...
How to Calculate Shutter Speed
When using shutter speed, the correct number can be found by doubling whatever your frame rate is. So, for example, if you are shooting at 24fps, your shutter should be set at 1/48. Sometimes you may run into an issue where your camera limits your options and you can’t choose the exact setting you need, so you just have to use the closest position. (i.e. if you don’t have a setting for 1/48, 1/50 will work just fine.)
Shutter angle makes this even easier and is the reason many camera operators use it. Since shutter angle is relative to your frame rate, the correct setting is always 180°.
Simple as that!
Common Issues with Shutter Speed Settings
Sometimes your normal setting can cause lighting in a scene to flicker. This can often be overcome by adjusting your shutter speed until it goes away. Some cameras feature a setting where you can adjust the shutter setting by hertz (Hz) for this very reason, as it is an extremely fine-grained tool you can use to help eliminate those annoying flickers.
What does ISO mean?
The final point on our exposure triangle is ISO, which refers to your camera’s sensitivity to light.
ISO actually used to refer to the film stock's sensitivity to light, so a low ISO vs. a high ISO would scale as low sensitivity to light and high sensitivity to light. How does ISO work? Let's take a film example...
ISO 800 would be, for example, higher, and it would be a film stock one would choose to shoot in low light, because you'd need your film to have a higher sensitivity to the light available.
What else happens in this instance?
The final image has more grain.
So to recap, in the film world, your ISO is selected based on the type of film you load into your camera. This makes ISO a much more limited part of balancing the exposure triangle when working with film.
Shooting digitally, however, makes adjusting the ISO as easy as spinning a dial, but it’s important to know the implications involved in your chosen setting.
How to Choose ISO
Choosing the best setting is very dependent on not only the camera model, but also the picture profile or specific camera settings you are using. On most stills cameras, conventional wisdom says to always use as low of an ISO as you can, in order to produce as clean of an image as possible, because, generally speaking, lower ISO settings have cleaner images with less noise or grain, while higher ISOs tend to trade off increased sensitivity for increased noise.
While this may work when starting out using standard or Rec. 709 picture profiles, it always pays to double-check your camera’s manual or any white papers provided by the manufacturer. This is particularly important if you use any of the various Log options afforded by today’s popular cameras, where your ISO settings can be much more limited and adjustments can have large effects on your dynamic range.
The best way to really learn how these adjustments affect your image is to shoot tests and review how they’ll look and work in post.
The Exposure… Polygon?
Once you’ve nailed the concepts behind the three points of the Exposure Triangle, finding a correct exposure by balancing the various options will become much easier. It is important to note that these three settings alone aren’t the only thing influencing your exposure. The triangle is essentially an aperture shutter speed iso chart. But there are ever MORE factors to consider!
The Fourth Point: Frame Rate
The unofficial fourth point of the exposure polygon is actually your frame rate. As your frame rate increases, your shutter speed will have to follow along. Each frame will then be exposed for less time, resulting in a darker exposure. While this may not show much a difference between 24p and 30p, start to get up to 60p or even 120p and you’ve begun to lose multiple stops of light and it will definitely be evident.
Beyond the Exposure Triangle
So now that you’ve learned all the various concepts of exposure. What do we do with them?
When you approach filmmaking step-by-step, finding the perfect exposure becomes much less elusive and a lot more repeatable, so ironing out a workflow is very important.
Typically, since you often begin shooting by selecting a frame rate, your shutter speed and the characteristics of motion in your work will also be determined usually first. You would then select your aperture ideally based on the depth-of-field look you’re trying to achieve, so that would only really leave you with ISO to adjust.
Lighting
As we learned earlier, while in the digital world we can just crank this setting up until we’ve hit our desired exposure, it’s important to remember that that can result in unwanted image noise. So, rather than rely on ISO to be your final adjustment, it is always best instead to adjust the lighting in the scene, making it brighter by adding light in a darker scene or removing it using filters in one that may be too bright.
Scopes
Thankfully, many tools exist to help you on your journey to finding the perfect exposure.
Waveforms
Waveforms provide a graphic representation of your image and provide one of the best ways to analyze your exposure. They allow you to see all of the luminance information on a graph, and you can determine exactly where certain elements in the scene fall on this chart to ensure nothing is over or underexposed. Scopes like this can be found in many popular cinema cameras.
False Color
False Color is similar to the waveform in that it is also showing the luminance information in your scene, instead of showing it on a graph though, it paints your image with various colors to describe their luminance. This provides a very visual way to view the exposure of your scene and make adjustments accordingly. Scopes like this can be found in many external monitors.
Light Meter
The light meter is the most trusted piece of equipment in many cinematographers' bags. These handy pieces of equipment can actually measure the lighting in your scene and help provide you with insight as to the correct camera settings to be using. Light meters have been in use since the beginnings of film, so it’s certain they can be trusted to nail your exposure in a very analog and manual way.
Up Next
The basics of exposing a good image aren't really basic at all, they are the way visual artists express the story. In addition to mastering these considerations, you can look forward to things like types of camera angles, shots, and movements. Have fun!


 "'Back Home"via Mercedes Arutro
 'Back Home'via Mercedes Arutro


