Recording quality audio for a narrative production, whether a short film or feature-length movie, has a lot of challenges. No matter what budget or production scale you're working on, many principles carry over and can be applied and adapted.
Today we're going to lay out everything you need to know to be successful in an area that is often the make or break for a project. Nobody, and no project, can go far without high-quality sound. Whether you are recording the sound yourself, or working in another part of the production and simply trying to better understand this critical role, this piece should be of tremendous use to you.
A lot of sound recording comes down to preparing for the shoot, having the right gear plus experience to use it, communicating with other departments, and using critical thinking to solve problems. Audio is one of the most immersive parts of a film and generally starts with the production sound, recorded by the production sound mixer and the sound team.
Here's what you need to know to improve production audio as well as your skills as a production sound mixer.
Pre-Production
Script Breakdown
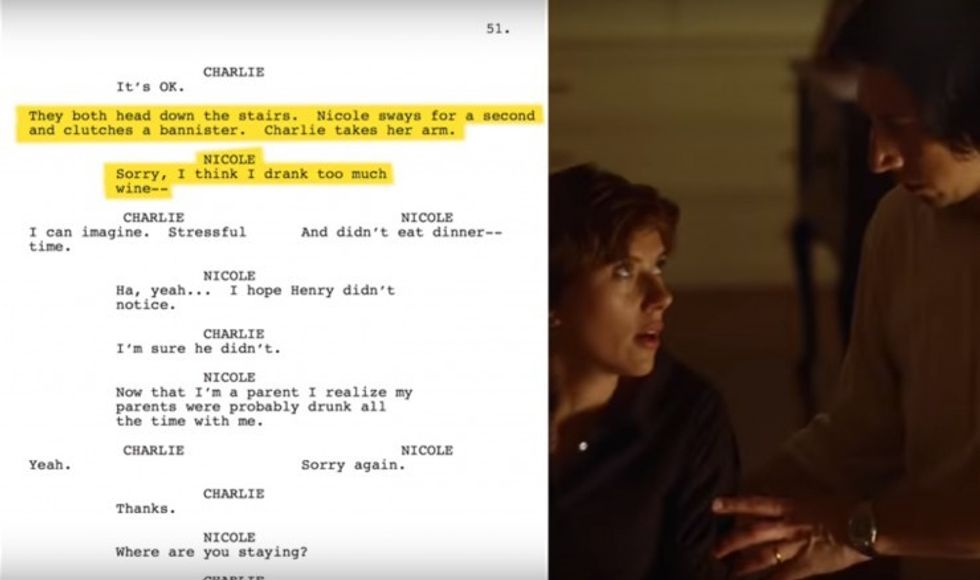
Knowing what to expect is half the battle. Before any narrative production, I ask for a copy of the script to read. In addition to knowing the story, it lets me know how many characters to expect in a given scene, the locations, and what kind of challenges we might face on set.
While the script might get revised before entering production or during production, I like to go through either the most up-to-date script or daily sides to color-code each character’s dialog and match those colors to my gear so I have an intuitive way of knowing what’s coming up as I am mixing. So if the character "Arya" is blue, the channel that corresponds to the character on the recorder is also blue.
Gear Prep
In the fast-moving world of production, having your gear prepped, organized, and ready to go is essential. While preparing to enter production, you should build out your sound kit to how it will be configured for the run of the show. That way you are ready to go and have confirmed everything is working before arriving on set. Organizing and knowing where every piece of gear goes helps you not only work quickly but minimizes your risk of losing gear while on location.
Expendables List
Make sure you have the expendables needed for the run of production. By breaking down the script ahead of time, you can get a loose estimate of what items you might need in terms of batteries, lav mounts, tape, etc.
Make a list of everything you may need, and submit that to production, so they can order it on your behalf.
Insurance
Taking expensive and delicate gear out on location creates a lot of risk for damage, loss, or even theft. While working for someone else, ultimately they are liable for anything that happens to the stuff, whether accidental or malicious. In the sound department, you are handing out different gear to different people. From slates and sync boxes to the camera department, wireless to talent, and IFBs to the director, script supervisor, and producers, there is a lot of potential loss or damage. In addition to your own personal insurance policy, every production should be providing a certificate of insurance listing your company as additionally insured in case anything unfortunate were to happen.
Working With Other Departments
Sound is a non-visual department, and a lot of times you aren’t at the forefront of a lot of other departments’ thoughts, so communication is a huge part of working on a film set. As a department head, it’s your job to communicate potential issues to other departments and get the information you need to do your job effectively.
Production
Some of the main jobs of assistant directors (ADs) and the production department is to keep production on schedule and facilitate communication. Doing good work in an efficient manner starts with knowing what’s happening, timing for the day, and having someone to express concerns to if they arise. Additionally, production can assign production assistants to help with lockdowns while rolling, minimizing issues with chatter coming from off set.
Locations
When there are potential noise issues – building HVAC, refrigeration, noisy neighborhoods, landscaping crews, etc – communicating with the locations department about getting those issues taken care of is of huge importance. Discuss concerns with the location manager well before shooting begins to ensure they have plenty of time to take care of them. In very large buildings, sometimes HVAC can take a lot more than flipping a switch to turn it off, often requiring several hours prior notice prior.
Camera Department
You’ll have a lot of interactions with the camera department. From setting up the camera to take timecode, delivering the slate to the 2nd AC, getting video feeds for your monitor, and discussing what upcoming shots might entail. The camera department may also occasionally need to listen to the mix on IFBs for cueing camera moves or focus pulls in scenarios when they can’t be in the same space with talent.
Costumes & Wardrobe
When it comes to micing talent with hidden lavalier mics the costumer is your friend. Before every scene, I like to have a quick chat with them to figure out what talent will be wearing, the material type, color, and what might be the best solution for hiding both the mic and transmitter. This lets me go back and prep the wireless mic with an appropriate mounting solution and transmitter pouch – be it an ankle strap, thigh strap, waist strap, or clipping directly to the pants waistline to be covered by a jacket.
Continuity or Script Supervisor
Communication with the script supervisor is very important. They are typically responsible for ensuring camera and sound are on the same page for labeling, gathering sound reports, and much more. The script supervisor may also need an IFB to hear what’s happening on set while they take notes for each take.
Electric
With the electric department being responsible for all electricity and lighting, you need to talk to them before tapping into any power for your equipment. Working with them to figure out how lighting will affect boom shadows can make your life a lot easier. With generators being heavily used on productions, communicating with the electric or transportation departments about getting them located further away from set will go a long way towards bringing down the noise floor.
Grip
Some of the gear that falls under the grip department’s purview can unfortunately create problematic noises, like squeaky dolly track or diffusion frames flopping in the wind. The grips I’ve worked with have all generally been very good about these potential sound problems, but never hurts to give a friendly reminder if an issue arises.
Equipment
Regardless of the budget and scale, when it comes to quality, it’s more about how you use the gear then what the gear specifically is to a degree. Inversely, you also need the right tools to do the job at hand. There are countless manufacturers that create sound gear at a wide variety of price points. The cost to quality ratio has significantly come down in recent years, and indie filmmaking has been more accessible than ever before as a result. Whether working on a feature with an extensive equipment package of top tier brands, a low budget passion project with simply a boom and a recorder, or anywhere in between, knowing your gear and how to maximize its potential is imperative.
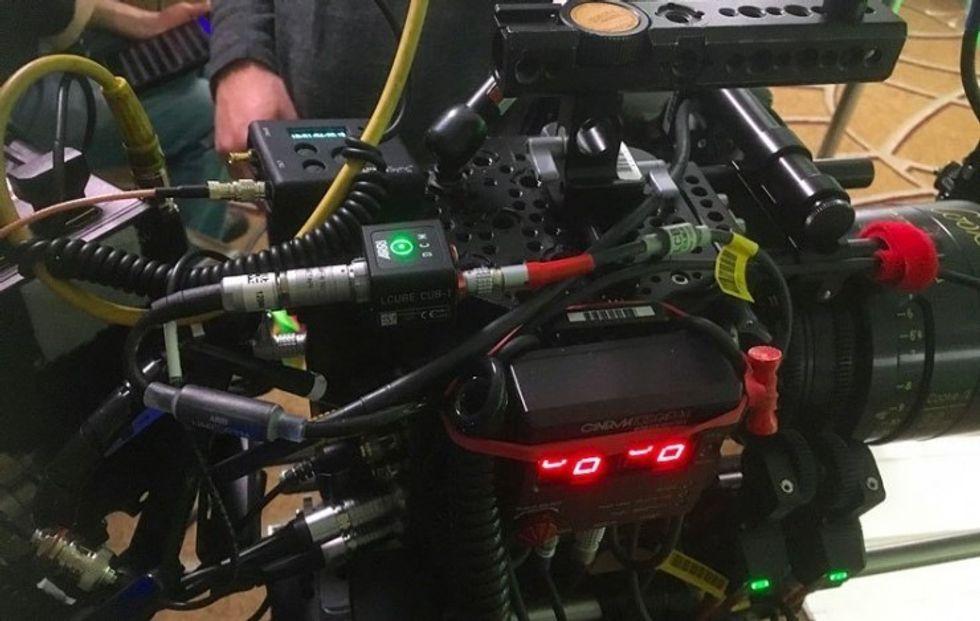
Mixer & Recorder
The mixer and recorder are the heart and brain of any production sound package. These days, it’s very common for the mixer and multitrack field recorder to be integrated into a single unit. The mixer and recorder allow you to not only capture the audio on set but to set incoming signal levels, route mix outputs wherever they might need to go – like an IFB – and monitor what’s actually being recorded. There is a wide variety of purpose-built field recorders ranging drastically in budget and feature set. With high-end recorders costing well over $9,000, like the Sound Devices Scorpio or Aaton Cantar X3, to low-end recorders like those by companies like Zoom or Tascam that can be had for a few hundred dollars. There is absolutely a huge quality, longevity, and feature set between those, so ultimately it comes down to what best suits your needs.
Boom Mics
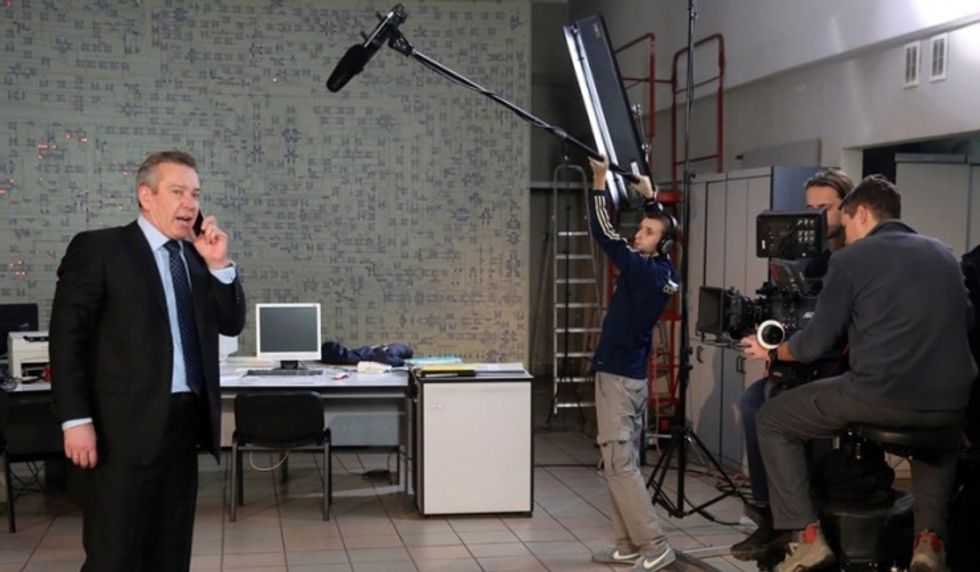
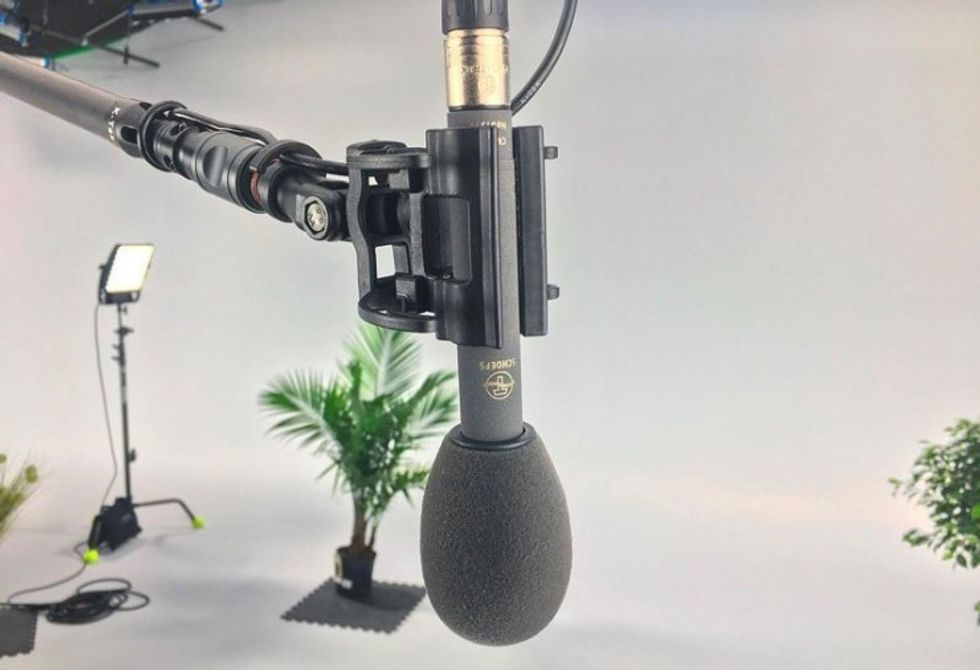
Boom Microphones are the core of how audio is captured for video. A well-placed boom will almost always sound far superior to a lavalier. There are several components to a boom mic kit outside of just the mics themselves. The boom itself, the mic shock mount, and your wind protection are all just as important as the mic itself.
Keep in mind, not all booms are created equal. They vary in material, quality, size, and weight. Generally speaking, this is not somewhere you want to skimp, as booms can transmit handling noise into the microphone, and a lightweight carbon fiber boom can make your life much easier. There are a lot of great options from the likes of K-Tek, VDB, Ambient, PSC, Loon, and others.
Choosing a Boom Microphone
Choosing what microphone will perform best in each scenario will vary. While there are best practices, trusting in your experience will inform your choice. The main factors that influence my choice are whether you’re indoors or outdoors, the location’s acoustics, and how noisy the environment is. For exteriors, generally speaking, shotguns with interference tubes are going to perform best. Their interference tube gives them an incredibly tight pickup pattern helping them reject more of the outside world around them. This same interference tube that makes them ideal for outdoor dialog capture can bring out undesired phasing and comb filtering artifacts indoors with smaller rooms or spaces with excess reverb.
My go to choice for indoor dialog is a super cardioid small diaphragm condenser. The slightly narrow pattern of a super cardioid gives a nice focused sound. When working in uncontrolled higher noise environments, I’ll likely lean more towards a shotgun again for the added rejection that comes along with it. Every scenario is different and anywhere from wide cardioid to the lobar shotguns will perform fine, it ultimately comes down to knowing your microphones – their characteristics, their sound – and making a judgment call as to what will work the best.
Shock Mounts
Shock mounts are an incredibly important part of the boom mic kit, as this is what physically holds the mic on the boom, and isolates it from outside vibrations from handling the boom. Another place not to be skimped on. Fortunately, there are great options from Rycote, Cinela, K-tek, and others. Make sure your suspension is optimized for the weight and size of your mic, otherwise it may not perform well.
Wind Protection
Keeping wind off the capsule of the microphone prevents unwanted low end rumble from being induced. Whether working indoors with fast boom movements or outside in high wind conditions, you need to have the right wind protection for each scenario. This could range from a light foam cover when working indoors, to a full blimp with a dead cat fur covering when outdoors. Often with very high levels of wind protection you’ll lose some high frequencies, so many high-end mics like the DPA 4017b or Schoeps CMIT-5U, come with high boost switches to compensate for this.
Wireless
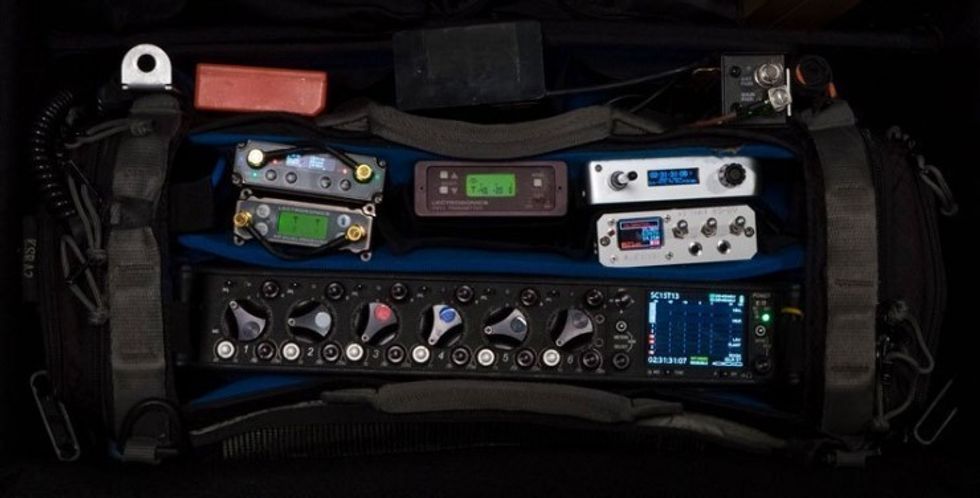
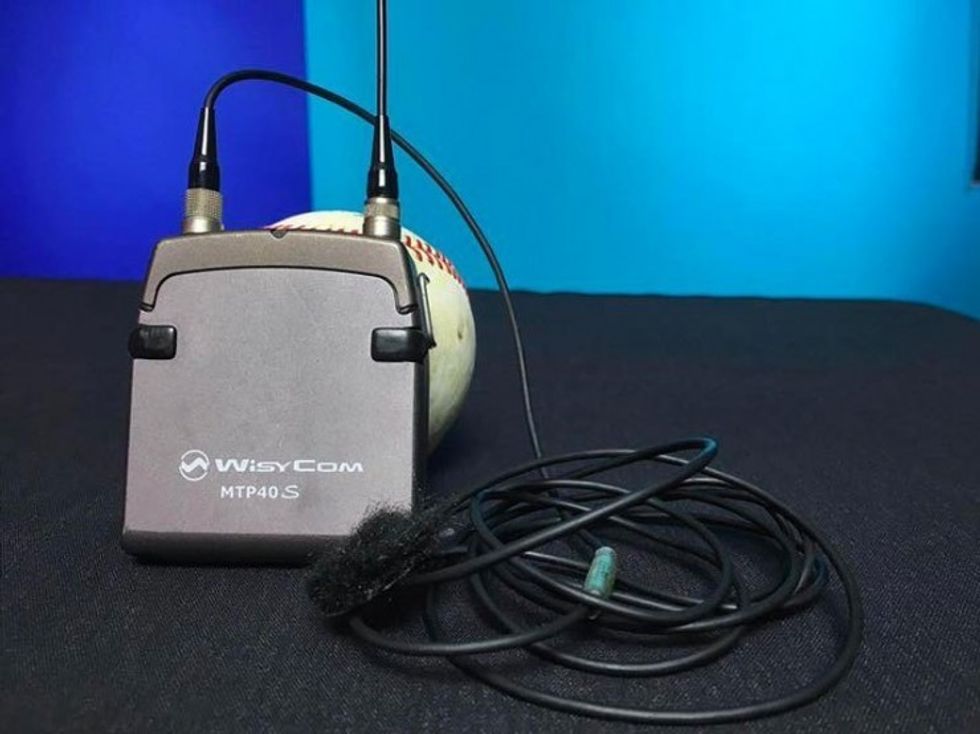
Wireless is a key component of modern production workflows, allowing for more flexibility and faster-paced shooting, as well as capturing quality dialog when framing doesn’t allow for proper boom placement. Not all wireless is created equal though, and can vary a lot in feature set, sound quality, usable range, and more.
Entry-level wireless such as Rode and Sennheiser Evolution Series leaves a lot to be desired in terms of feature set. Outside of sound quality and self noise, there are a number of features I look for when selecting wireless including: receiver diversity, tuning band, typical range, ability to use external antennas, mic input termination, ability to run frequency scans, output power, etc. Fortunately, having all these features and high sound quality is standard for any high-end wireless system from the likes of Lectrosonics, Wisycom, Zaxcom, Audio Limited, and Sennheiser’s higher end product lines. In modern workflows, it’s very common for the boom mic to be wireless as well.
Lavaliers
Body-worn lavalier mics are a great way of capturing clean dialog for scenarios where the boom mics aren’t practical due to framing or heavy shadows, but they also come with a lot of disadvantages as well. Preventing clothing rustle or muffling when burying lavs under clothing can be quite challenging and every wardrobe requires different techniques. There is also a limit to the quality & self-noise possible with miniaturized microphone capsules like those of lavs when compared to the quality possible of boom mic capsules.
Even with all these challenges, they are an essential part of modern production workflows. There are quite a number of amazing lavs ranging in quality, size, and budget from the likes of DPA, Sanken, Countryman, Sennhieser, Shure, Sony, Deity, and more. My personal favorite is the DPA 6060 for it’s incredible sound quality and very low profile size. Makes it an excellent choice for buttonhole rigs or hiding in a thin and lightweight wardrobe.
Plant Mics
Plant Mics are mics that are hidden on set in order to capture dialog or nat sound where booms aren’t going to play well and don’t suffer from the same issues body worn lavs do. A few use cases might include rigging the interior of cars, closed sets, or when talent is in a specific area of the set allowing for quality capture with a hidden mic.
Wireless IFB Headsets
Wireless IFBs (Interruptible Foldback) headsets allow various crew members to listen to a feed of the audio mix. A crucial piece of gear allowing those at video village to hear what’s happening in the performances. Typically, in addition to the boom op and utility having a private IFB line, headsets will be distributed to the director, script supervisor, producers, and anyone else that might need one. Having a private line for the sound team allows communication without everyone else on set hearing your conversations.
High Gain Antennas & RF Distribution
The use of remote external antennas and RF antenna distribution allows you to not only get more wireless range, but gets the antennas closer to set then the sound cart might be able to be. Receivers in the way they fundamentally work have oscillators built into them that when channel counts start climbing can create interference with one another. Stack a bunch of receivers in close proximity to each other all using independent whip antennas and you’ll get diminished range & reliability, or worse intermodulation.
As channel counts start increasing, adding an RF distribution can help by isolating the wireless receivers from one another while sharing a common antenna. With the added range you get off high gain antennas, you can also reduce the required transmitter power giving you more battery life and yielding a lower RF noise floor.
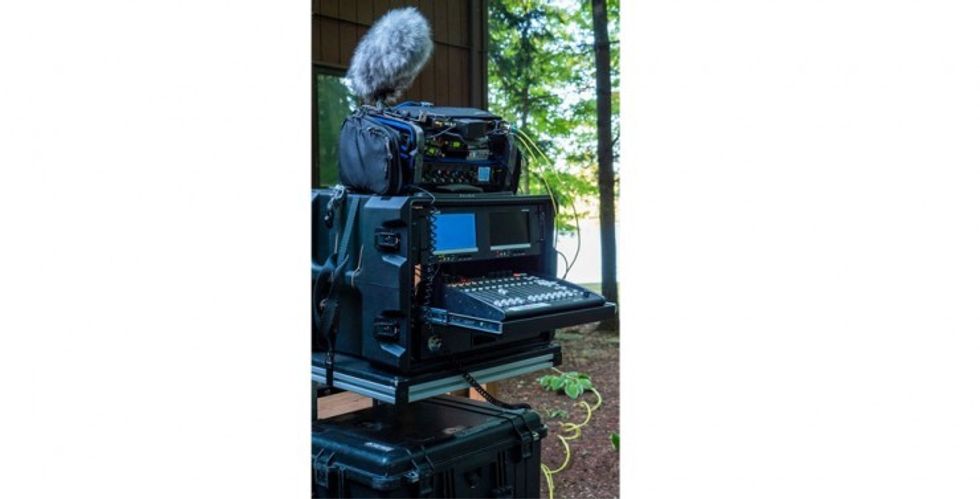
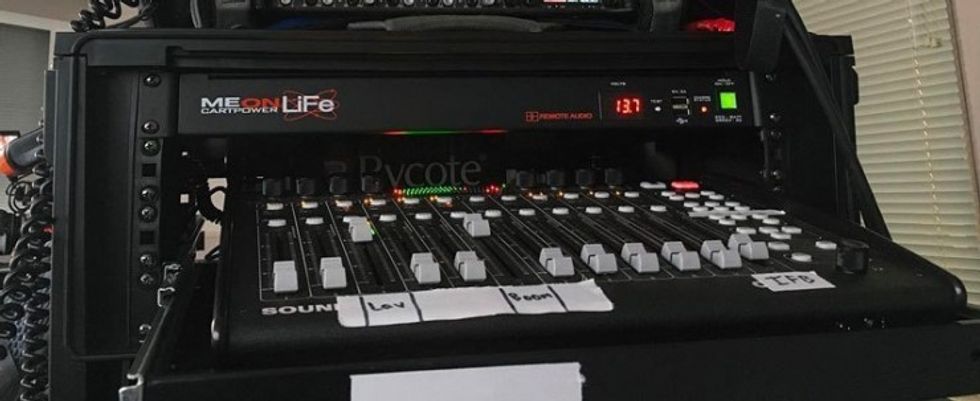
The Sound Cart
Working quickly and efficiently starts with being well organized and nimble. Having a cart that keeps you mobile is a necessity in the production world no matter what department you are in. In the sound department, there's a lot of gear that needs to be transported from location to location. Investing in a quality cart allows for quick and easy transportation of all your gear.
I personally like vertical style carts for their small footprint, and use an 8020 modded vertical Magliner Junior. Cart’s are a very individualized thing that varies quite a bit from sound mixer to sound mixer. The key things I look for when selecting a cart are keeping a small footprint, lightweight but strong design, minimum of 8” wheels for rough terrain, ability to hold cases, stands, boom, cabling, and monitors, and a work surface. On top that, a size to fit comfortably into a vehicle for easy transport.
Video Monitors
When not physically on set, having a video feed from video village is extremely helpful for mix cues, knowing frame lines, and working out potential shadow or reflection issues with the boom op. It also allows you to better keep in contact with what’s happening on set between takes.
Sync: Timecode Boxes & Slate
Since cameras are terrible at recording audio, there is a very good chance all the audio will be recorded using a separate recorder. When this is the case, being able to synchronize the footage and recorded audio becomes a big consideration. The simplest way is by using a dumb slate with matching labeling to the recorded sound file names, and using the visual and audio cue from the slate clap to sync the files in post-production. Smart slates use a LED display to flash corresponding timecode visually to the camera.
In modern professional workflows, this is where timecode boxes enter. Timecode is embedded metadata that allows for frame accurate syncing of audio and video files in post with extreme ease. Professional cameras, audio recorders, and timecode smarts slates all support the use of timecode for this purpose. For my workflow, I use my recorder to generate the timecode fed to my Timecode Systems Wave RF Master Clock that distributes the timecode to RF sync boxes that go on each camera ensuring reliable sync throughout the day without drift issues.
Power Distribution & Batteries
One of the less sexy categories of equipment, but also one of the most vital, is how you power everything. I would put it into three categories: power distribution, batteries and chargers, and cart power.
Power Distribution
Power Distribution is where all the individual pieces of gear interconnect to and safely splits a single power source into multiple outputs. There are a ton of great options from DIY to high end battery distribution like the Audioroot eSMART BG-DU. When choosing a battery distrobution, I like having multiple switches to divide components of my audio kit into power zones. Another important factor for me is a display that reads out battery voltage and current draw. This helps me keep an eye on the battery level to know how long until I need to swap batteries.
Batteries
Having plenty of battery power to get through the day is essential, especially when working in remote locations that have limited access to AC power. There are a lot of great battery options to power your gear from, such as NP1 lithium-ion batteries, smart batteries that provide battery telemetry like Inspired Energy ones, and many more. A few things to keep in mind when choosing batteries are capacity, cold weather performance, and how you connect to them.
Cart Power
In my eyes, viable cart power solutions must fit a few criteria. It needs to have multiple DC outputs to provide power to not just my bag, but monitors, and anything else on my cart. It needs to be able to plug into AC power so I don’t need to rely on batteries when AC is available. Finally, it needs to have a high capacity internal battery that it seamlessly transitions from AC to battery power, and charges its battery when AC power is present. I think of this like a production specific UPS that outputs DC instead of AC. There are a few options for cart power from the likes of PSC (Professional Sound Corporation) and Remote Audio. For this, I personally use the Remote Audio Meon LiFe. This lives in a rack case with my Sound Devices CL-12 mixing control surface and powers my entire sound kit and the 17” monitor that lives on my cart setup.
Other Equipment
Outside of just your core sound equipment there are a lot of accessories that not only make your life easier, but also make sets safer and protect your equipment from damage during inclement weather. With schedules to meet, and scenes that can require filming outdoors in weather such as snow, rain, high winds, or freezing temperatures, you need to be prepared for whatever the world throws at you.
In my kit, I keep an insulated ice fishing tent, Sachtler sound poncho, clear trash bags, rain jacket, rain pants, waterproof boots, sun hat, and warm layers. I also keep a couple sound blankets in my van to address hard reflective surfaces, footsteps on top of dialog, or to cover noisy sources that cannot be shut off – like HVAC in some larger buildings.
Safety for fellow crew members and talent is paramount. Be prepared to take precautions to anywhere someone could potentially get hurt, Anytime you are using stands, they should be sandbagged to prevent them from toppling over and hurting someone. Any cable runs should be taped down to prevent someone from tripping and hurting themselves. Often productions have overnight shoots, so having an adequate working light will help you stay safe and organized.
The Sound Team
On productions, members of the sound department typically consist of a sound mixer or sound recordist, the boom operator(s), and a sound utility.
Sound Recordist
The sound recordist, production sound mixer, or simply sound mixer, is the head of the sound department, and is ultimately responsible for all sound on set. Typically supplying the sound equipment, and hiring the other members of the production sound team.
Boom Operator
The boom operator or boom op, is the onset representative of the sound department. Using a boom with a microphone attached to capture the film’s main sound source is one of the many responsibilities of a boom operator.
Sound Utility
The sound utility works to support the sound team. Some core responsibilities may include running cabling, maintaining and charging batteries, keeping the gear organized, distributing IFBs, wiring talent, and anticipating potential needs that may arise for the sound mixer or boom op.
Workflow
There are a lot of nuances that go into doing great production sound work, and ultimately a lot of it comes down to being prepared, organized, and setting yourself up for success. A lot of the workflow for getting great sound on short films or narrative features isn’t just about the actual recording, but everything you do before and in between shots.
Loading In & Setting Up
The first thing I do upon arrival is unload my equipment and start getting prepped for the day. I want to know where the set is going to be not just for the current scene but other scenes throughout the day as well. This way I can plan where to ideally set up my sound cart and not have to move it all day. This might be inside, outside, in a garage, etc. Ultimately you want to be well out of frame and within a distance to get cabling for both SDI video a nd remote RF antennas in closer to where the action is on set.
For anytime I am working outdoors, I keep an insulated ice fishing tent in my van. Not only is it insulated for cold weather, waterproof, and a great way of getting shade on sunny days, but it is also blacked out on the inside making it easier to see monitors.
Radio Frequency Scans
When arriving at a new location it's important to run wireless frequency scans and coordinate any wireless channels. Most professional level wireless have this feature built in. There are also products like RF Explorer out there allowing for a more in depth look. Having your wireless on clean channels goes a long way toward ensuring you don’t experience interference while helping maximize your potential range.
Coordination is also very important because wireless transmitters in addition to their set frequencies also output harmonics that can overlap one another creating potential interference from intermodulation. I use the iOS or Android app Freq Finder for this since it allows you to input the frequencies you are using and check them for compatibility with one another.
Distribute Equipment
The sound department provides a lot of gear to other departments, including the many IFBs, timecode boxes for on camera, and the slates to the AC. Before any gear goes out it needs fresh batteries. The last thing you want is the director’s IFB to die during the middle of a take, or cameras to lose sync without noticing. Once everything is ready to go, the utility or boom op can start getting equipment to where it needs to go.
Blocking Rehearsals
Blocking rehearsals allow for key members of the crew to see how a scene will play out. I think it’s very important for both the sound mixer and the boom op to both be present. During blocking you will learn where talent will be throughout the scene, where dialog will take place, and any actions that might step on dialog that needs to be addressed. From here, each department can get to work finalizing what’s needed to be ready to start filming.
Micing Talent
At this point it’s a good idea to check in with the wardrobe department to see what our talent will be wearing so we can start prepping lav mics and wireless transmitter pouches. Every type of wardrobe will create unique challenges to overcome, so knowing what technique to fall back on comes with time and experience. Talent might have preferences for how they wear their transmitter, so early on in the production its best to have a quick chat with them. I will try and always favor their preference. I’ve worked with talent who prefer belt clips, waist straps, ankle straps, and even clipped to their bra strap on their back.
Micing someone requires getting into their personal space, so I always try to be very communicative about what we are going to be doing. While most professional talent are used to getting mic’d, some people won’t always be comfortable with you invading their personal space to do so. In that case, I will let them mic themselves while giving them a detailed walk through to help them get it right.
Another thing worth figuring out with talent is what their dialog level might look like so you can approximate their gain staging for their wireless transmitter.
Here are two techniques I love to employ when possible:
- Buttonhole Rig – Using a very small lave popping up from just behind a shirt or jacket button.
- Paperclip Spacer – Using a bent paperclip to reduce clothing noise, especially great on heavier clothing.
Potential Noise Problems
Extraneous noises are the enemy of capturing great audio, this may include environmental sound sources like weather, traffic, generators, refrigerators, or noises from actions that overlap dialog like footsteps and loud props. A lot of these can be addressed to minimize their impact on the final product.
HVAC and refrigeration can be turned off. Footsteps can be addressed with carpets or foot foam on the bottom of shoes. Loud props such as a plate getting set down on a hard surface can be addressed with moleskin or foot foam softening its sound.
Talking to production and locations about lockups of foot traffic, or potentially even vehicle traffic, can help further lower the noise floor. If generator noise might be a problem, it’s best to communicate this to the electric team early on, so they have ample time to move it further away. Ideally with something like a building between set and the generator.
Recording & Mixing
Once everything is set and ready to go for the scene and it’s time to start recording and mixing. Once the AD has called for sound to roll, it’s time to hit record, audibly slate the take, and tell the boom op we are rolling over his IFB so he can communicate on set that sound is rolling. From there, the camera will begin to roll, and the 2nd AC will slate the camera and sound.
If all your gain staging is correct from the beginning of the signal chain down the line, you should only need to make subtle trim adjustments throughout the scene. Mixing the sources and crossfading the channel faders to ensure only the mics you need open at once allows for a cleaner mix for IFBs and dailies, as well as better approximation of what the production audio will sound like in post.
Unless otherwise requested, I typically record a stereo mix, even with all mono content, because it will land on channel 1 and 2 on the polywav track layout. This allows for easier previewing of just the mix and not the ISO channels.
File Management
How you approach labeling and file structure is a conversation you should have with post, the DIT, and script supervisor to ensure everyone is on the same page. Generally speaking, you might start with a hierarchical file system starting at the top with a project folder, followed by a date folder, and finally scene folders within that.
Labeling for what the takes are should always match what the script supervisor and slate says to avoid confusion in post-production. As cards get changed, you also should be labeling sound roll numbers, and communicating the roll changes for the scripty to log.
Whether using digital or hardcopy sound reports, they should be delivered to the script supervisor to be sent to post. Sound reports typically contain information like scene, take identifier, file labeling, track labeling, take notes, and metadata information including timecode, sample rate, bit depth, roll number, and contact info. In addition to turning over media, I also dump a copy onto my own hard drive as another backup just in case.
Capturing Room Tone
Capturing room tone is something easily forgotten about by anyone outside the sound department, but can save the day when it comes to post production. There are two main uses for room tone, or world tone for outdoors.
First, to help smooth problem areas in the dialog edit by being able to bridge edit points with the same noise floor as what’s behind the dialog. Second, to analyze the noise profile and be able to more accurately use software to denoise it. Once rolling, generally speaking 30 seconds of quiet room tone is good enough for a location with a constantly changing noise profile. For something like the outdoors, I try to capture a bit more length. This simple step can save a ton of time and frustration during the dialog edit in post.
Final Thoughts
While this just scratches the surface to all the nuances and techniques used by professional sound recordists, hopefully, it provides some insight into the world of production sound. Ultimately, it starts with a strong knowledge base to fall back on, having the right tools at your disposal, using critical thinking, and creative problem solving. If there is a problem that can be addressed in production, it should be. One of the most foolish phrases that gets used way too frequently is “we’ll fix it in post”. This can lead to endless headaches down the line and likely requiring costly processes like ADR. If there is a problem, say something, make adjustments, and ask for another take.
Editor's Note: This story first appeared on Rapp's website https://henrirapp.com and was edited for clarity.