Since the earliest days of cinema history, color grading has been an integral part of the filmmaking process… And, wait, was that a scoff I detected?
Oh, so you think just because films were done in black and white that they didn’t have the need to color grade?
Well, think again, my friend, as color grading is truly an OG film skill. Just ask the guys from Film Riot, who in their latest video said, “Even in the days of black and white, different chemical treatments made it possible to give different atmospheres to the image.”
And there’s a lot more to learn from there. So whether you're just starting or need to go back to basics, here’s everything you need to know about color grading.
Color Grading 101 - Everything You Need to Knowwww.youtube.com
The Basic Concepts of Color Grading
As with any filmmaking (or specifically post-production) process, there are some basic terms and concepts you should know before you dive in. For starters, you should know the difference between color grading and color correction.
Here, I’ve created a detailed list of the differences:
- Color correction: done first to correct your image or the color of your footage.
- Color grading: done second to change the colors for aesthetic reasons.
It’s not that difficult. But it can understandably be a bit confusing for those just starting.
 Color CorrectionCredit: Film Riot
Color correction should always be your first step to get your footage into a neutral baseline from which to begin your work. This may include things like adjusting white balance, equalizing exposure, reducing highlights, increasing the midtones, and applying noise reduction.
Most importantly, this is where you unify the base look of all the shots in your sequence. It's all about balance.
Color grading comes next where you can use curves, masks, color wheels, and other precise tools to develop the aesthetic your film needs. You can also utilize things like LUTs and grain to really make your image pop.
But to really talk about color grading, we need to talk about color space.
 Color GradingCredit: Film Riot
Color Space and Rec. 709
Knowing which color space you are working in, or which color space your camera is recording, is crucial to planning your grade and deliverables.
For example, Rec. 709 is a color space used for deliverables, and Film Riot explains that it's “the most common profile that most screens use by default.” This is an aging broadcast standard from the 90s that is still used to make sure that all your devices and screens are showing the same colors for your images and footage.
However, it is slowly evolving into new HDR (High Dynamic Range) profiles like Rec. 2020 and Rec. 2100 for cinema. Unfortunately, consumer display technology is still playing catch up.
 How many colors each color space can reproduceCredit: Film Riot
Each camera manufacturer also has its own optimized color space for interpreting raw sensor data. Just don't mix up Gamut and Gamma.
Where Gamma relates to brightness and contrast, Gamut is all about color.
The goal with color space is to use the best possible acquisition color space your camera has and then deliver your final image in the correct color space for your exhibition. Save for Netflix and some other streamers, Rec. 709 is still the go-to for most deliverables. Even YouTube still relies on the aging broadcast standard.
 Different color space for different camerasCredit: Film Riot
But while some cameras can record in Rec. 709, it might not be the best color space for color grading, as you'll be locking yourself into a limited color range. But if you're delivering footage without grading, Rec. 709 is a great solution that can save on storage, time, and money. Consider your acquisition and deliverable format before hitting record.
Honestly, the whole story of color space deserves an article unto itself, but here's a great breakdown from Frame.io to get you started.
The Differences Between RAW and Log
It’s helpful to have a holistic knowledge base to really understand color grading. That's why it’s cool to see Film Riot talking about different recording options and profiles, as it is such an important part of the color grading process.
Take for example the differences between RAW, which Film Riot explains as footage that “records all the information from the sensor to develop a usable image,” versus Log, which “uses an optimized gamma curve to record an image containing as much information as possible in the highlights and the shadows.”
 RAW image pipelineCredit: Film Riot
RAW footage isn't really an image, it's literally raw sensor data pulled from your camera's sensor. It has no color space when recorded and lets your color grading software interpret the footage into a workable color space. While this gives colorists a lot of options to push and pull the image, it comes at a cost—RAW has an appetite for storage and processing power.
 Credit: Film Riot
Log footage, on the other hand, is compiled in the camera with an acquisition color space before being recorded to your media and can come in all sorts of containers, such as H.264 and ProRes. A Log image appears washed out, which still gives creatives a lot of room for color grading but takes up less storage than RAW and requires less processing power.
 Log image pipelineCredit: Film Riot
Having an understanding of your final output is necessary to make decisions on what format to shoot on. If you have a quick turnaround, RAW may not be the answer. Even if you have all the time in the world, Log footage may be more than enough for your needs. So when should you use RAW?
Well, it depends. Here's a write-up from our very own Charles Haine to help you decide.
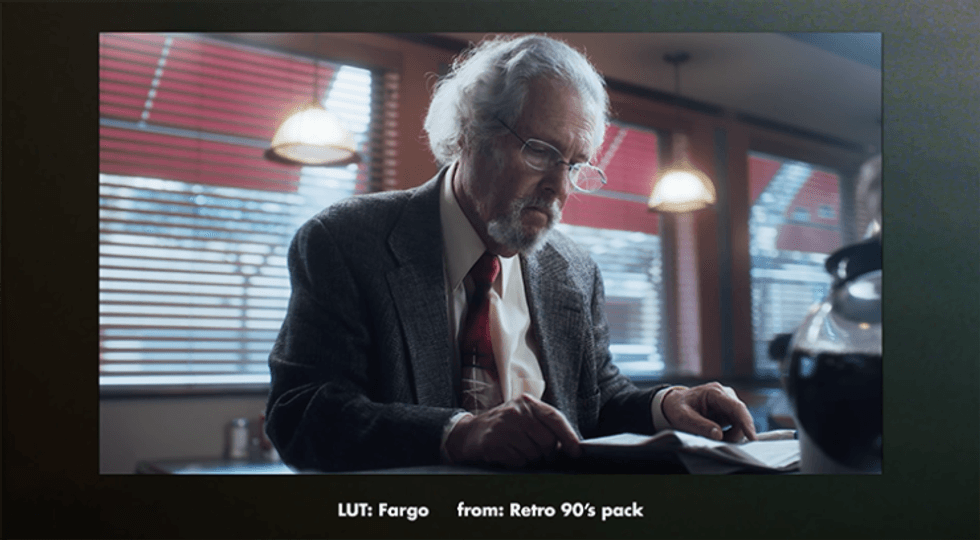
Using Creative LUTs
Finally, while there is plenty more to learn about color grading theory and how to work with nodes, scopes, and waveforms, we do have to mention LUTs, or Look Up Tables. They might be the single most important innovation in the world of color grading since… well… color itself.
 Conversion LUTCredit: Film Riot
LUTs modify the color space or visual look of an image pixel by pixel.
Initially, LUTs were created to be used for monitoring and properly perceiving the additional look that print film would apply after you did your color grading pass. These are called technical LUTs. But in the world of digital cinematography, LUTs have evolved. When used creatively, this simple modification tool allows filmmakers to emulate film stocks or evoke nostalgic emotions attached to certain decades. Take a look at this sample from Film Riot:
 Credit: Film Riot
Now, with great power comes great responsibility, as these creative LUTs have become so much a part of filmmaking and video production that they can be overused or—more often than not—just used poorly.
The real trick is to use creative LUTs as a quick way to start your color grading process. They are a great way to get inspired, lock in a look in pre-production, or set a foundation for film emulation. You should still do your color correcting first. Just remember, subtlety is key. Juan Melara has a great blog with tips on working with creative LUTs.
Still not sure what we're talking about? We explain more on LUTs here.
Food for Thought
Hopefully, these insights have given you a solid understanding of the basics of color grading. Maybe this was your first time learning about these concepts, or you might have simply needed a refresher. If you’d like to read more about color in general, check out this guide.
Regardless, take these tips and tricks with you to help you on your own filmmaking journey. And be sure to share your projects and favorite looks in the comments below!
Source: Film Riot
- What Is Color Grading, and Why Do You Need to Do It? ›
- A Complete Guide to Setting Up a Home Color Grading Suite ›
- We're Going Back to Basics—Color Grading 101 in 2022 ›