Premiere Pro Tutorial: Using Adobe's Blend Modes to Create Rich, Filmic Images in a Jiffy

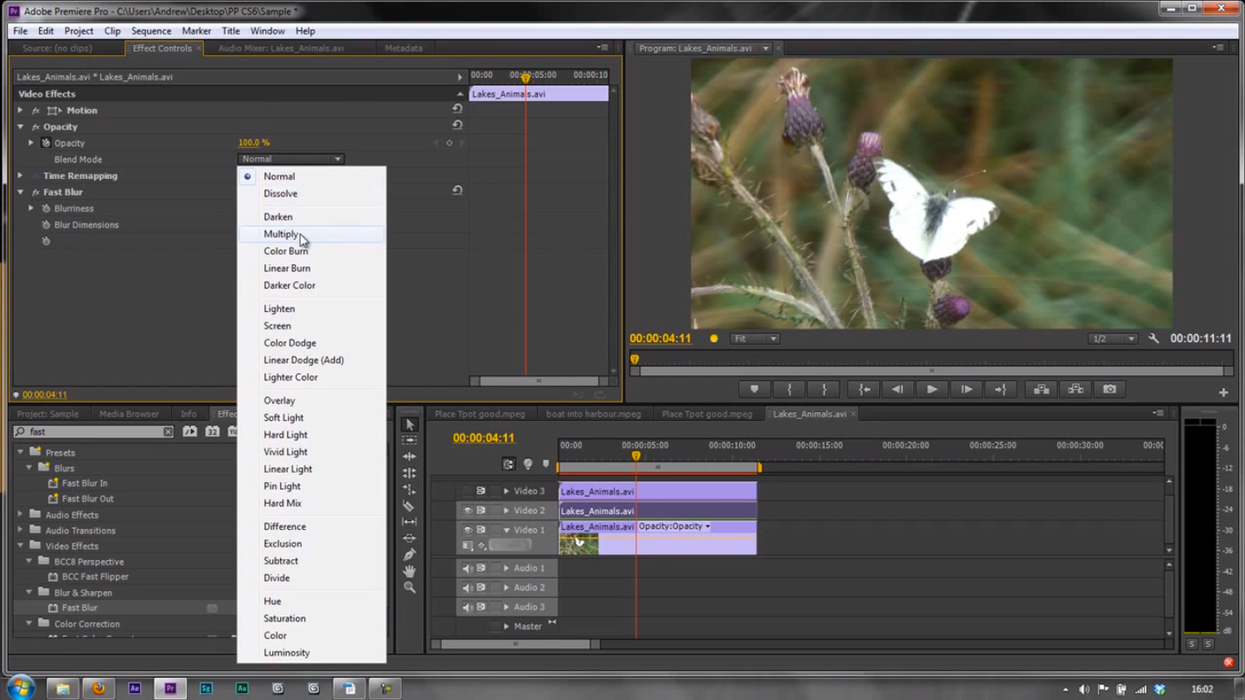
It seems as if everyone's shooting with flat or log profiles these days. While these profiles can be a tremendous tool for maintaining dynamic range and preserving chrominance detail, the amount of post work required to make this footage look its best can be overwhelming at times, especially for those of us who are shooters first and editors/colorists second. However, bringing your flat footage to life doesn't need to be as tedious a process as it's sometimes made out to be (with roundtrips from After Effects and your color grading tool of choice). In fact, you can get great looking filmic shots in a jiffy just by duplicating some layers and letting Adobe's fantastic blend modes do their thing. Here's Creative Cow's Andrew Devis with the details:

At this point, you might be saying to yourself, "Why would I go through all of this trouble when I can accomplish the same thing with a basic curves plugin?" The concept behind using layers and blend modes -- as opposed to traditional color correction techniques -- is a simple one that is akin to the way HDR footage is captured, with two different exposures that are merged together to create one wider latitude exposure. With this method, the amount of control that you have over the intricacies of both your shadows and highlights is limitless, and the sheer amount of "looks" that can be created this way is astounding. Once you find your own "special sauce" combination of blend modes and opacities, recreating and tweaking it to perfection should become another quick and simple step in your post production process.

Granted, this method will not be for everyone, especially those on extremely tight schedules where both editing and rendering times are at a premium. However, if you're looking to bring a some pizazz to your videos and are willing to put in the time to experiment with this technique, the results can be absolutely stunning, especially considering how little work it takes compared to traditional color correction.

What do you guys think? Have you used this method on your videos, and do you have any recommendations for which blend modes to use? Let us know in the comments!

Link: Premiere Pro CS6: 69 Color 22 The Filmic Blend Technique - Creative Cow

Your Comment

26 Comments

"It seems as if everyone’s shooting with flat or log profiles these days"

Even those that can't, still seem to aim for that look in color correcting.
Every advert, Vimeo upload and Music Video seems to be using the "scandi-grade" look these says.

I get positively giddy when I see something on Vimeo which actually has rich vibrant colors.

May 30, 2013 at 9:52AM, Edited September 4, 8:21AM

0
Reply
Fresno Bob

I like the idea of pulling more filmic colors from video. I often use this same technique, but I use two adjustment layers instead of duplicating the video layer. Not sure if it saves you any of the render time (haven't tested it against this method), but it's just my preferred method for color grading in Premiere Pro.

May 30, 2013 at 10:06AM, Edited September 4, 8:21AM

3
Reply

This is interesting. I don't love how it affected the highlights, but I don't know how much of that is footage-specific vs. the technique itself. This is well-timed for me - I just shot what must be the flattest footage I've ever shot, and I've been trying different things to correct and grade it appropriately.

May 30, 2013 at 10:12AM, Edited September 4, 8:21AM

1
Reply
David S.

Hey David, my guess is that what you're noticing with the highlights is the result of badly shot video, and not the grading technique. I noticed it too, and after having tried the technique on some of my old footage, I came to the conclusion that the highlights getting blown out is not really a problem with properly shot footage.

May 30, 2013 at 3:22PM, Edited September 4, 8:21AM

1
Reply
avatar
Rob Hardy
Founder of Filmmaker Freedom
5876

I prefer to use the Cineon Converter for changing log-like footage back to linear -- it's less CPU intensive and the highlight roll-off option is pretty handy.

May 30, 2013 at 10:30AM, Edited September 4, 8:21AM

3
Reply
Ok

Love it when NFS posts Adobe tutorials. Gonna have to check this one out later tonight. Thanks!

May 30, 2013 at 10:31AM, Edited September 4, 8:21AM

0
Reply

Highlights blow up. Personaly i dont really like the grade. It looks pretty cheap to me. I prefer much more subtle grading preserving details in highlights and darks and give accents with masks.

May 30, 2013 at 12:50PM, Edited September 4, 8:21AM

18
Reply
D

This is brilliant, just had a play around with it on some gh2 footage I shot today. This along with film-convert and PluralEyes will really speed up my editing work. Yeay! Another thing that can be really simple to add spark to your footage is to create two color mattes in amber and light blue then messing with the blend modes can create some really nice effects while keeping export times nice and quick!

May 30, 2013 at 2:56PM, Edited September 4, 8:21AM

0
Reply
Kev

nothing you couldn't do with curves, but hey, thx;)

May 30, 2013 at 4:22PM, Edited September 4, 8:21AM

0
Reply
JB

Seriously unconvinced of this, I'm afraid. There's quite a lot of misinformation in the video, in a purely technical and factual sense if nothing else.

Firstly, this has nothing to do with film. Like any grading technique, it can be used to create a look which is subjectively "filmic", but equally can be used to make something un-filmic. The technique has no inherent "filmic" nature.

Secondly, the idea that video doesn't look like film because of line-skipping is just flat out wrong. As is the suggestion that a 2px vertical blur fixes line-skipping, or adds some kind of "richness" to the image. This technique manipulates colour with blend modes, not with blurring.

Thirdly, there really isn't any advantage to using this over a regular 3-way corrector, which separates your luma ranges with a far greater degree of control. A 3-way corrector is also less cumbersome (not having to mess with 3 layers indepedently) and in most cases won't have the same performance hit.

Don't get me wrong - this can be a useful technique in some cases, and understanding (and use) of blending modes is more important than many realise. But the only advantage it offers over "proper" grading is instant gratification. Put simply, I think there's already a hell of a lot of bad info on the internet about grading, and I think this is in that category. Which is a shame to see, from creative cow.

May 30, 2013 at 4:22PM, Edited September 4, 8:21AM

0
Reply
Luke

I second that!

May 30, 2013 at 7:03PM, Edited September 4, 8:21AM

0
Reply

+1 People should look at other tuts than this... Keep posting vfx stuff though nfs

May 30, 2013 at 7:38PM, Edited September 4, 8:21AM

0
Reply
Derek

Totally agree. This seems more like a quick-fix solution rather than an actual grading technique. The more I learn about the mysterious art of color grading, the more I realize how much you can do with the basic grading tools.

While it may seem like a good idea to rely on techniques like this to quickly get the results that you're after, it can also become a crutch. Not saying the technique is inherently bad, but I would definitely recommend that anyone using it also take the time to learn more about proper color grading.

May 30, 2013 at 8:41PM, Edited September 4, 8:21AM

5
Reply

+1, I had discovered this tutorial last year by accident, at first I thought it was interesting, later I realized it is completely unpractical as there is no effective control over any of the element such as contrast, saturation, etc... anyway, the future is RAW, so lets get it cooking!

May 31, 2013 at 1:49AM, Edited September 4, 8:21AM

0
Reply

I know this site is about flat-field sensors, but I just looked at the Canon XA25 at a local camera show. I own an XA10 and really like it. I know it's not the super sensor size, but it does what I want it to. I also shoot with my 7D and manual lenses and get great results for the small screems.

Anyway, the XA25 can output RAW onto a compatible recorder.It cannot record RAW internally. The camera cost about $2,500.00 and the recorder about $4K.

Don't yell at me because it's a video camera. I'm about to rent both units and try it out.

Regards,

Rachael

June 1, 2013 at 8:40AM, Edited September 4, 8:21AM

0
Reply
Rachael Dakoda

+1 Filling in the gaps between the lines? I'm disappointed in Creative Cow.

May 31, 2013 at 5:12AM, Edited September 4, 8:21AM

2
Reply
steve

+1 - imo this is an easy fix, with less to no control of the overall image. also blown out highlights as in the example above is in no way a "filmic" look.

May 31, 2013 at 3:16PM, Edited September 4, 8:21AM

1
Reply
Roger Pettersen

Can't imagine cluttering up a timeline with 3 layers of everything. Filmconvert is a little pricey but the results are astounding. The gamma shifts, stock options, camera options, exposure, color temp, grain size/amount, blur etc it's all in 1 effect. Not into self promotion but look at this from a $699 Nikon:
https://vimeo.com/64274981

May 30, 2013 at 4:43PM, Edited September 4, 8:21AM

19
Reply
alan

When I apply Filmconvert I just use the filmstock emulation. None of the luma stuff.
Do you find yourself using that - luma, exposure etc?

May 31, 2013 at 2:00AM, Edited September 4, 8:21AM

0
Reply
Fresno Bob

Sometimes applying certain stocks darkens the image a bit so I'll compensate with exposure slider.

May 31, 2013 at 7:08AM, Edited September 4, 8:21AM

0
Reply
alan

OK, here's a perfect example of why Motion's ability to make effects for FCP X is awesome. A couple of months ago, I made an effect that applies a variable percentage of an Overlay, a Screen and a Multiply blend mode to anything you like. (No blur, so not exactly the same as in the video.) Apply it to an Adjustment Layer to tackle many clips at once. Here's the free installer:

https://dl.dropbox.com/u/125405/BMCC-Additional-Effects-v2.zip

To find out how I did this, here's an article I wrote describing something similar:

http://www.macprovideo.com/hub/final-cut/motion-and-fcp-x-correct-flat-p...

Though if you want a better S-curve for contrast, try this for free:

http://coremelt.com/products/coremeltfree.html

(Disclosure: I made the video on that page for CoreMelt.)

May 30, 2013 at 5:46PM, Edited September 4, 8:21AM

0
Reply

Here is discussion about adobe premier pro... Not about FCP... :-)

May 31, 2013 at 12:45AM, Edited September 4, 8:21AM

5
Reply
Sergey

I've created almost the same effect with blend modes, just in a different NLE; I thought it was worth mentioning. And even though I prefer FCP X, I've got Premiere and I'm still interested in it — all NLEs have their strengths and weaknesses. It would be great if Premiere had the ability to create custom effects/titles/transitions/generators, and it would be great if FCP X had built-in curves.

No offence intended and not trying to start a flame war.

May 31, 2013 at 6:37PM, Edited September 4, 8:21AM

9
Reply

I agree with Luke.
Even if I find this tutorial very interesting (it opens my mind to a new way of thinking certain effect use), I don't agree with the starting sentence in which talks about the differences between digital and filmic image;
he talks about the gap between the horizontal lines that composes the image, but this is not always true: the differences between 1080i and 1080p is the way the image is created, and if you work progressive (1080p) you should not have neither horizontal lines nor gaps between them (we talk about frame). On the other side, working interlace (1080i) you have horizontal lines that composes the image (we talk about fields), and also the "gapes".

The difference between film and digital, nowadays, is the pixel and the codec and the way the image is processed.... but I think that all of us already knows that.

So, I think it is wrong to talk about this color tecniques as a way to create a more filmic look with a digital image. It is a way to bump up the colors or press the blacks, or nay way you want it to call.

Thanks

May 31, 2013 at 1:34AM, Edited September 4, 8:21AM

1
Reply
Andrea

Whether the footage is progressive or interlaced, there are still 1080 lines.

June 5, 2013 at 7:27AM, Edited September 4, 8:21AM

1
Reply
Mike

Dont quite understand this- if he wanted to preserve the highlights, wouldn't he have used one of the darkening tools to bring out the detail in the light area? Didn't he just blow it out more by using a lightening tool?

January 28, 2015 at 10:35AM

0
Reply
avatar
Torsten Pearson
Writer-Director-Editor
486