I remember when I was first starting in film and video. The concept of shooting digital video with a small DSLR camera seemed magical. How does that thing even work? What do all those buttons actually do? And while it may be fun to just click around and figure things out on your own, if you’d generally like to learn how to use your digital camera—you might want to watch this video below.
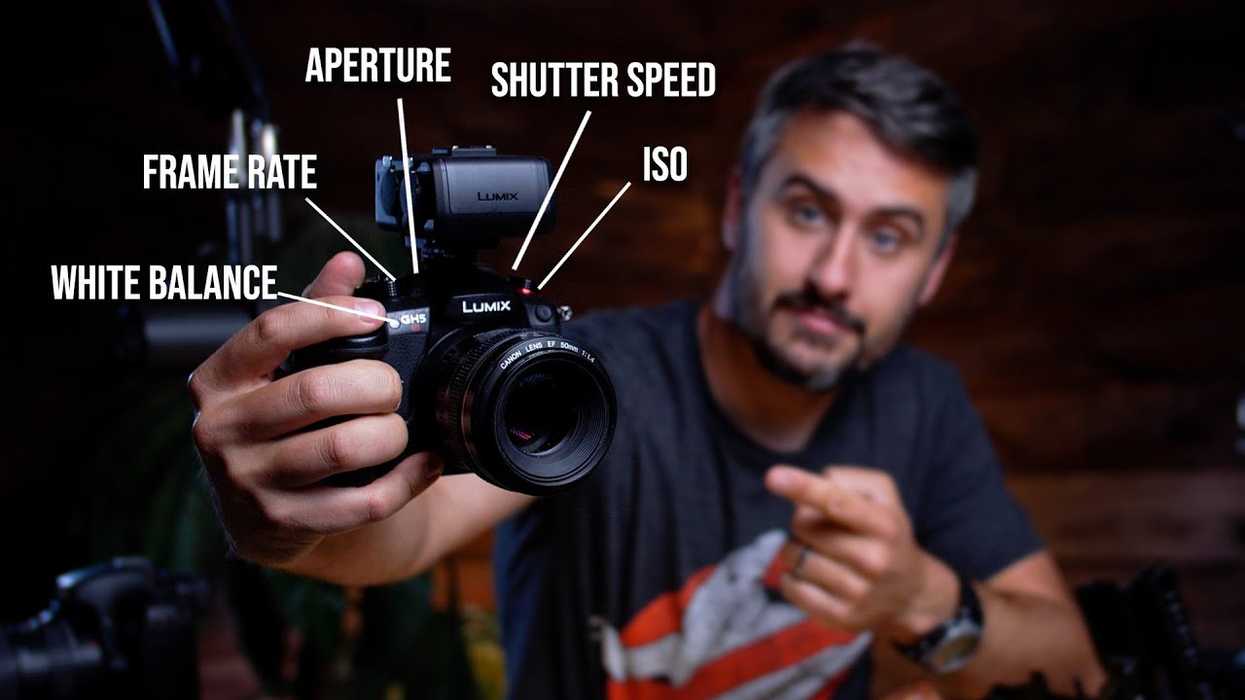
In just under 30 minutes, YouTuber Tomorrows Filmmakers breaks down all the basic principles that you’ll need to know to pretty much master your camera. These tricky terms like frame rate, ISO, shutter speed, aperture, and white balance are quickly demystified with some simple explanations and helpful examples.
So, if you’re looking to get caught up to speed on digital videography, here’s everything you need to know! We’ll also dive a bit further into each of these core camera concepts with some additional resources and further information below.
Frame Rate
Frame rate is one of the most important basic principles of both film and digital videography. It’s also a great one to start with, as it will help inform your decisions for the rest of your camera settings. For a bit of history, you can learn about the origins of frame rates in film here.
For most projects, 24 frames-per-second (fps) will be your best option and the most cinematic. However, there are pros and cons to other frame rates which can change the feel of your projects, as well as create some interesting effects if you’re shooting high-speed subjects (like helicopter rotor blades, for example).
ISO
Taken by itself, ISO simply refers to your camera’s sensitivity to light. The origins of ISO go back to the days of film itself, as the different film stocks would react with different sensitivities to light, which in turn would inform the film’s speed. Along with film itself, though, the same principles can theoretically be applied back to our own eyes. Which begs the question: what’s the ISO of your eye?
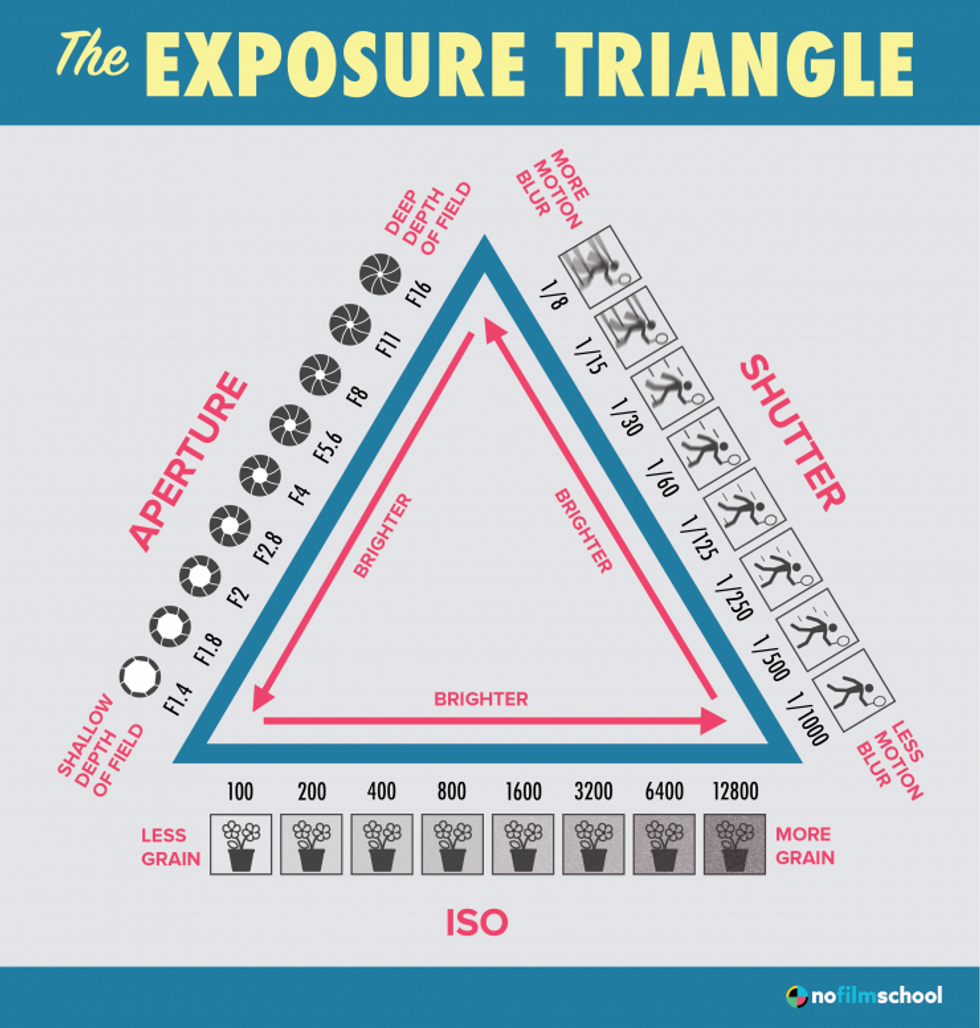
To really understand ISO, though, you’ll really need to take a look at the whole exposure triangle which also includes shutter speed and aperture. These three video elements together will inform just what type of footage that you’ll get in any shot as you adjust for different aspects like brightness, blurriness, graininess, and depth of field.
Shutter Speed
Along with ISO and aperture, shutter speed is another crucial element of video, as well as an important aspect of the exposure triangle. In general, you’ll usually want your shutter speed to be double the inverse of your frame rate. For example, if you’re shooting a scene at 24 fps, you’ll want your shutter speed to be at 1/48 (or 1/50).
However, as with many of the rules to filmmaking, there are times you might want to experiment with other shutter speeds for different creative effects. You can read here how shutter speed can be used for everything from action scenes to slow-motion to epic time-lapses.
Aperture
While ISO addresses graininess and shutter speed addresses blurriness, aperture is your gateway to defining your video’s depth of field.
Aperture itself just refers to the hole or opening in your camera through which light travels. The size of the opening is represented in a value called an f-stop, which is defined by the smaller the opening, the larger the f-stop, whereas the larger the opening, the smaller the f-stop.
It can be a bit confusing to understand at first (here’s another helpful video), but the big takeaway is simply that the larger the f-stop, the deeper your depth of field is going to be, and vice versa. If you’d like to learn more about depth of field, here’s everything you’ll need to know.
Once mastered, you can also start to mess around with moving your depth of field with more advanced techniques like rack focus.

Finally, one of the easier concepts to at least understand (but still hard to master) with your digital video camera is white balance.
While color correction and grading both in-camera and in editing platforms like Adobe Premiere Pro and Final Cut Pro may be necessary for more advanced filmmakers, the basics to white balance are simple.
When shooting video for the first time, you’ll want to use white balance to let your camera know which color is white in your given lighting situation. Your camera can usually handle the rest, as long as the lighting stays consistent, but even still there are plenty of auto settings that you can use which will adjust the white balance on the fly.
And that’s it! With these five basic principles, you should be able to start off with your digital video camera of choice. And all in under 30 minutes.
Any questions? Leave them in the comments.
Source: Tomorrows Filmmakers