
We captured every shot with just one person operating a camera the size of a DSLR, but the footage looks roughly equivalent to 65mm. The film premiered on Short of the Week today, and I’m here to tell you how we did it. Check out the short below to see for yourself. More details after the jump.
Large-format cinematography has become very popular lately. Full frame cameras like the Sony Venice, RED Monstro, and ARRI Alexa LF have enabled filmmakers to capture footage with larger sensors, creating a distinct look and aesthetic upgrade from traditional Super 35-sized formats.
In the cinema world, the next step up from full-frame is the Alexa 65, which can be prohibitively expensive for a low-budget production. However, something else caught my eye after doing some research. This camera isn’t by any means unknown—it’s very popular among high-end commercial photographers—but I hadn’t seen much mention of it within the established filmmaking community: the Fujifilm GFX 100.
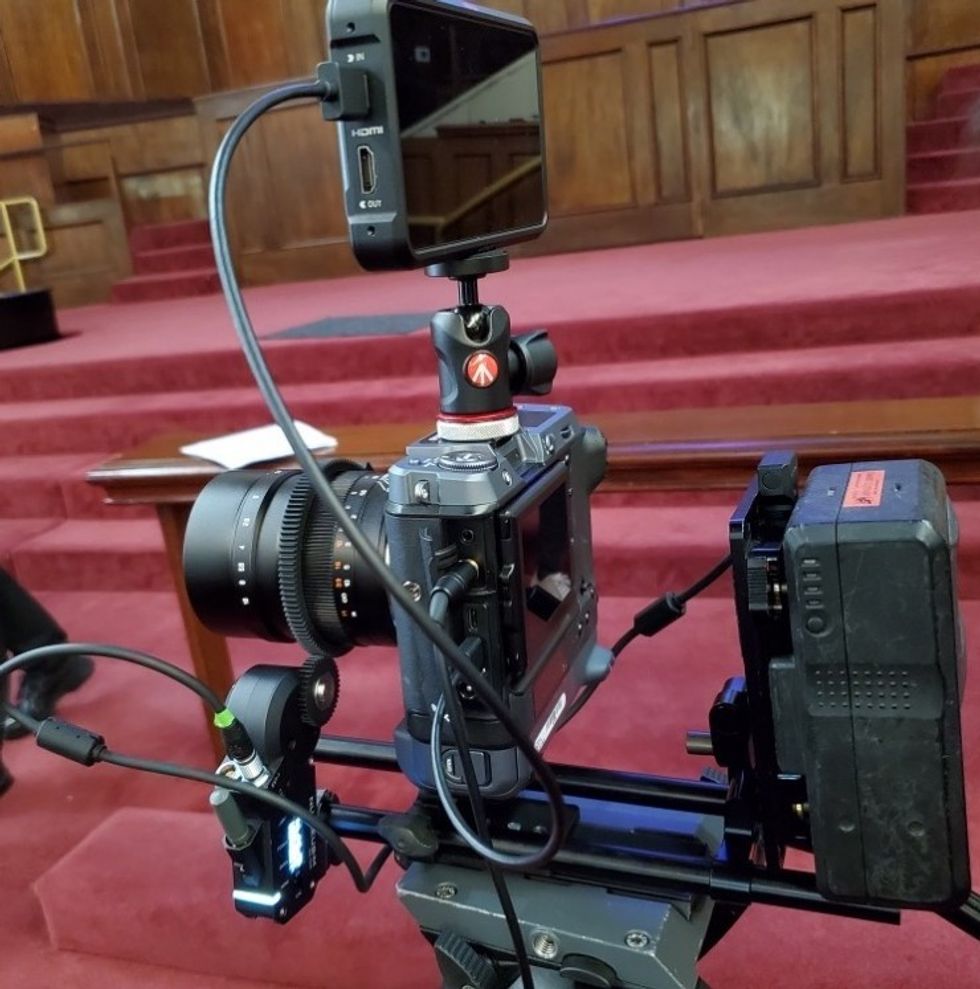 The Fujifilm GFX 100 hooked up to a follow focus and external recorder. This rig is compact, durable, and much cheaper than comparable cinema setups.Credit: Brett Cramer
In the picture above, we have a build consisting of the Tilta Nucleus Follow Focus, Atomos Ninja V with 500GB Angelbird AtomX SSDmini, Gold Mount Battery, 12” rods, Mitakon Zhongyi Speedmaster 65mm F/1.4 lens.
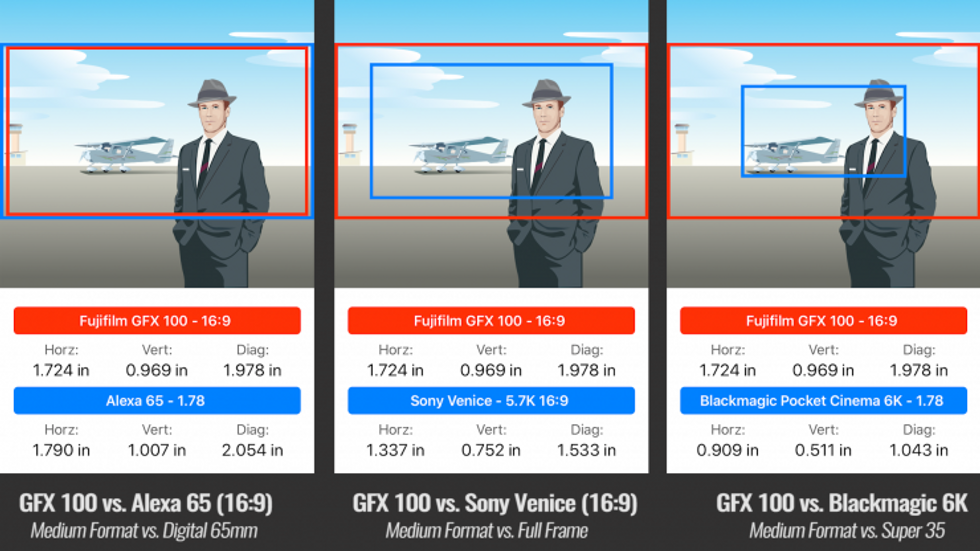
The feature that excited me the most was its massive 44x33 sensor, which is a step up from the 36x24 sensor found in most full-frame cameras. Despite its classification as “medium format”—an old photography term—this is actually quite bigger than full-frame and comparable in size to the Alexa 65 when used in 16:9 mode.
 Credit: pCAM Pro—Film+Digital
The GFX 100 boasts tons of video-specific features, such as 4K 10-bit 4:2:2 with the use of an external recorder. (A recent firmware upgrade enables ProRes RAW on an Atomos Ninja V.) It also has in-body image stabilization, audio recording tools, HFR options up to 60fps, and fantastic color profiles based on Fujifilm’s proprietary “Eterna” film stock. Once I found one available for rent at a nearby photography store, I knew this camera would be the right choice.
You might have seen an article I wrote last December where I covered how we made a compelling and polished indie film on a shoestring budget. This time, I’ll examine the nuts and bolts of crafting an impactful large-format image.
Lensing with a Medium-Format Sensor
The first thing you’ll notice when using a sensor this large is that all of your lenses behave differently. They will not produce the same angle of view as they would on a full-frame or Super 35-sized camera. It’s important to become familiar with the focal length conversions so you can compensate accordingly.
I recommend you download the “pCAM Pro—Film+Digital” app on your phone. It’s available on the App Store and is very useful for calculating focal length differences between different sensor sizes. Check out the example below.
 Credit: pCAM Pro—Film+Digital
These are focal length comparisons for a 45mm lens between three different sensor sizes. To get a similar angle of view on a Super 35-sized sensor, you would need to use a 24mm lens. However, the depth of field would still look different.
While a 45mm lens is considered mid-range on Super 35, it’s fairly wide on the GFX 100 due to the larger sensor. In fact, it produces an angle of view closer to 24mm—so you’re basically getting the wide view of 24mm, but with the compression characteristics of 45mm.
 Credit: Brett Cramer
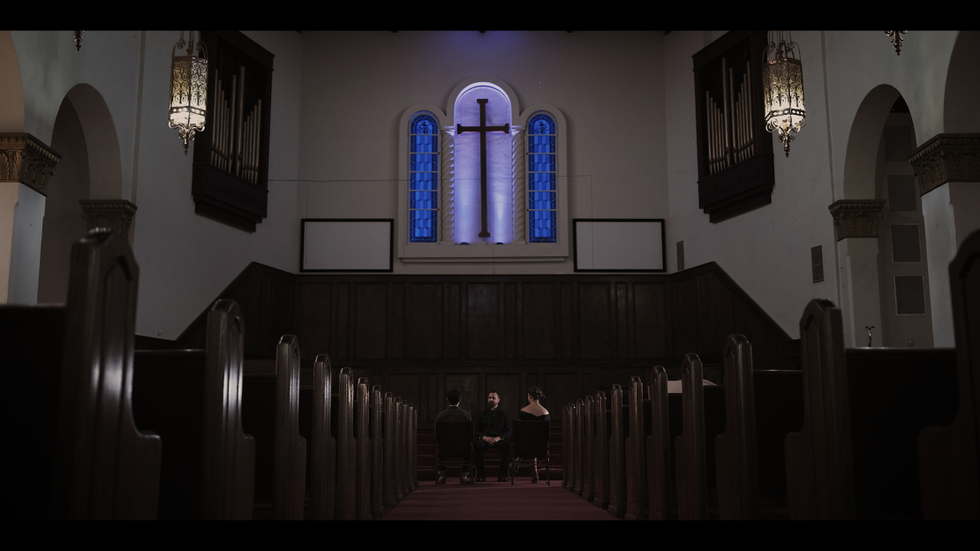
We captured this shot wide open with a Fujinon GF 45mm F/2.8 lens. It created a much wider angle of view than it would have on a smaller sensor. We also used a 2.00:1 aspect ratio to keep it as close as possible to the 1.90:1 aspect ratio used in digital IMAX.
The 65mm prime was our workhorse for the bulk of the shoot, since it roughly matched the angle of view of 50mm on full-frame and 34mm on Super 35. Check out the focal length calculations and visual example below.
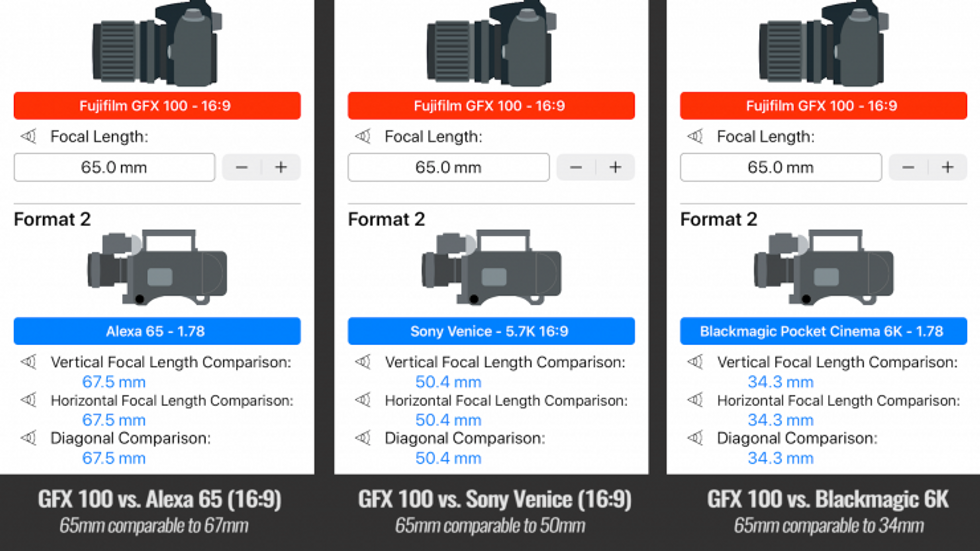 Credit: pCAM Pro—Film+Digital
In my opinion, this is the sweet spot for medium format cinematography.
 Credit: Brett Cramer
We captured this shot wide open with a Mitakon Zhongyi Speedmaster 65mm F/1.4 lens. Notice the lovely fall-off and shallow depth of field, which partially resulted from getting a 34mm angle of view (or 50mm on full-frame) with the compression characteristics of a 65mm lens.
I’ve found that the best focal length range for medium format is 35mm-85mm, with 50mm-65mm being the sweet spot that produces the best three-dimensionality. The below shot was also photographed with a 65mm lens at F1.4.
 Credit: Brett Cramer
We used the Mitakon Zhongyi Speedmaster 65mm F/1.4 lens again for this shot. Notice the unique depth of field and compression characteristics, which separates the foreground from the background in a very pleasing way. The closer you move the lens to your subject, the more dramatic this effect becomes.
Because of the use of a longer focal length to achieve the same angle of view (a 65mm lens on medium format vs. a 34mm lens on super 35), I got a shallower depth of field. The blur circle diameter of an out-of-focus object is almost two times larger on the GFX 100, so the background appears more out of focus.
Camera Placement
There are many benefits to using a camera with a sensor this large. It naturally harvests more light, which makes it perform better in low luminance. You can push the ISO higher without as much noise. Most importantly, it creates a more vibrant and three-dimensional image. This becomes more apparent when you take camera placement into account.
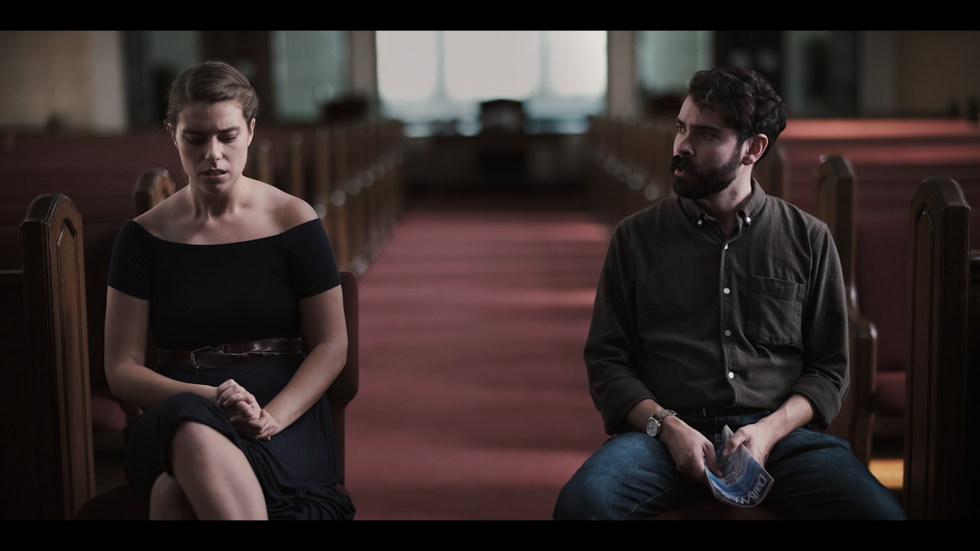
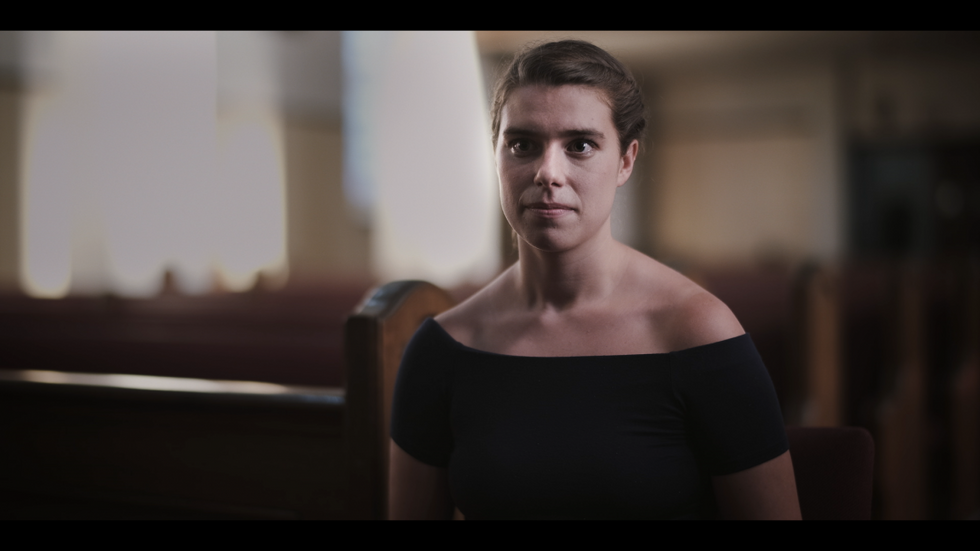
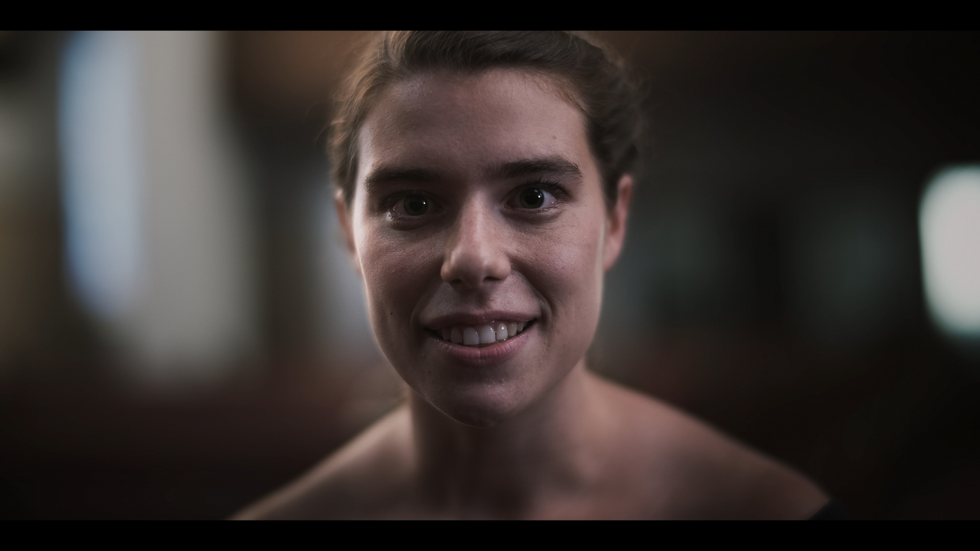
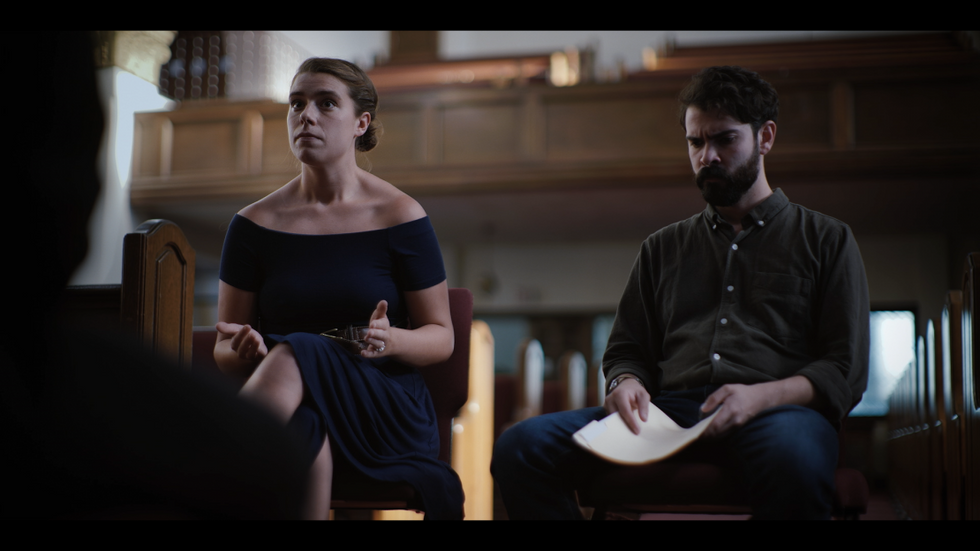
In my film Together, when the priest questions Anna about her relationship with God, I wanted to visually show how uncomfortable she was. To accomplish this, I moved the camera right up to her face—so close that it almost hit the minimum focus distance on the lens. Consequently, the depth of field changed in a very dramatic way. I also changed her eyeline, so she could stare directly into the lens, which enhanced the tension of the scene, and accentuated the feeling that all attention was focused on her.
 Credit: Brett Cramer
We pushed the 65mm lens as close to her face as we could get. This created insane bokeh around her head, and an image so shallow that even her ears were out of focus. This usually isn’t ideal for most shots, but it helped enhance the uncomfortable feeling of the scene. We would not have achieved an effect like this with a smaller sensor. This shot only has light color correction applied.
This effect was created entirely with camera placement and shot size, rather than moving the camera during the shot.
Exposure and Depth of Field
This is where things get a little more complicated. This probably requires a more extensive breakdown, but in short, your lenses will behave up to a full stop lighter when working with a medium format sensor. There is roughly one stop of difference between medium format and super 35, and about a half-stop of difference from full frame.
This means that exposing a lens to F1.4 on a medium format sensor will produce the same depth of field as exposing to F1.2 on a full-frame sensor, or about F0.9 on super 35.
 Credit: Brett Cramer
To create a comparable image on a smaller sensor, you would need to compensate for both focal length and exposure. A shot filmed with a 65mm lens at F1.4 on the GFX 100 would need to be shot on a 50mm lens at roughly F1.2 to match on full-frame. This means your lenses are even shallower and more light-sensitive on medium format.
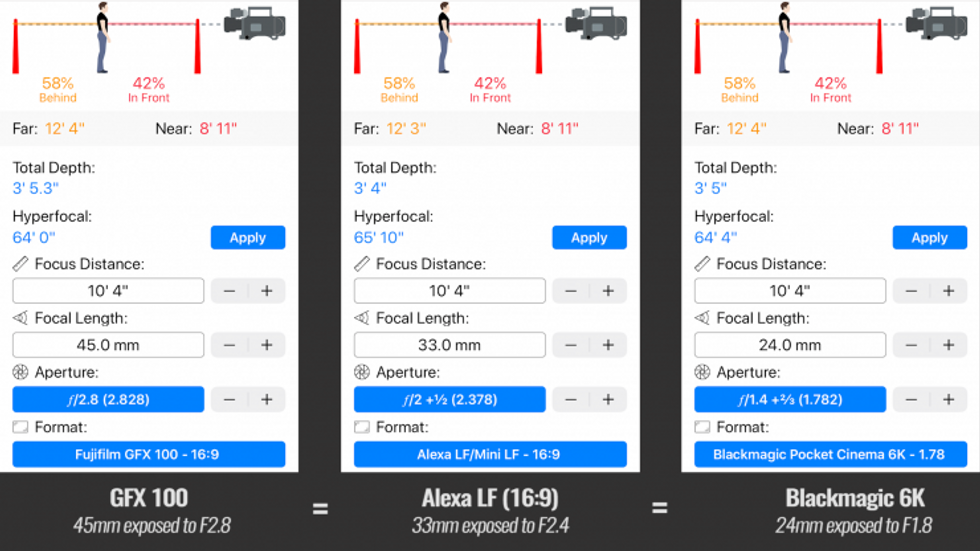
There’s a lot of math that goes into this, so without getting too technical, here’s a rough breakdown between three different sensor sizes. This time, let’s use a 45mm lens exposed to F2.8 on the GFX 100:
 Credit: pCAM Pro—Film+Digital
A camera with a massive sensor like the GFX 100 will be a great asset in low-light situations. I barely had any equipment, so I had to rely mostly on natural light. I exposed most shots to F1.4 in order to keep my image bright enough at an ISO of 200. That would have required F0.9 on a Super 35 camera. Another solution would have been to increase the ISO, but my goal was to produce the cleanest image possible.
There are certainly many other factors to consider when shooting large format, but these are my biggest takeaways and suggestions that I believe will add a unique visual style to your filmmaking, for a fraction of the normal cost.
It’s also worth noting that Fujifilm recently released the GFX 100S, which includes the same features in a smaller camera body for only 60% of the price.
If you have any questions, feel free to contact me on social media and I’ll be happy to answer as many as I can. Thanks for reading, and I hope you enjoyed the film. Happy shooting!
Read Short of the Week’s article on Together.
Connect with me on social media! Instagram: @bcram88 Twitter: @bcramerjr Vimeo: https://vimeo.com/bcramer Website: www.brettcramer.com


