What if I told you that changing a few settings might unlock more dynamic range and color fidelity in your exports in Resolve? What if I told you that you may have been doing it wrong this whole time and never knew that you were clipping clouds and shadows that you could have been retaining?
Resolve has some really great settings that a lot of us might not even touch, settings that unlock more dynamic range and data and make full use of color space-aware grading tools.
What is color space? What are "Color Space Aware" tools? Watch the below video, and then watch it again.
Color-What?
Color space is an oft-ignored aspect of the image pipeline for beginner (and even some advanced) editors. You don't have to be a pro colorist to understand how it all works, and it's important to ensure you're not giving your highlights an awkward buzz cut they didn't ask for. I honestly never touched these settings until I got into Resolve as an editor, and Adobe Premiere Pro doesn't even really have any true settings like this, at least not easy ones to access.
According to the source college professors told you to never use (Wikipedia), color space is "a specific organization of colors." Simple, right? But it can get complicated. When referencing color space in terms of cameras or in post-production workflows, color space refers to color models such as RGB and CMYK for print, and deliver standards such as Rec.709 for broadcast and DCI-P3 for cinema projection.
It gets messier the deeper you dig, so just think of it as a collection of colors each "space" is able to reproduce. The bigger the space, the more data it requires, as well as better display technologies.
While the concept can seem pretty technical, it's really not that complex on the surface. You just have to make sure you're telling your editing software what you're putting in and what you want out of it. For example, your camera shoots in one color space, and your exhibition platform demands another (sometimes). Your NLE needs to know what it's getting and where it's going.
Color Managed Workflow
In this image, you can see that compared to the Rec.709 color space, DaVinci Wide Gamut and ARRI Wide Gamut both have way more color data. However, most of the time, a lot of us are just working in either Rec.709 or its heftier sibling, Rec.2020.
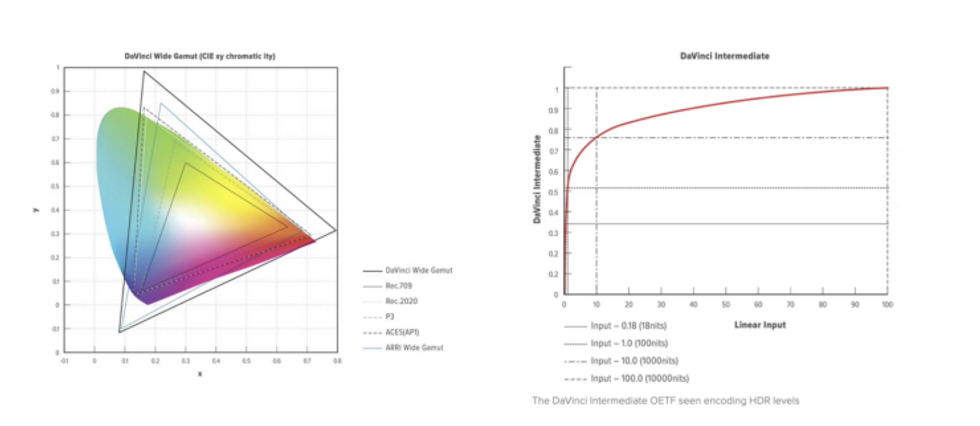 Credit: Blackmagic Design
As HDR output and workflows become more and more prominent, color space is important when we set up our projects. Especially now that Resolve has all of these great color space-aware tools. These tools enable a more high-dynamic range way of editing color, as opposed to the standard Rec.709-based color wheels. To access these tools, however, you have to enable Color Management altogether.
Essentially you have input color space, timeline color space, and output color space while working in Resolve. Output color space will likely be Rec.709 because that is still what most monitoring devices are based on unless you're outputting for movie theaters. If you set up your pipeline properly, your deliverables can be expanded and modified to fit that exhibition color space as needed.
 Credit: Blackmagic Design
Resolve has robust awareness of certain formats, particularly with BRAW or some other RAW formats (sorry, ProRes RAW users), but you can also set the input color space on a clip-by-clip basis if you have multiple formats in one video. Generally speaking, it seems useful to utilize the widest gamut possible as your timeline color space, which would be DaVinci Wide Gamut at the time of this writing. This will allow you to edit with color space-aware tools, like curves and the HDR color wheels.
ACES and Other Workflows
ACES (Academy Color Encoding System) is a super wide colorspace and workflow that can be pretty daunting, but once you get it figured out, it will make everything you do easier. Your workflow will also be much more cohesively from a color perspective.
We have a whole series on ACES that you can check out here.
- Your Guide to Understanding ACES (Part 1)
- Your Guide to Understanding ACES (Part 2)
- Your Guide to Understanding ACES (Part 3)
With ACES, you can bring any color space input and bring it into the same color space as all of your other elements and then spit it back out, unified in the same color space. ACES will help you merge everything together, which is specifically useful for compositing. Luckily, most rendering and editing platforms have some sort of support for ACES, but the support for it in Resolve is by far the most intuitive.
It's really a good idea to get well acclimated with color space and how it works, especially if you're working in Resolve. There is a lot of good stuff that you might not be using, and you might be losing dynamic range in your delivery that you don't need to.