Rosario, a student of European high fashion and later an apprentice to Oscar-winning designer Colleen Atwood, has brought an incredible level of expertise to the series, crafting all costumes and armor for all characters, bringing a modern sensibility while also honoring traditional Japanese methods and culture.
We were delighted to meet with Rosario via Zoom to discuss his work on the series.
Shōgun - Official Trailer | Hiroyuki Sanada, Cosmo Jarvis, Anna Sawai | FXwww.youtube.com
Editor's note: The following conversation has been edited for length and clarity.
No Film School: I know that your background is high fashion, so what got you into costume design?
Carlos Rosario: I feel like it was destiny, really. I feel like the circumstances in life led me into costume design. Initially, it didn't even cross my mind that actually costumes were needed on movies. That's how clueless I was about the movie-making process. When I got into the industry, I was very, very young. I actually came to Los Angeles as a tourist, and a friend of mine told me, "Why don't you just actually bring all your drawings with you, just in case? It's Hollywood, you might meet somebody."
And so one thing led to another, and I met somebody that actually told me that in order to work in the movie industry, I needed to be part of the union. And at that moment, obviously, I didn't have any experience. I couldn't join the union as an assistant designer or a custom designer, but I thought, well, I have all my illustrations. There was a section that was specifically for illustrators, and so I applied as an illustrator because I didn't know what the process was to design costumes. And I thought, well, I know how to draw. Maybe this is my way in.
And so I applied, I presented my portfolio, I showed my drawings, and I got really lucky because the president of the jury was the president of the union. And two weeks after accepting me, he actually became one of the designers on Batman and Robin. And so he asked me if I could do the drawings for his project, and that's how I started.
So, in a way, I started as an illustrator. It's as simple as that. That was my way in. And throughout the first few years, by working very closely with designers, specifically Colleen Atwood, because I worked with her for a long time, it really allowed me to understand what it meant to be a costume designer, what the essence of this job was about. And so that's the way I started, basically.
NFS: The show is a very unique period, rich with history; where do you even start in terms of the research?
Rosario: So I think that's the most important thing when you do a period project is definitely to know the period as much as possible. You need to understand the language of the clothing of that period. That's really the most important thing because that's your way to create a very strong foundation. Then after that, you can be the artist that you want to be. You can create visuals that could be either extremely accurate historically, or they can be more symbolic, or they can be more emotional, more psychological, you know what I mean?
But at least the foundation to start any kind of design in terms of costumes is about understanding the period. So what we did is that we were in touch with experts. We studied as much as possible this period. We dissected and understood and studied the paintings of that period. Because I didn't want to study the costumes that I've seen on Japanese movies of this period, because that's only the interpretation of the director. It's the interpretation of the costume designer. And I didn't want to go through any filters. I wanted to go straight to the source.
And straight to the source, one, was studying the paintings, two was studying the characters that this characters of Shōgun are based on, and then understanding the language of the clothing of that period, the patterns. Everything meant something.
And then also we went to the archives of all the museums in the world to see if we could actually see pieces from that period. And of course, they're all faded and they're in bad condition but that also gave me an idea of how to design this project. So that was kind of like the first step towards designing this movie, this project.
NFS: I watched your featurette and saw all the layers that the characters and the actors were wearing. Why was that so important to you to have those elements that we are not going to be able to see?
Rosario: That is a very good question. It's true that when I look at the show, of course there are all those details that you're missing, right? But the energy while we were making the show was really about making it as authentically and accurately as possible in order to respect the aesthetic, the Japanese aesthetic, the Japanese culture.
And I feel like even if you don't see it, the energy is there because when the entire crew, not just the costume department, but the entire crew, the actors, and everybody sees that every single department is working so hard to make everything the right way it builds up the energy of being passionate for what you're doing, and everybody is putting their best into it.
And the reason why I feel like the show is so successful is because you can see that people have really spent a lot of time working really hard to make it right. To make a really beautiful, authentic, quality-oriented show. And that really matters. Even if you don't see it, the energy is there.
NFS: Yeah, I love that.
Rosario: And also I feel like, I'm not Japanese, so my responsibility was definitely to respect the Japanese culture, to respect the Japanese actors, to respect this Japanese story with Japanese characters. And so that was really my challenge to get to the core of it.
But also, like I said in the clip that you told me about, it really is about understanding it, understanding the period, but then you have to bring it into the world. This is not just for the Japanese people, for Japan, it's for the entire world. So you have, as a designer, you need to find a balance between being very accurate, historically authentic, but also being able to create visuals, create costumes that are approachable to the audience, so the audience feel, they feel connected to the characters, but also because everything is so authentic, they emerge themselves into the experience of being part of futile Japan.
And that in itself is also the charming part of this project, is just being incorporated into this world that is so unique.
NFS: It was very interesting to see the actors comment on that too, and see that sort of be reinforced and accomplished so well.
Rosario: Thank you.
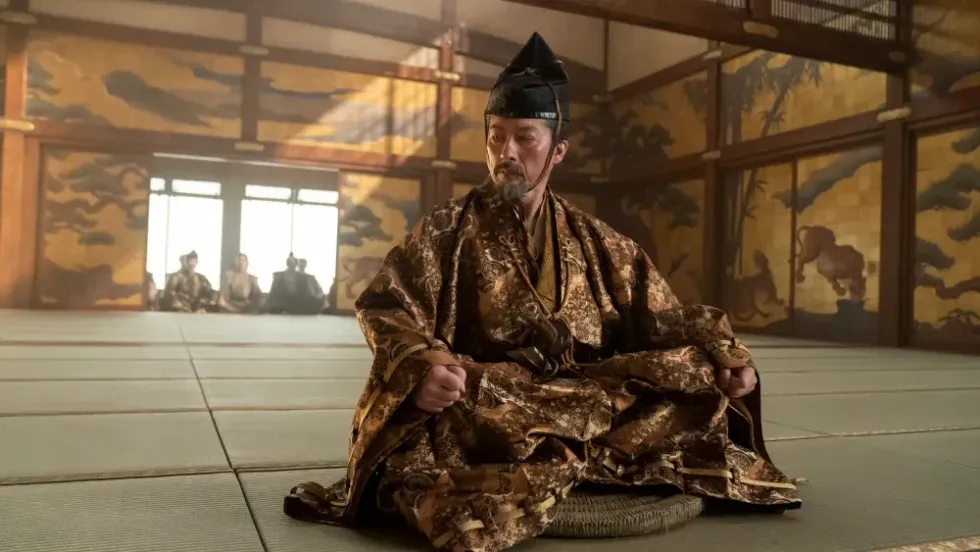
 ShōgunFX
NFS: I know that obviously there are very intricate costumes, including armor, but I am interested in—with everything on the show being made—do you have any idea of what a typical production time on one of your costumes was?
Rosario: Well, I can tell you that each one of those ladies with the Uchikake plus all the different layers, it would take at least a week, a full week to make.
So what's difficult for us is that on TV, everything goes really fast. And usually the pattern on a TV is that you have two weeks of prep for every episode. But these ones were so gigantic that I needed to start designing them months in advance in order to be ready to deliver on the first day of shooting. So it was really complicated.
So by the time I was actually having my creative meetings with the directors and the showrunners and the producers, almost everything was almost in a good place. I needed to have something to show because we were going to be shooting in a few days, you know what I mean? And so I needed to make sure that I was as prepared as possible and not leave everything at the last minute.
So I would say that the length of some of the costumes for the ladies was at least a week. But some of the jinbaori ... some of them, it took a few weeks to make. On and off. Lady Ochiba also has pieces that are very complicated, and those took maybe 500, 600 hours to make.
Also, when we started into certain costumes for the peasants or for Muraji where we used the Sashiko sort of technique with all the stitchings, we made entire outfits with stitchings made by hand. So that also took a long time. So it was very time-consuming, but it was part of making this show as authentic as possible. And all those details really, I think, ultimately helped build the characters.
 ShōgunKatie Yu/FX
NFS: Yeah. I am so grateful that you had that time and the budget. The whole show is just so refreshing in its uniqueness and in that authenticity.
Rosario: You know what I love about it, as I'm speaking with a lot of people, is that I feel like in this time, this age where there's just so many shows out there and it's all about productivity and quantity and more and more and more. And it's almost like there is a lot of platforms out there that don't even care about the quality. Like, here, "I'm giving you this amount of ... Just make a movie, whatever. I just need it for ..."
And I just feel like this one was made the right way. And I think it's refreshing. Absolutely. It's refreshing, and it's inspiring for us and for people like us to be able to do our job properly.
NFS: Is there a costume that was the most challenging for you to design?
Rosario: So I think, like I said before, I think the ones that obviously were the longest ones to make were more challenging. I would say, well, the armor was a long process, because I was thrown into this project in a very kind of dramatic way because I had to design right away all the armor in six weeks. And I didn't know anything about this period. I've never done anything that was related to Japanese costumes.
And so in six weeks, I had five illustrators. I needed to do all the research, all the drawings, get it all approved by everybody. And then once it was approved, then basically do boards for every single one of the armors. And every army has different categories. You might not see it on screen, but you have different levels. And so for each one of them, we needed to create all these boards with all the details, everything that how we wanted the armors to be later on so we could send them to the companies that make them.
So that was challenging. But for example, Lady Ochiba had a lot of really complicated outfits because she had so many different layers. There was a lot of hand painting, there was a lot of embroidery that had to be made. And then the jinbaori. The jinbaori for Toranaga also took a long time.
For example, the peacock jinbaori, that's like hundreds of peacock feathers that were all selected by size, and they were all stitched by hand into the jinbaori. Or the one that he wears at the end, which is one that looks like an armor. And we cut this dozens and dozens of little pieces of wood and leather, and then we just kind of put them together with cording. And so that took so much time. So things like that were time-consuming and obviously were more challenging than the others.
NFS: I know it's a large question, because your experience is so extensive, but is there a piece of advice that you would give someone starting in costume design?
Rosario: I think that in my experience, the more you know, the more ready you are to enter the world of entertainment because I do find that the new generation is not as ready as it should be when they get to work to start working with us. I think that when I started, I started as an illustrator, but then ... And even in school already in Paris, I knew how to be a pattern maker. I know how to dye. I know about fabrics. I know about the history of clothing. I mean, I have been learning as much as possible about everything and every single department of the costume department. So I know how to lead my breakdown artist. I know how to lead my tailors. And that is very important. The tailors, if they know you know, it makes the entire process much easier.
Going there and asking them to do something that they know it's not possible already ... There is already a disconnect there. But if they know that you see them, not only they will be able to do something beautiful, but at the same time they can bring your ideas to another level because they know you can follow. You know what I mean? So you need to know about architecture, about fabrics, about everything that will make you be a better costume designer. In my opinion. That's the best thing to do when you start.
And then I know that in this type of field, it's like you also need to learn on the field because there is an aspect that will be revealed as your career is unfolding, as you're communicating with people, as you go on your own path and you speak with costume designer and the rest of the crew, you will learn from everybody. Be open to everything that everybody has to say. But if you come already with a strong foundation of a knowledge of the basics, at least people know that. They will notice that. And if people notice that, they will put more energy into helping you, supporting you, sponsoring you. There is nothing more annoying than working with people that you are like, "What are you doing here? This is not about going to Target and buying socks. This is a serious job." You need to have culture. And so that's what I would recommend them.
NFS: Sidebar, real quick. I love Colleen Atwood's work. I spoke to her for Wednesday, and that was incredible learning from her as well.
Rosario: She is amazing. She's amazing. And that's what I always say. When I was working as an illustrator on Sleepy Hollow for her, I remember seeing her putting ... She put all these different tables in the warehouse, and I was just looking at her and I was like, "What is she doing? What is she doing?"
And so what she started doing is that she started creating all these pyramids of little pins, and one button here and one button there, to sort of start building the character. And it's at that moment that I realized the infinite possibilities that this job has to offer. Colleen Atwood is amazing for that. She's a true inspiration. I agree with you. She's a goddess.
NFS: Yeah. Huge fan. Huge fan.
Rosario: Huge fan.
 Blackmagic's Mostly Moonlit Short "4 Hours After Sunset" Shows The Extreme Low-Light Capabilities of the BMPCC 4KCredit: "4 Hours After Sunset"
 John P. Hess shows us what happens to our sensor's signal when running through a higher gain amplifier.Credit: Dual ISO & Dynamic Range (Featuring The BMPCC 4K)

 Credit: Dual ISO & Dynamic Range (featuring the BMPCC 4K)
 Credit: Dual ISO & Dynamic Range (featuring the BMPCC 4K)

 ShōgunFX
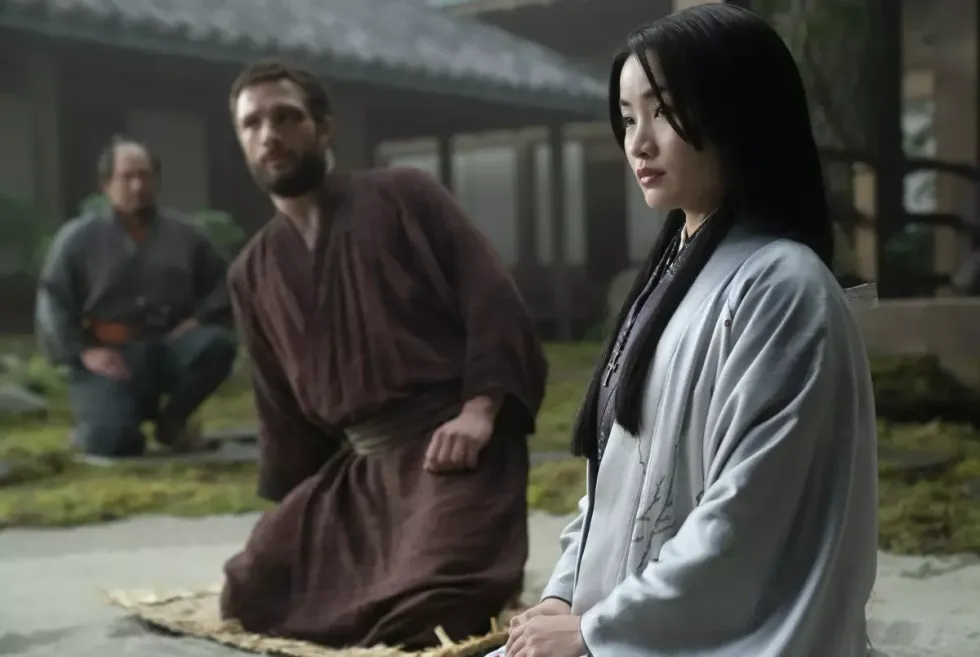 ShōgunKatie Yu/FX


