This is the third article about the new release of Premiere Pro and After Effects for video editors. We have already covered:
- an overview of new features for video editors,
- new Selective Color Grading CURVES in Lumetri Color,
- everything you need to know about a new release of After Effects.
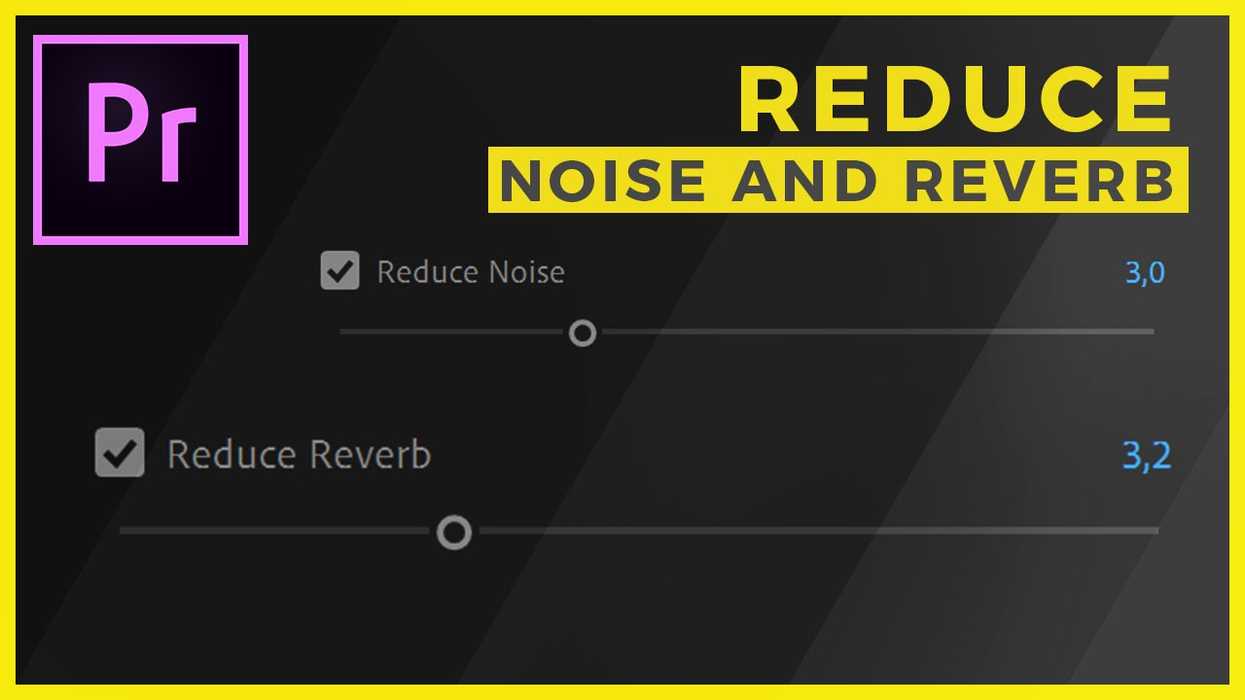
Creative Cloud's 2019 release of Premiere Pro introduces an update to its sound editing capabilities with a Reduce Reverb slider and an updated Reduce Noise algorithm. In the video below, I will be taking a closer look at how these two work in a real-world application.
The upgrade adds new intelligent algorithms for reducing noise and reducing reverb. These are extremely easy to use because you control them as sliders. The question is whether they can do a decent job.
I just want to stress one thing: I'm not a sound guy so please forgive me if you know more about this stuff. I'm a video editor and whenever I have the opportunity, I would hand over the sound repairing to someone else. I'm testing it from the perspective of someone who has only a basic knowledge about sound. Keep that in mind.

I also think that these are designed with such a user in mind. It's obvious that the two sliders are not the best solutions on the market for noise and reverb reduction. The task that they have in the editing workflow is to do a decent job in a short amount of time. For me, that's perfect. It will make my life easier.
It's time to talk about how the sliders work in action. I tested them on footage of the first video I recorded in my office when it was all empty on the other side of the camera and a reverb here was huge. The process of working with them looks like this:
- we first need to select the footage and assign dialogue type to it in the Essential Sound panel
- we should turn on the Solo Mode for the track we want to work on
- we can use Auto-Match feature to normalize the audio
- then in the Repair section, there’re sliders for reducing reverb and reducing noise
- after checking the checkboxes, we control the strength of the effect with the sliders
- if we need more control over the results, we can go to the Effects Control panel and enter the effects that were applied

This is the way to go about these new features of the Essential Sound panel. I've found that while they do a decent job, the result needs to be normalized again. They drop the gain and that can be a bit frustrating. Overall, taking simplicity into account, I think this is good add on to the existing audio tools in Essential Sound Panel in Premiere Pro. If we edit the effects in the Effects Control panel, we really have much more possibilities and control over the results.
Will you use them in your projects? Let us know in the comment section below.