The use of LED volume stages for film and commercial productions is becoming more popular following the critical success of Disney’s The Mandalorian, lensed by Grieg Fraser.
This article is the third in a four-part series aimed at helping onboard filmmakers into this new toolset for telling great stories. For a primer, read parts one and two.
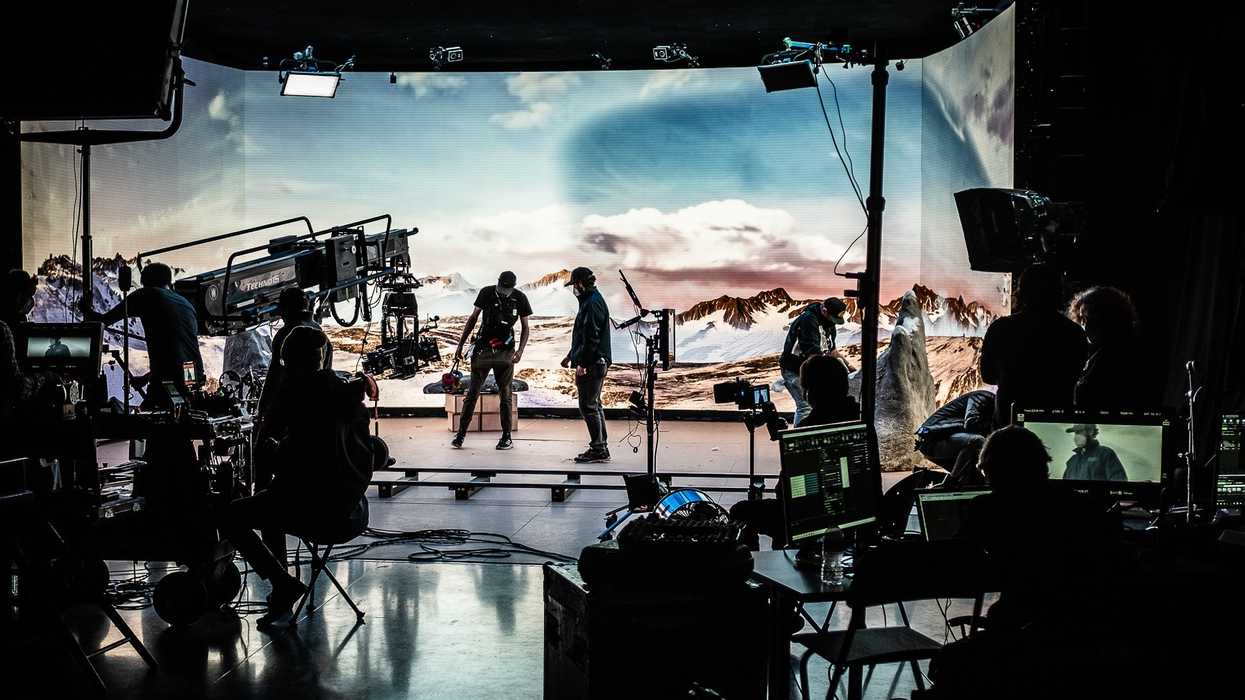
LED Volumetric Filmmaking
Put simply, the difference between LED volumetric filmmaking and traditional filmmaking is that in place of large sets/locations or chroma key to fill in the background of your shots, synchronized LED screens are used to capture a final pixel image. This is helpful for a multitude of productions for reasons I have covered in previous articles.
Why does it work? Well, the camera is tracked in 3D space, which allows the screens to react and shift their perspective in response. This creates something known as parallax: when objects move at different rates based on their distance from the subject viewing them.
This is part of the reason why Fraser and the team from The Mandalorian won seven Emmys along with other awards and nominations for their work in this field. It really changes what is possible on set and unlocks endless possibilities for how you can tell the story.
 Credit: Luka Cyprian
Just Got the Gig
So you are a cinematographer, and you just got hired to work on a production that plans to use volumetric filmmaking methods to achieve the final result. I’ve put together a quick list of tips and important notes to be aware of as you head into the project.
Camera
Cameras: Make sure the camera you are using has the ability to genlock with the rest of the stage. Some cameras have genlock (like Sony’s Venice and ARRI’s Alexa Mini), but a lot of cameras don’t. It is a broadcast-centric feature and usually requires some fine-tuning between systems to get it perfect.
Lenses: Anamorphic lenses have a more difficult time in these environments, especially if you are shooting on a smaller stage. This is due to the flaws and more organic approach to focus fall off for which most anamorphic lenses are praised. Without getting too techy about it, anamorphic lenses tend to "accidentally" put the LED volume screens in focus when you don’t want them to be, inducing moire.
That said, Fraser shot all Panavision anamorphic on The Mandalorian, proving it can be done.
Aperture: Shoot at lower stops. I found T2.8 generally to be the highest I could go while not worrying about inducing moire on the screens in the background, but this is all directly related to your depth of focus. So grab your 1st AC and pull out the DoF calculator because even if it isn’t visible on your production monitor, you don’t want to get to post and find that on a 40-foot screen there is suddenly a moire pattern of the LED screens in the background.
Shutter Angle and High Frame Rates: Your ability to shoot at high speed or at any shutter angle other than 24fps/180deg is impacted by the refresh rate of the panels you are using, which is controlled at the brain bar. In our testing with RoE BP2s refreshing at 96hz, we could shoot 48fps or 24fps/90deg shutter. But be sure to test this before you lock it on set on the day.
Tracking: Your camera needs to be tracked within the space, for which there are a few solutions currently available. No matter what, this will mean placing either dots or a sensor on the camera to track its position in 3D space. You need to consider the occlusion of these trackers when planning camera moves. Want the shot to push through some leaves? Make sure you have enough points to track on the camera so that you don’t lose tracking and cause disturbances with the frustum.
Viewing Angle: Different LED panels can have different ideal viewing angles. What usually happens when you view the panels at an off-angle is a slight or sometimes dramatic shift in the color of the panels. If you end up pointing a camera at a hard-seam in a volume, the LED panel operator may have to set the color balance based on that viewing angle. You can see an example of that below.
 Credit: Luka Cyprian
Colorspace and Bitrate: One final thing to bring into the conversation with your Unreal team is, "What colorspace are we finishing this project in? Is it DCI-P3, REC 2020, ACES?" Knowing this in advance will help conform the colors seen on-screen with the colors you want to finish up in post.
As well, make sure to speak with your Volume/Unreal teams about what bit-rate they are sending out of the engine, and then out of the LED panels. RoE BP2s can send up to 12-bit color out of the pixels, and depending on the settings, your engine might be sending you less info than that. This is important to build for in prep as you may get to your color grade and realize that the background doesn’t have all the color data you need it to have to flex with the rest of the foreground image. Shooting a 16bit RAW file doesn’t help if the color data captured from the background can’t match it.
 Credit: Luka Cyprian
Lighting
It’s All One Big Light: One of the helpful things about shooting in an LED volume is that the entire space is a big softbox. This means that your fill sources are all taken care of. It is also possible to do softer keying and backlighting with only the LED panels. Where you need to bring in other fixtures is when the light sources need to be harder or more source-y than the panels can emulate.
Work Smarter: Use the lightcards as much as possible and familiarize yourself with what they can do in prep. Understanding how much light and shadow you can pull with the panels alone will help when you are lighting on set. Honestly, this all will make your grip team very happy, it's the lightest 20x20 flyswatter out there for certain.
Hard Lighting: Hard sources (like undiffused HMIs) are difficult to use in the volume for two reasons.
First, it is more difficult to match the tone and texture of the sunlight being presented in-engine when putting up lights inside your volume stage.
Second, it requires a lot of grip gear to handle the light spill from the sources onto the LED panels so you don’t get panel washout. Some panels fare better than others when it comes to this but at their core, they don’t like being hit with other light.
Frustum: The frustum can have its own independent exposure level so your surrounding area in the volume can do more of the lighting heavy lifting to compensate. It also won’t be obstructed by any lightcards you place, so you can drop them in areas of the wall that you will eventually move through with your camera without any issues.
 Credit: Luka Cyprian
Practices
- Familiarize yourself with Unreal (while not an absolute requirement) and understand the vocabulary to speak with the technicians at the brain bar and VFX team to make communicating your production needs a lot easier. I’ve included a quick vocabulary list at the bottom.
- Be a part of the environment creation conversations. Unlike shooting in a chroma key environment, you now have to match the lighting of the digital assets and not the other way around. This means that without any set-driven knowledge and oversight, decisions can be made at the environment creation stage that impact your ability to match lighting for on set.
- Prep, prep, prep! While this is a given for almost every shoot , the undeniable amount of control available to you and the rest of the creative team at this point is really an untapped well of potential. The rules are not set in stone yet, and as with any good magic trick, the right amount of flair in your setups can help you sell almost anything.
- Get to know the team of technicians that you will be working with at the "brain bar." They are now an extension of your on-set team and efforts and could end up doing any number of things to affect the final image, including:
- Generating and placing light cards as sources to use on the talent and set present on the volume stage
- Tweaking the color of the sun and other lighting sources to match with the sources you are using on set
- Balancing the exposure of frustum to the rest of your lighting on set
- Controlling the refresh rate of the in-engine content and the walls to allow for high-speed production
- Tweaking the camera tracking with new sensors and cameras to ensure the trackers placed on the camera are never occluded
 Credit: Luka Cyprian
Vocabulary
Frustum: The render window within the engine that is tracked with the camera’s movement. This is projected on the LED walls in the highest resolution possible while the surrounding region is used as an active lighting source and isn’t as high resolution.
Lightcard: A 3D object rendered in "Unreal space" that acts as a light source or flag within the volumetric stage. Essentially you are taking a block of panels and just turning them into an off-camera light or shadow source.
Occlusion: The act of blocking or obstructing something from view. It has become the go-to term to describe the interaction between objects within the volume.
Brain bar: The group of technicians on set who are in charge of everything within Unreal and the volumetric stage. This includes the Unreal operator, LED volume playback operator, camera tracking technician, digital gaffer, or lightcard operator.
Final Pixel: The term used to describe images that will be printed when the project is finished. (In contrast to images that are used with the intention of being touched up later.)
What's next? Continue your learning
Read about the differences between virtual production and traditional production, and cover the basics of virtual production.
Special thanks to the Director’s Guild of Canada for the use of the photos in this article from our amazing shoot in February of 2021. Thanks to our shoot sponsors, ShowMax for providing the Volumetric Stage, Animism for providing the environments and VFX support, William F. Whites for providing the camera/lighting and grip gear.
Karl Janisse is a Canadian cinematographer, photographer, and visual storyteller currently residing in Vancouver, BC, who specializes in virtual production cinematography and workflow design. He believes great images make the heart bigger and the world smaller. Karl also co-founded an online school Pocket Film School that helps bring education about the film industry to people around the world.
- Learning How To Work With LED Walls feat. ROE Visual ›
- Sony Announces its Own Mixed Reality Headset for ‘Spatial Content Creation’ ›
- Sony Unveils OCELLUS: A Game-Changing Camera Tracking System for Virtual Production | No Film School ›
- Sony Unveils VENICE 2 Extension System Mini for Ultimate Pro Cine-Style Flexibility | No Film School ›
- ARRI Introduces LUKA: An Unreal Engine Plugin That Brings Lighting and Camera Tools to Virtual Environments ›


