Lighting for visual effects can be tricky. As one tries to virtually replicate light and shadow within a virtual space, matching the real ambient lighting in the original scene can be challenging if you don't use the right workflow. And doing it by eye? Forget about it.
One visual effects guru on YouTube has a new workflow that uses a few simple yet high-tech tools to realistically insert a 3D model into a scene with no one being the wiser.
A Little History
Most use a high dynamic range image (HDRI) to capture as much of the scene as possible and to see the direction of the light and how the shadows play around it. This is then used to create a lighting map to match the light that was present on the day your plates were shot.
![]() Breaking down HDRICredit: Vox
Breaking down HDRICredit: Vox
Since the 90s, filmmakers have used an HDRI chrome sphere for this purpose because it can capture light in 360 degrees, reflections, and the dynamic range that comes with it, from all angles. The concept was invented by visual effects artists Paul Debevec and Jitendra Malik, who noticed the reflections of light on a teapot. You can read their research paper here.
Multiple images of the sphere can be taken at different shutter speeds and aperture settings and then “unwrapped” and merged in software to create the high dynamic range image that shows all the light data and reflections that were present in the scene. With this data, visual effects artists can replicate the light conditions by putting a virtual sun in the proper position in the sky, showing how shadows will be cast, and creating the right reflections on shiny surfaces.
New High-Tech Tools
However, InLightVFX, also known as Jacob Holiday, has created a new workflow that uses a 360° camera, a color checker, and the ACES Color system to more accurately insert a 3D model into a scene while matching the ambient lighting that was naturally reflecting off surfaces all around.
Holiday set up the camera in the shot and then remotely triggered it, capturing over and under exposures, as well as a properly still image. Then, he merged all the images to create a master HDRI that best represented what his eye and camera saw, showing detail in light and shadow.
While he was on set, Holiday also laid out a color checker so that he could get the proper color balance based on how the light reflects off the colors during that time of day. Shades can change subtly over time, and so knowing how color reflects light at the time the original scene was shot makes color grading the scene a lot easier. A simple gray card, like a paint swatch from a local hardware store, would also provide the necessary color data.
The New Workflow
With those two tools, and the images were taken to measure the light data, Holiday was able to being his CGI workflow in Blender and a free version of NUKE compositing software. His first step was to convert the video footage, and the images to use the same color space, in this instance, the ACES color system. The key here was to get all the data to have the same color space, as well as the same gamma readings.
To do that, Holiday went into Nuke to apply the aces input display transform (IDT) to convert all the data into the same ACES color space. This is where the images of the color checker come in. Holiday selected the ACES IDT in the project settings, then applied the proper ACES IDT for his Panasonic GH5 camera. To do that, he did a simple google search to find out which one to select.
He then brought in the HDRI. To match the original footage, he sampled the color checker gray to ascertain the proper shade values. He sampled the pixel values of the gray patch, and read the RGB values indicated. He did the same for the HDRI. Noting the differences, he did a little math to adjust consistent pixel values for both. In theory, he had the original footage, and the HDRI matched for color.
The one downside with this method is that any color grading at this point will mess up the workflow. So, it’s important to grade beforehand or keep the adjustments to gain to keep everything consistent.
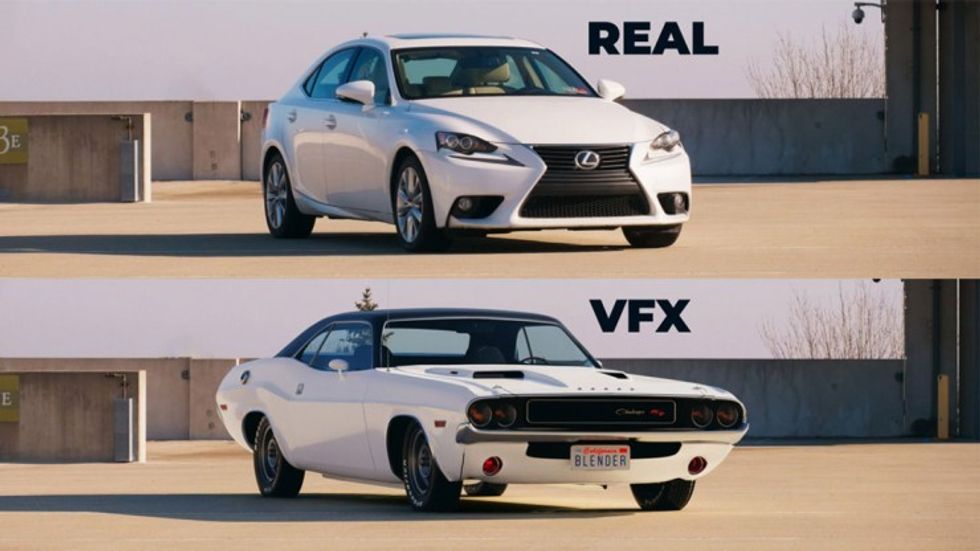
Then, it’s time to move to Blender. This is where Holiday is going to bring in the 3D model that he wants to insert into the scene. There are a lot of steps here, but the gist is to apply the same RGB values into the scene and then apply them to the 3D model imported, along with the ACES IDT. This provides the diffuse, color, and albedo of the model, as well as the reflection, color, and displacement of the light on the 3D model.
This is where Holiday had to deal with the “bad sun” in the sky that was backlighting the scene, but with some judicious masking in software, he was able to do just that. Then, he was able to create a virtual sun, aligning the shadows with how they appear in the original footage and adjusting the color and darkness of the shadows based on the color checker in the reference image.
 Credit: InLightVFX
Adjust the RGB curves, roughness, and project the footage on the floor plane, and Holiday was able to realistically insert the 3D model into the scene. A few adjustments to account for errant reflections, color, and visibility, and then rendering the file out, and the 3D model is properly lit within the scene like it was actually there.
Taking the Proper Steps
There are a lot of steps, including a few steps we didn’t cover, but they are all manageable after spending time familiarizing myself with the interfaces of Nuke or Blender. It’s a clever way to apply the ACES color system to properly light a 3D image for some basic CGI work. With it, users will have a virtual model to interact with the live scene around it.
Holiday has offered the elements on his website, including an ACES kickstart kit, with which to practice his new workflow.
So give it a try and let us know in the comments if it worked for you!
Source: Jacob Holiday, InLightVFX