This is a guest post by Cinematographer Ryan E. Walters.
I'll be the first to admit nothing replaces a professionally built sound stage or studio. I've had the opportunity to shoot on a wide variety of stages and I appreciate what they bring to a production. However, I have also needed a space where I could shoot some of my stock footage, as well as record my training videos. And I need that space to be affordable and accessible to me at any time. So I converted my garage into a mini "studio." To learn how I got this done for under $500, continue reading ...
Defining The Objectives
Before you begin any project, I highly recommend clearly defining the objectives you want to accomplish. A set of clear goals will help you plan so that you can meet all of your objectives when the project is done. And more importantly, it will help you to figure out if the project is even attainable before you start spending money. My objectives were:
- A space that is always available to me
- Have complete control over the light
- Able to store equipment
- Have multiple circuits, and be able to run up to 80 amps worth of light
- Maintain the use of the garage door (not block it off)
- Be able to hang lights from a grid
- Be able leave some lights set up and ready to go for my training videos
- Keep costs to a minimum, but spend money where it is needed
- Audio is a secondary issue, as MOS* stock footage shot will be the primary use of the space
(*MOS = Without sound)
Having completed this project, I can say that I have met all of my goals and then some. :) I even stumbled across some handy tools that I have repurposed for daily use on some of my productions, which I've listed at the end of this article.
The Supplies
- Black Paint (Any flat black paint will do) [$20 - $30 per gallon - I used 2 gallons]
- 1" Aluminum Pipe (10' length) [$10 per section - I used 12]
- 1" Pipe Connectors [$5 per connector - I used 6]
- 1" Conduit Hanger [$1 per hanger - I used 36]
- 1 1/4" Wood Screws [$5 per pack - I used 1]
- 8 1/2" Clip Light [$9 per light - I used 2]
- Kvart Wall Lamp form Ikea [$10 per light - I used 2]
I spent less than $150 total on all of the following items. Your cost will depend on how you configure your mobile breaker box.
- Breaker Box
- Circuit Breakers
- Outlet boxes
- Outlets
- High Gage Cable
- Dryer Plug
- Dryer Outlet
- Small Plastic Dolly
Other tools you will need:
- Stud Finder
- Measuring Tape
- Screwdriver
- Wrench
- Hack Saw
- Paint Brushes & Rollers
Converting the Garage
This first step to the conversion is the easiest- paint the garage black. I went with a flat black paint as it will help me control the light. The white paint that was originally there would have reflected any stray light adding to the overall ambience, which is not always desirable. Unlike the setup for my Grading Suite where the quality of the paint matters, here, the purpose of this paint is to absorb light. So it is not crucial to get technically perfect black paint. Get something that works and fits your budget. Paint every wall, and let it dry before continuing. If you want to go above and beyond, you can also paint the floor black. You'll want to use specialized paint for that purpose and you should consult the experts at your hardware store for what will work for your application. (I opted to not paint my floor).
My garage measures 19 feet wide by 18 feet long, so as I drew my plans for where I would hang the grid from, I decided on a distance of about 3 feet. Or, to be more precise, 32 inches, as the building code specifies a separation of 16" between studs, so I went with every other stud in the ceiling. This meant I would have a grid with 6 rows. To hang the 1" rod, I used 6 hangers per row and spaced them evenly across the row. Using my stud finder, measuring tape, and screwdriver, I attached the hangers to the ceiling. (The spacing in-between hangers on my setup was 36 inches).
[caption id="attachment_31164" align="aligncenter" width="609"] Pipe Hanger[/caption]
[caption id="attachment_31163" align="aligncenter" width="616"] Pipes Hanging From the Ceiling[/caption]
Theses hangers worked great, as they allowed me to hang the grid as close as possible to the ceiling, keeping it out of the way of the garage door, while at the same time allowing enough room to use an end jaw Cardellini to rig lights from.
[caption id="attachment_31170" align="aligncenter" width="616"] Out of the way of the garage door[/caption]
[caption id="attachment_31172" align="aligncenter" width="616"]

Then, using a hack saw, I cut 12 inches off of 6 of the pipes. Once everything was cut, I began to insert the pipe into the hangers. As you do this, it is best to take out the screws from all of the hangers and push the pipe into the hanger. After it has been inserted into the hanger, you can bend it back around the pipe and it should hold without the screw. Do not insert & tighten the screws until the very end. If the pipe is falling out, you can insert a screw into the hangers, but leave them loose. After you have inserted one length of pipe into all of the hangers, then attach the pipe connector. You'll want to tighten the connector to the hanging pipe, and then unscrew the open end of the connector. Next, you'll take the second section of pipe and insert it into the connector and continue to insert the pipe into the remaining hangers. Once this section of pipe is hung, go back and tighten the connector and then tighten the screws to the hangers. By leaving the screws to the last step, you will give yourself the ability to move and adjust the pipe as needed. If you tighten everything as you go, you'll inevitably get the pipe stuck, and have to loosen everything anyway. (Trust me, I know from experience ... :) ).
[caption id="attachment_31167" align="aligncenter" width="616"]
Now that the grid is hung, it is time to add the lights. One of my goals was to have a lighting setup ready to go for the tutorial videos I produce, while at the same time allowing for the garage door to open. Ideally, I wanted to use film lights, but when I rigged them up, they prevented the garage door from opening. So I headed over to Ikea and found a small halogen lamp that would work perfectly for this one setup. Their small profile, goose neck design of the lamp, along with the snoot, meant that it would work well as a background light and as a hair/rim light. Since it had a halogen bulb in it, I could also put it on a dimmer to control its intensity. (Even though the color temperature will change as it dims, I've found that often times a warm hair light has a nice effect on the talent, and provides for nice color separation in the image).
[caption id="attachment_31168" align="aligncenter" width="616"]

[caption id="attachment_31169" align="aligncenter" width="616"]

The second set of lights I wanted to install was a set of work lights above my camera cart. As these are lights that allow me to see what I'm working on, I was not concerned with installing real overhead lights. Instead, I opted for two clip lights positioned overhead and attached to the grid. I also plugged them into one of the existing overhead light outlets. That way, the lights will turn on and off with the light switch. I chose daylight balanced CFL's in all of the overheads, as they provide the most light output for the wattage, and they also wouldn't burn out the Edison adapter I was using in the light socket. And this completed the building of my lighting grid.
[caption id="attachment_31160" align="aligncenter" width="616"]

[caption id="attachment_31166" align="aligncenter" width="616"]

Building the Mobile Breaker Box
With the grid complete, all I was missing was the required power and proper power distribution system. This is the part of the build that can get dangerous very quickly. And since I value my life, and it is worth more to me than the savings of a couple of bucks, I opted to hire an electrician friend of mine to help me with that part of the build. And I STRONGLY recommend that you do the same. When I met with him, I explained what I wanted to do: have a mobile breaker box that supplied 60 amps of power routed into two legs. And I wanted the other end to be a traditional dryer plug. The reason I went with these specs is that most dryer outlets have a breaker of 60 amps, and I wanted to be able to use this box with me in my studio, as well as take the box with me on location. By having it be a standard dryer plug, I can tap into someone's dryer outlet and instantly have 4 more circuits, and 60 more amps to work from. (See- thinking & planning ahead can pay off ... ;) )
After a quick trip to the hardware store, and in under an hour, he had installed an additional 60 amp circuit in my garage and built a mobile breaker box. I really appreciated his help on this, as it went smoothly, quickly, and it all works perfectly. I'm not sure I could have said the same if I tried to do it on my own... It also helped that the main circuit breaker was already located in the garage. :)
[caption id="attachment_31159" align="aligncenter" width="616"] My mobile breaker box[/caption]
[caption id="attachment_31157" align="aligncenter" width="616"] Close up of the box[/caption]
[caption id="attachment_31158" align="aligncenter" width="616"]
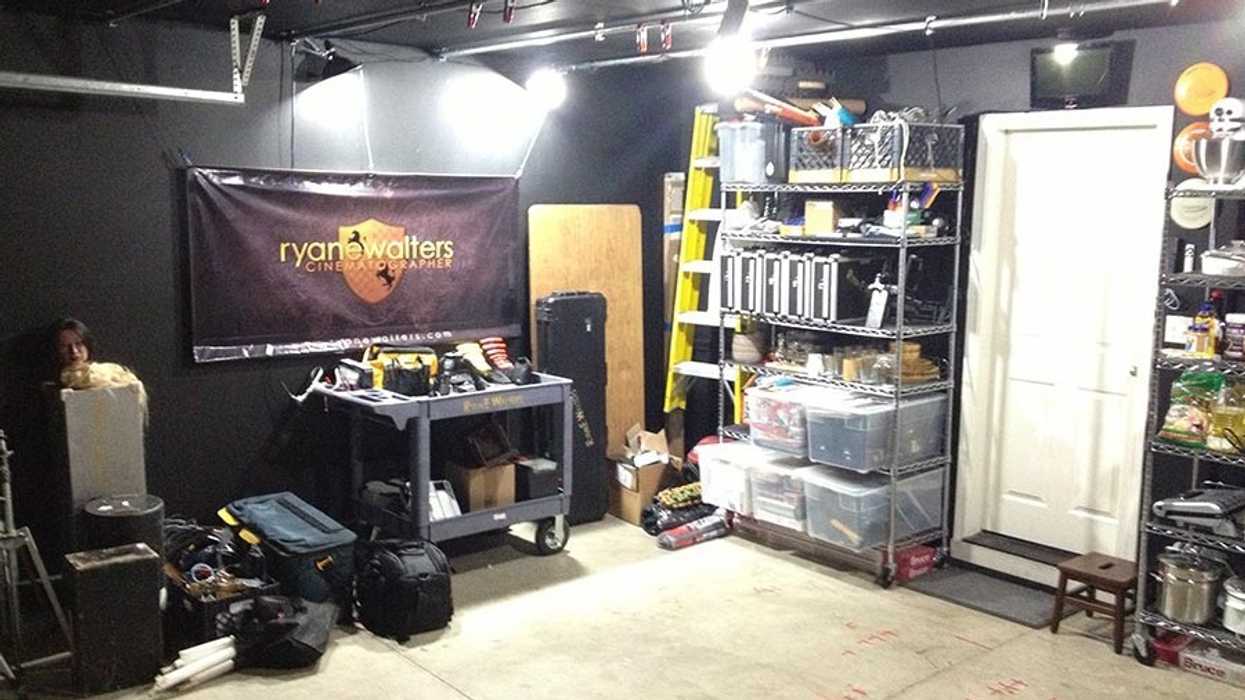
The Completed Garage
Below is what the completed garage looks like from all four corners. To store my gear and other household items, I'm using wire shelving. As you look at this setup, you may be wondering about how I deal with sound issues? Well, as I stated from the outset, sound was not a major consideration in my design, as I don't need the control of a sound stage. However, I have been recording my tutorials in this space. And when I need to control sound, I'll hang furny blankets from the grid and they do a great job at helping cut down on any sound issues I may have. If you want to hear what kind of results I get, listen to the audio in this video). If this isn't acceptable for your needs, then you'll want to invest in some professional sound dampening materials and apply them to the walls. (I also recommend consulting with a sound expert to help you if you go this route).
I now have 80 amps of power- 20 amps from the circuit that was already there, and an additional 60 amps from my box. This should provide me with all the power I need for just about any setup I'll have in this space. (And as LED lighting gets better, I'm sure 80 amps will be more than overkill ...)
SIDE NOTE: I also installed an Apple TV along with a small stereo system so that I can stream music, podcasts, and any other content I want from my media library. The addition of this little setup has been nice for adding ambience during a shoot, or giving me something to listen to when I'm working in the garage.


Future Additions
So far I have been very happy with the results from this setup. I have thought about installing an additional breaker box in the ceiling so that I can plug lights directly into that instead of having to run them down to my mobile box. (This would just be for convenience). And I'm also working on building flats that I can use in my stock footage shoots. I'll be sharing more about that in a future post...
Some Helpful Tools
Throughout this process, I have stumbled upon some tools that I have repurposed for film work and you may find them helpful for your own productions. I found all of these tools at my local Harbor Freight store. My experience with Harbor Freight has been very mixed. If you need a speciality tool to only work once, and you want to save money, then this is a great place to get it. If you need it to last, then look elsewhere. However, I have found the following gems...
1,500w Dimmer
Originally designed for use with a router, this can also be used as a dimmer. And at 1,500 watts, it covers most lights that I use on small productions. This item goes on sale periodically for around $10-$12, and when it does, I'll usually pick up one or two. They've lasted me about 3-5 years depending on how roughly they are treated.
[caption id="attachment_31171" align="aligncenter" width="616"]

Spring Clamps
These are nothing new, as spring clamps are commonplace, but they can be bought cheaply from Harbor Freight. If I'm already at the store, I'll pick up a couple. It is hard to ruin a spring clamp. I usually lose them before they ever go bad... In my studio setup, I use them to keep cable runs neat.
[caption id="attachment_31165" align="aligncenter" width="616"] Spring clamp used to manage cable runs[/caption]
Equipment Case
These come in black or silver, and they come with dividers and foam, all for $25 - $30. While I wouldn't use these cases to carry something as sensitive as a lens or a camera, I have found these cases to be great for all of those items that need protection, but don't quite need the level of protection that a Pelican case provides.
[caption id="attachment_31162" align="aligncenter" width="616"]

[caption id="attachment_31161" align="aligncenter" width="616"] Case with a TV Logic stored inside[/caption]
I hope that this has given you some ideas on how you can repurpose your garage and use it as a small shooting space for some of your productions.
This post originally appeared on Ryan’s Blog.
Ryan E. Walters is an award-winning Oregon-based cinematographer. His work has allowed him the opportunity to travel worldwide in the pursuit of telling stories that are visually compelling. His experience includes feature films, documentaries, commercials, and shooting for Comcast, TLC, Oxygen, and the Discovery Channel.